-->

Sunday, April 28, 2019

The Bogatyrs of Varsavia - WIP

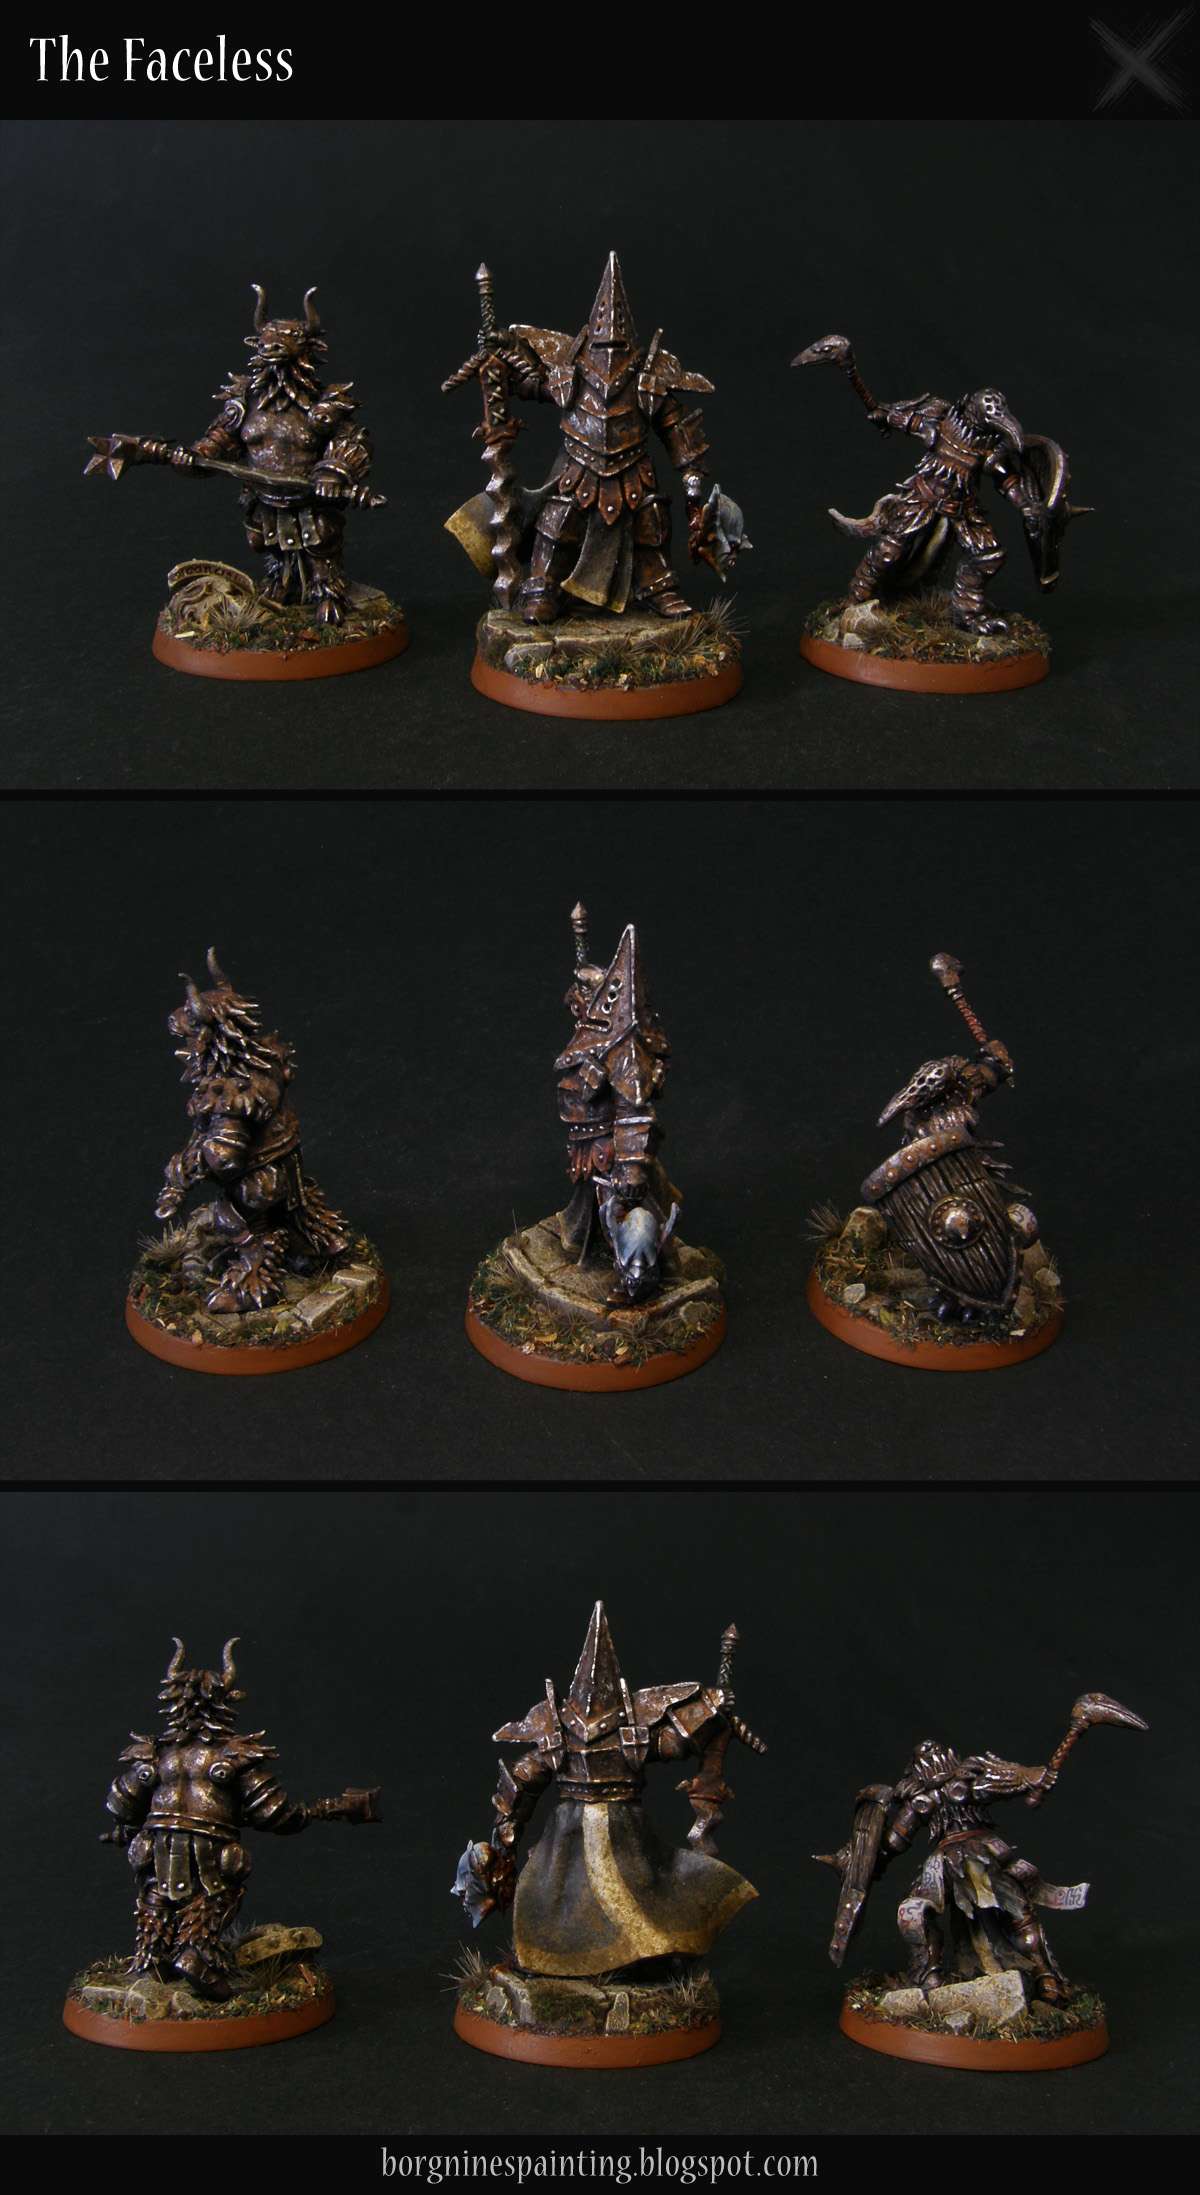
Time has come to finally get this project started, after years of slowly planning it and gathering bits: kitbashed wight bogatyrs (heroes), because those are always fun! Here they are all together, below I will explain every one of them and how they came to be.


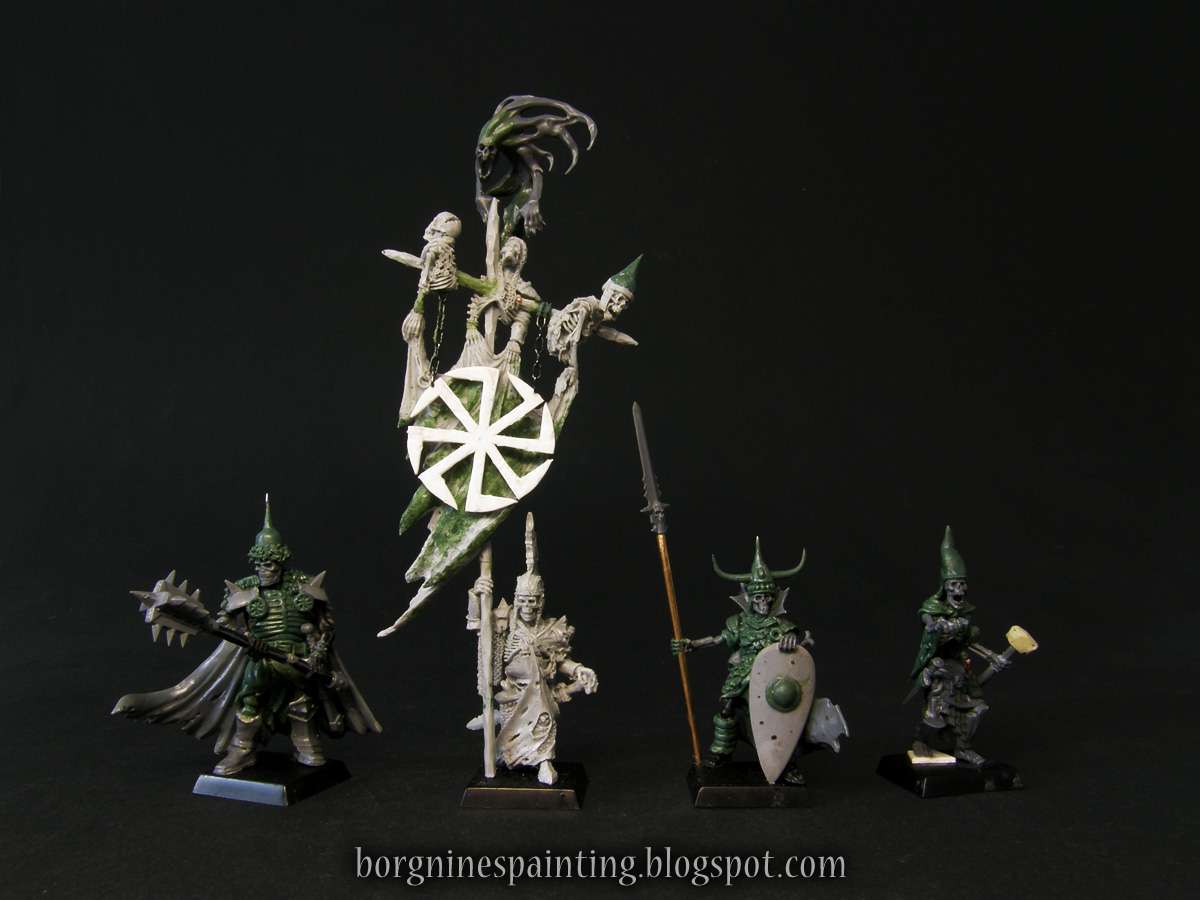
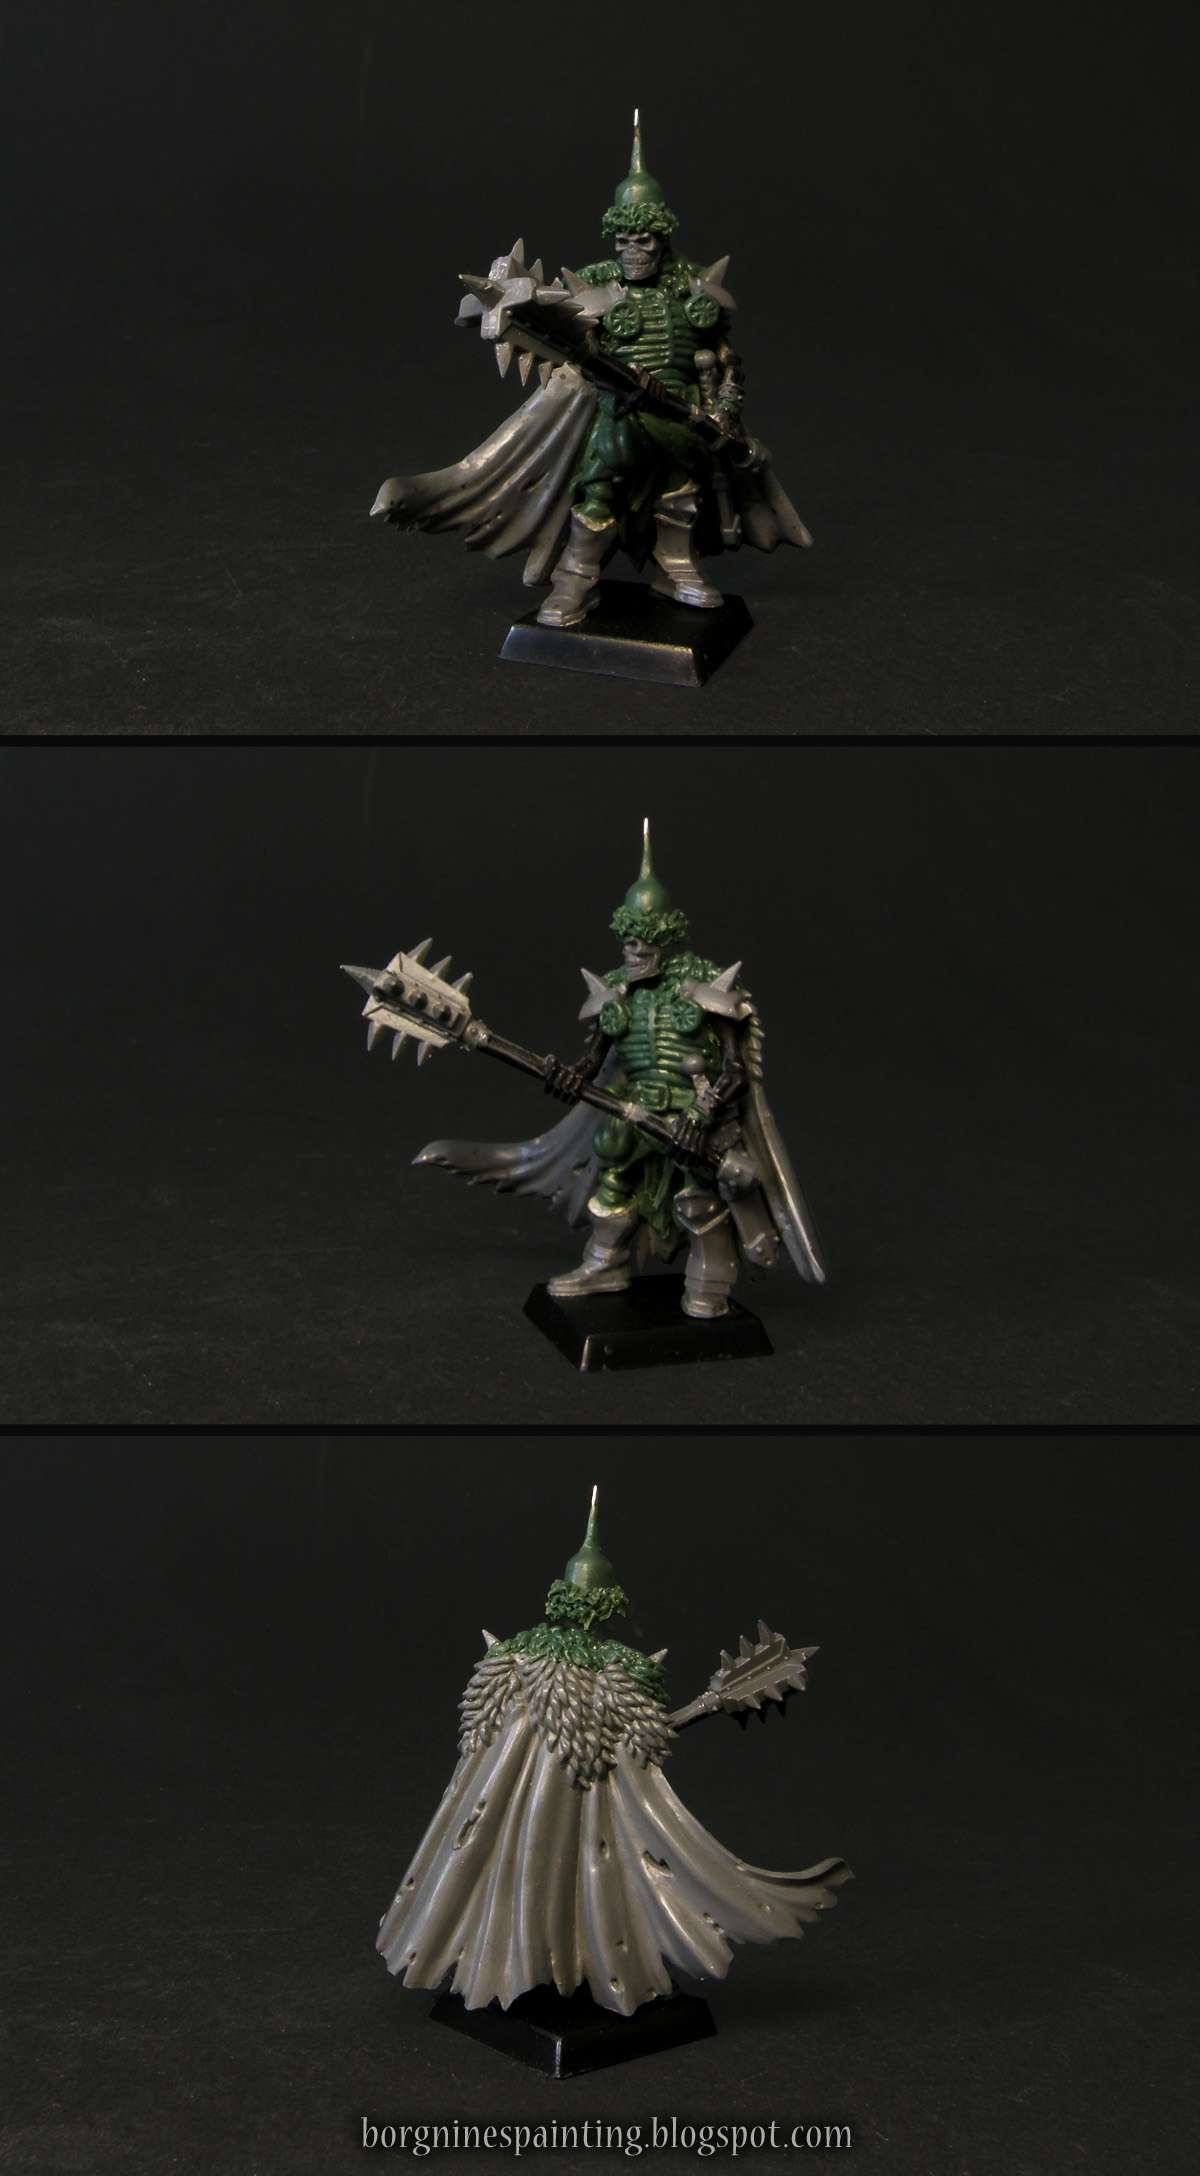
Now, the singular heroes. The one that started it all is Yarema, the bodyguard giant.

The whole concept for him came from this cape - I saw it on an auction site long time ago and bought it to kitbash a wight, mostly because other undead heroes had similar capes, like Zlyshko or Kiril. Then, when it came, I realized how big are space marine capes! It barely fits on a 20x20mm base, but I didn't want to cut it or change too much, so I created a whole character around it - an imposing giant of a wight known for bodyguarding ancient kings and princes.

I wanted to use some other bits to build his body, but they were all too small, so I had to sculpt him mostly from scratch. His head is also made out of one of those older skulls, ones which were much bigger - I tried using a modern skull, but with that giant torso and cape, his proportions were becoming comical. Interestingly enough, his hands were taken from a TK charioteer, a miniature that was laying around in my drawer for more than 12 years now! It's good that his parts have found some purpose.

EDIT: The painted miniature can be seen HERE.

An unpainted, kitbashed Wight King miniature, carrying a two-handed mace, with a flowing cape and armor made out of greenstuff.

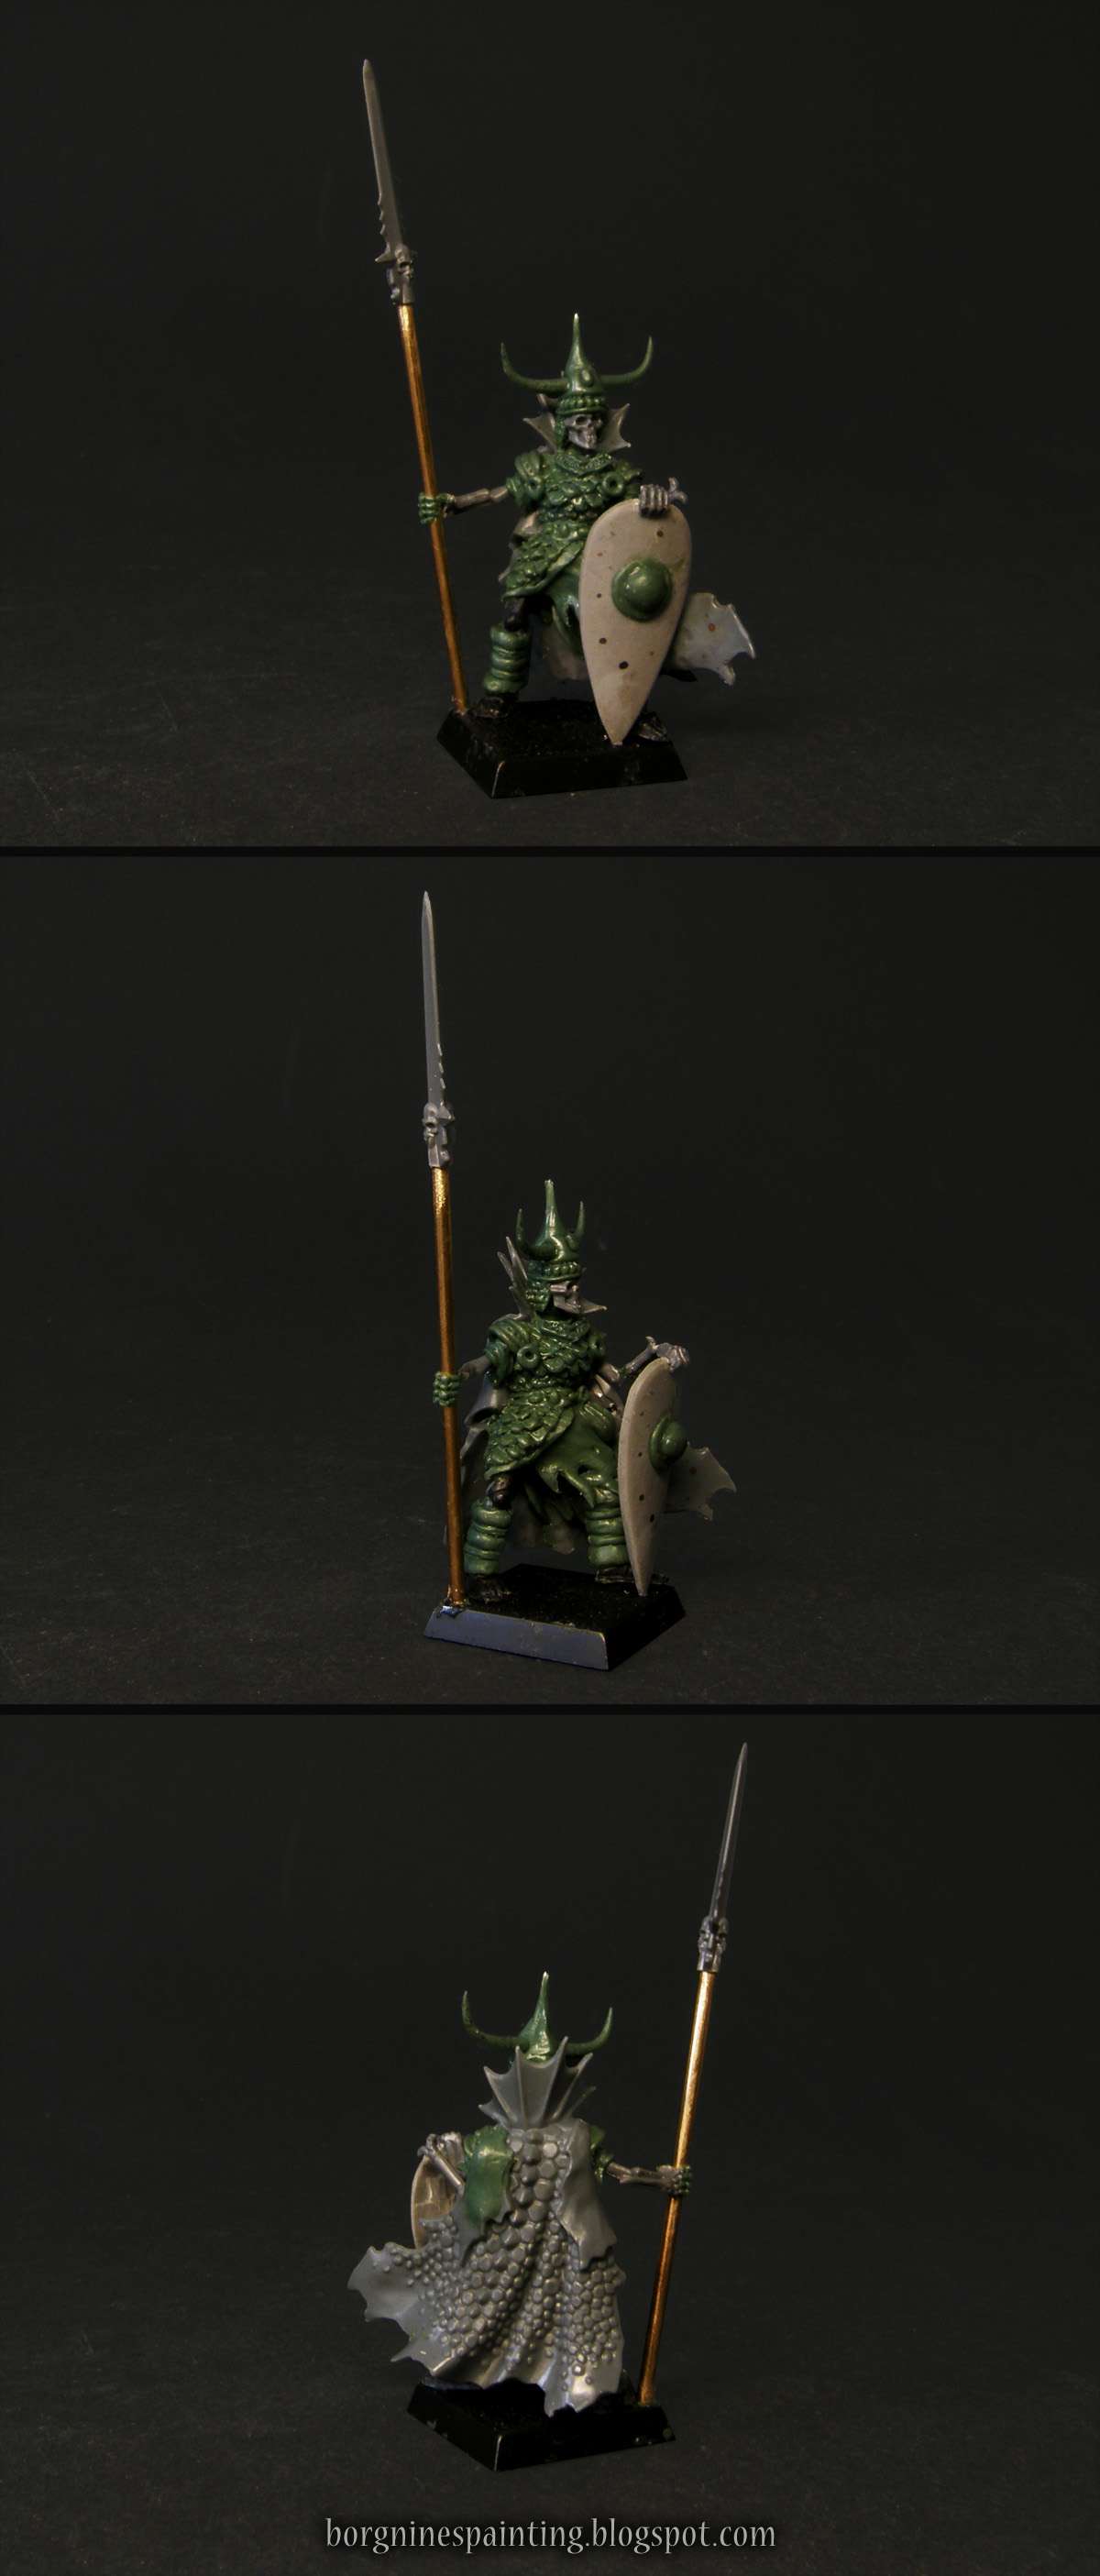
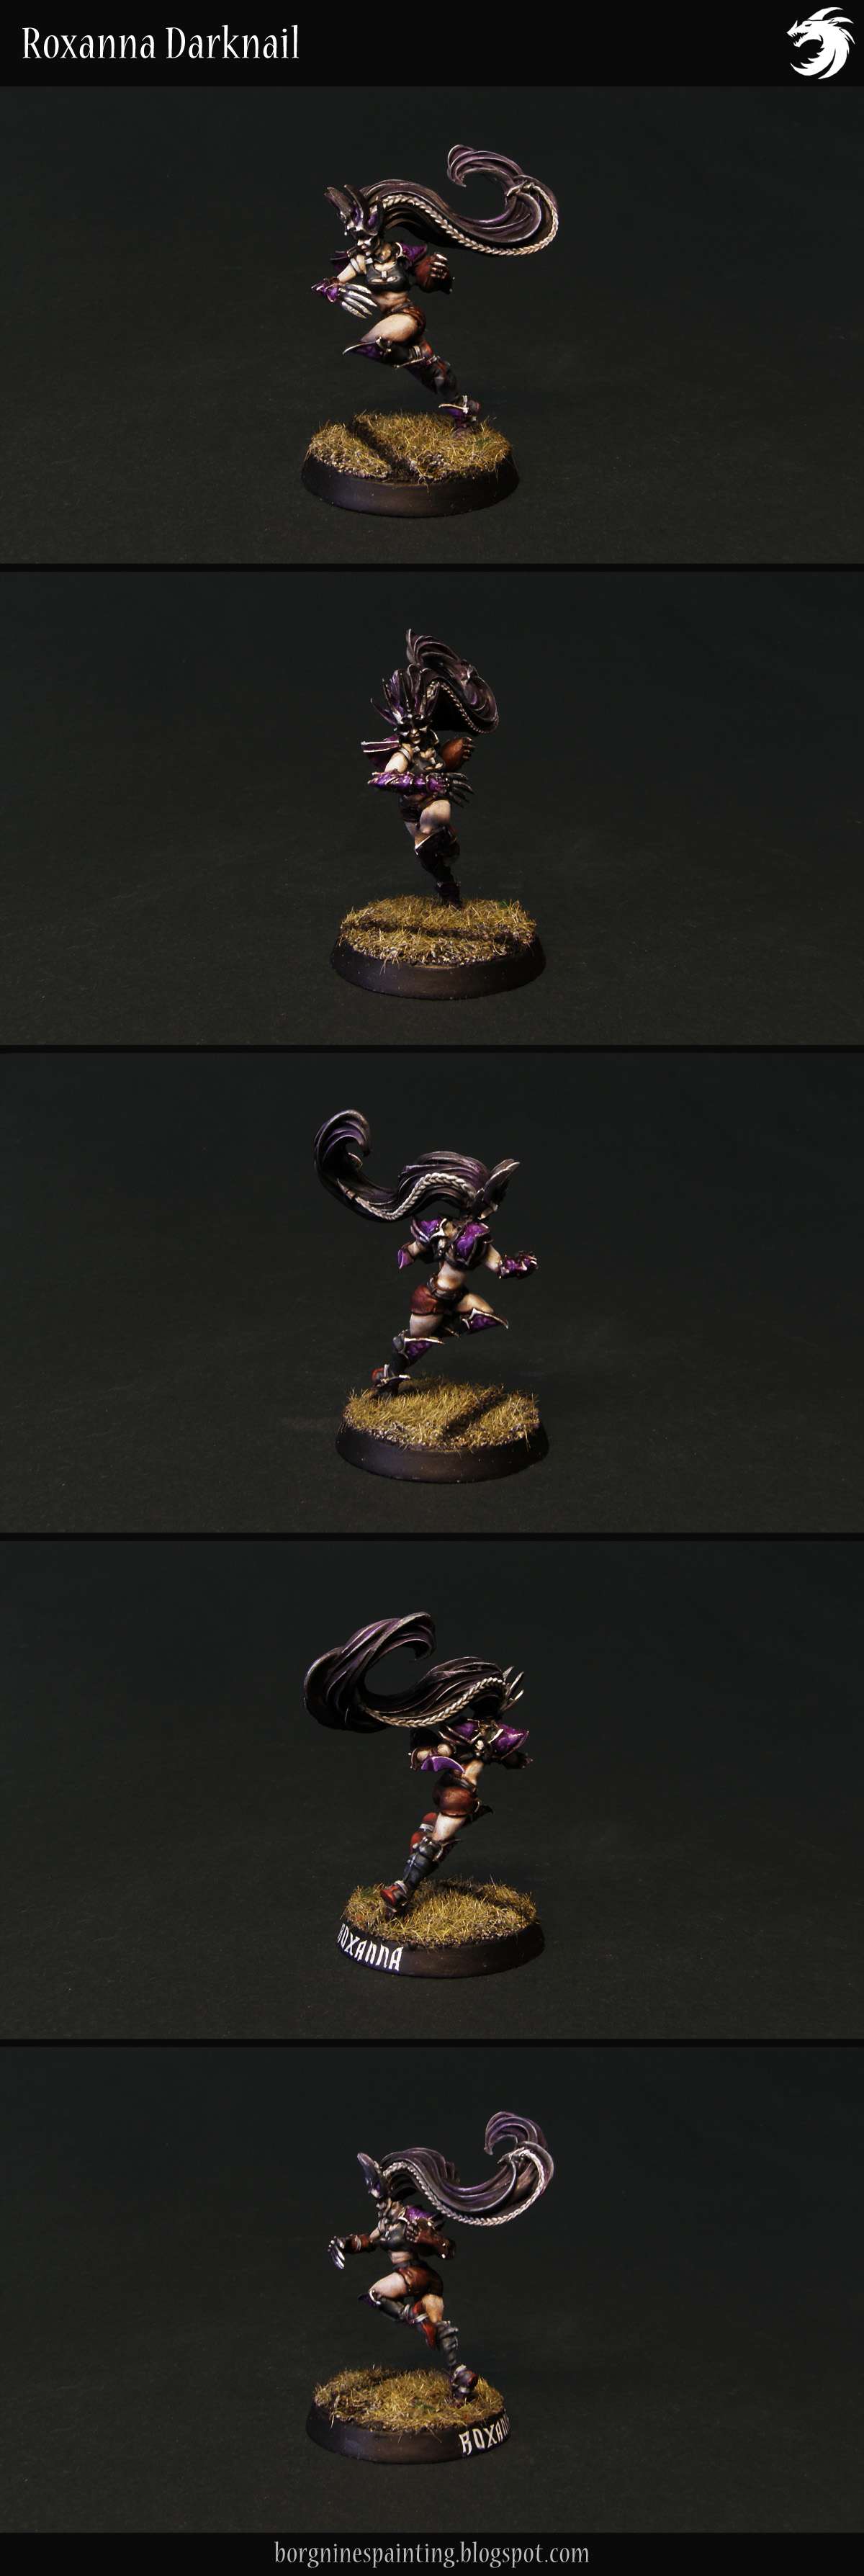
Next one is the fearless heroine, Drachitsa the Dragonslayer.

Similarly to Yarema above, her whole concept started with the cape - I bought several of those because of the potentially-useful dragonskin texture and those high collars. After getting them I came up with the idea of another wight hero who would drape themselves in the skin, to create some kind of monster-slayer - because it's both a good concept for a wargame character and because it's such a well-known trope for a fairy-tale hero of old. Her legs were taken from the same charioteer that gave his arms to Yarema.

EDIT: The painted miniature can be seen HERE.

An unpainted, kitbashed Wight King miniature, carrying a spear made out of a brass rod, kite shield and wearing a flowing dragonskin cape.

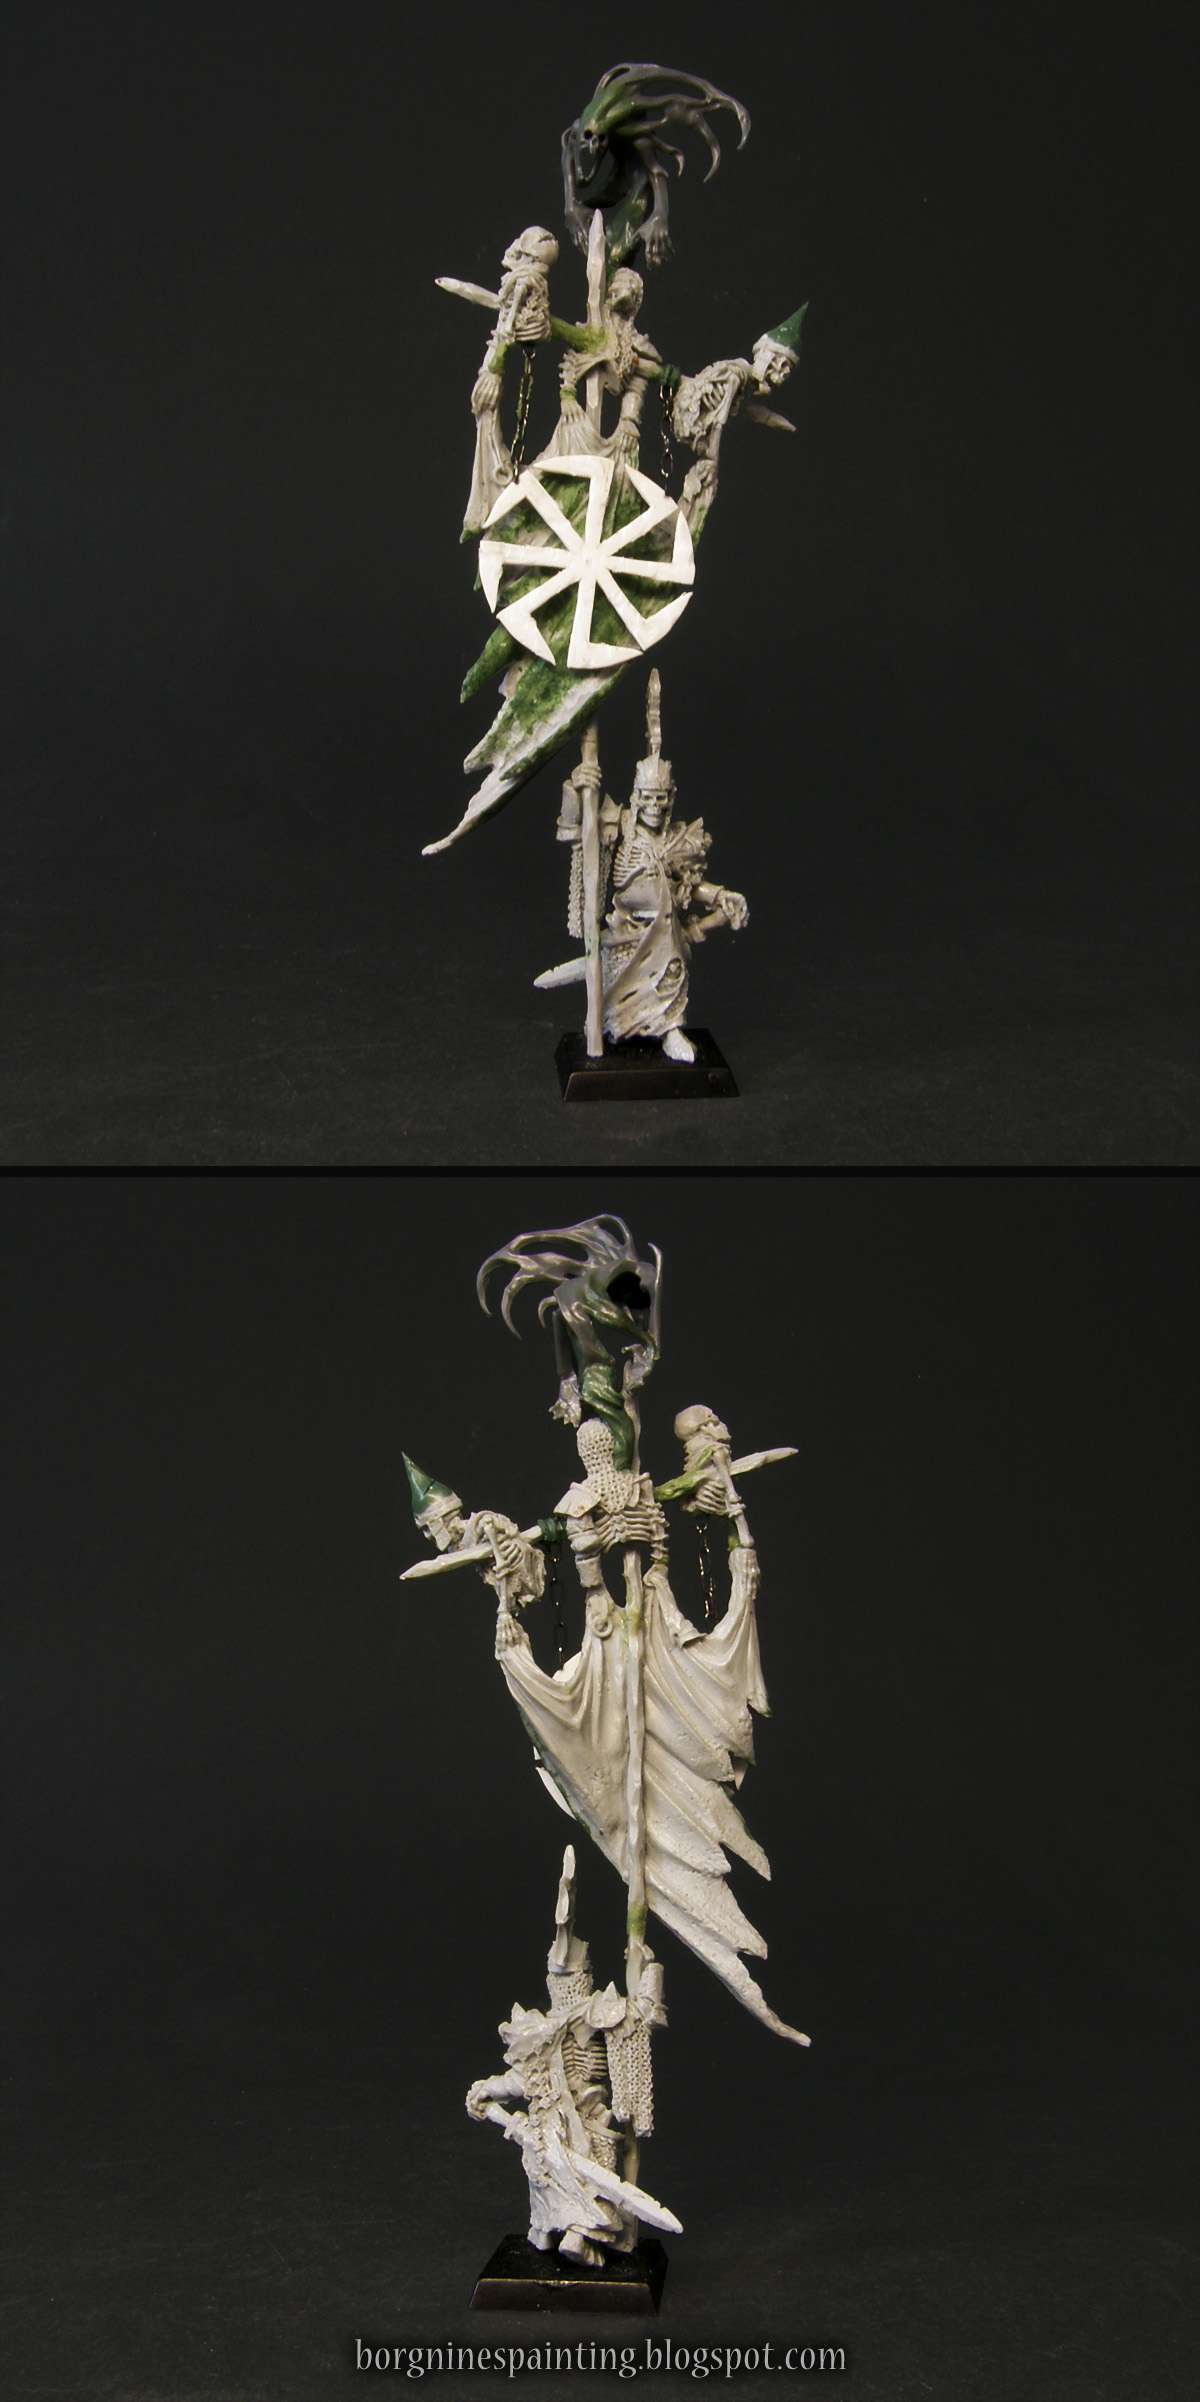
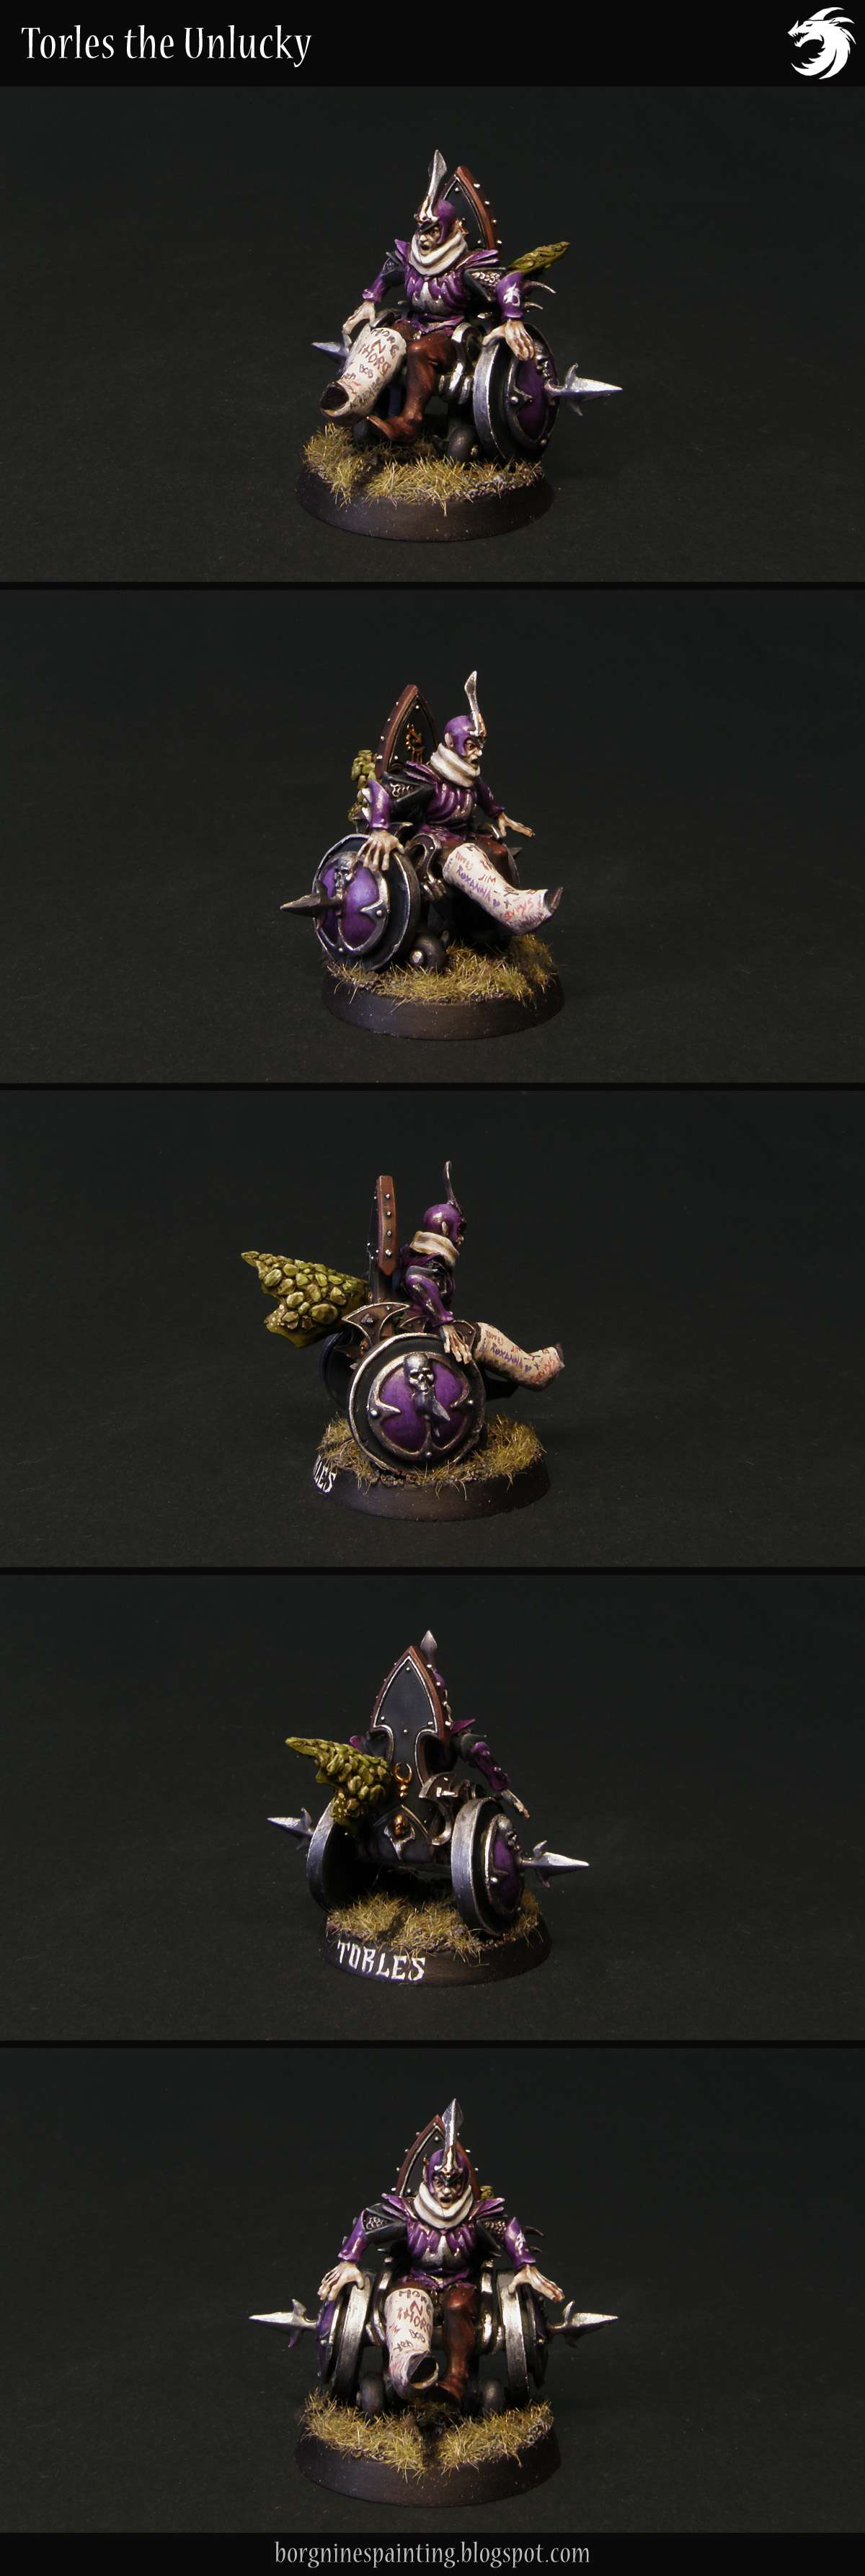
Then, the standard bearer, Vekoslav.

I used here the single only Vampire Counts model ever released by Forge World, a Battle Standard Bearer. The model is nice, well made and I didn't want to convert it in any way, but the standard with sculpted vampiric iconography was a bit problematic - not fitting in any way with my other wights. The simplest solution would be to file it all smooth and cover it with freehands as I always do with those dusty skeletons, but I already had standards like that and this one should stand out as THE most important one in the whole army.

To achieve that, I decided to give it an additional dimension - instead of yellow markings on a black background, I will have a separate golden sigil hanging in front of a black flag. Wanting to push it even further, I dug up Nagash's unused hand, one with the ghost springing out of it and mounted it on top of the standard. This will be kind of a more reserved version of another Battle Standard Bearer I did in the past.

An unpainted Wight King miniature from Forge World, slightly converted - with a plasticard sigil hanging in front of the banner.

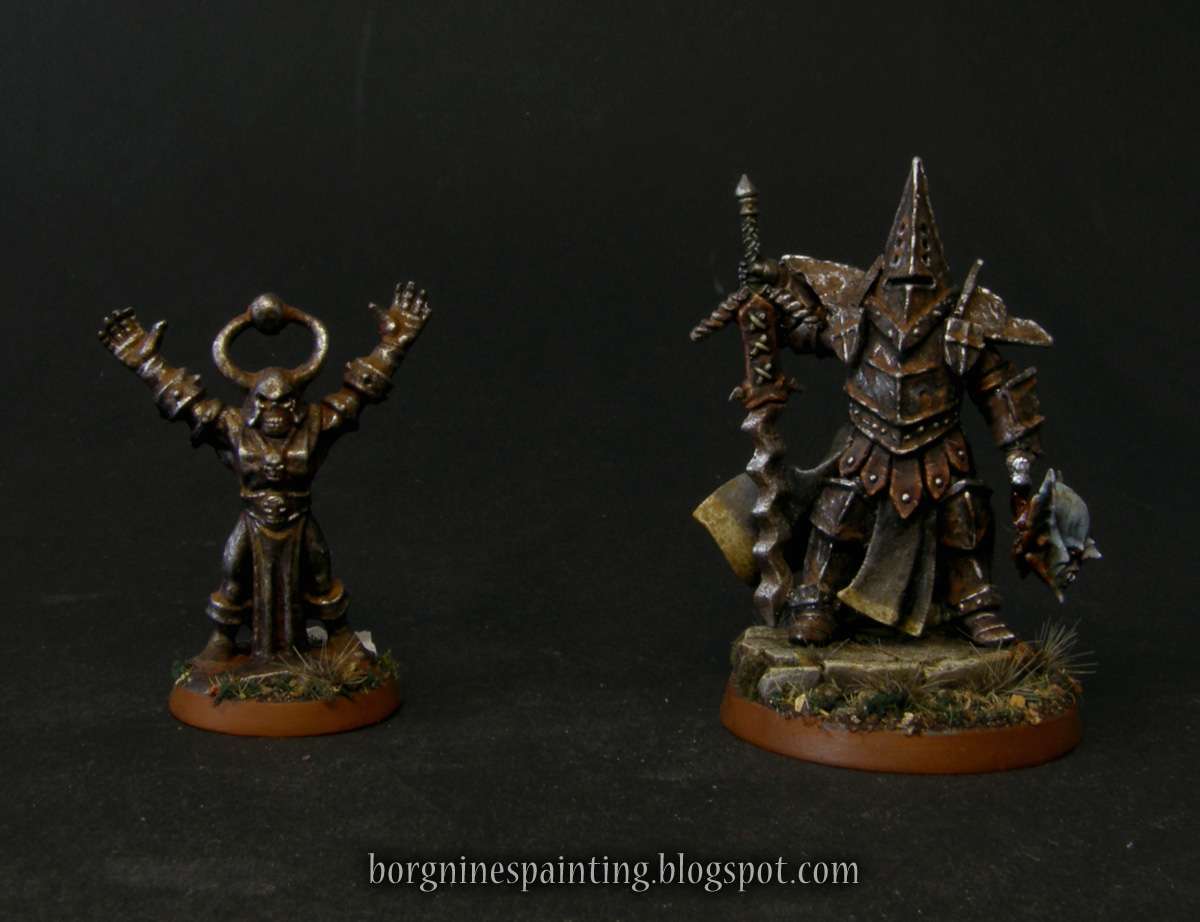
And the last one, Drazhan the Younger, the wight construct-architect.

This one will be my version of a Necrotect from the Tomb Kings armybook. Original GW miniature of him is equipped with a whip - and while I think it fits the image of ancient Egypt that TK had, it didn't fit in any way in my army. I wanted him to be a sculptor and a constructor, so I gave him a hammer, a fancy hat (inspired by the hat of the TK Necrotect) and a pointing hand - now he should look like the responsible, authoritative person on the construction site. The base for this kitbash was one of the skeletons that came with the Necrosphinx kit - both because the pose and proportions were good for this purpose and because it reflects his TK roots. He will be also a narrative excuse to build more constructs for this faction - I have a lot of ideas for those!

EDIT: The painted miniature can be seen HERE.

An unpainted, kitbashed Necrotect miniature made to fit in a Vampire Counts collection - wearing a pointy hat and holding a hammer.

Sunday, April 21, 2019

Dark Rusted Metal Tutorial

Title card of the tutorial, showing a photo reference with a rusted gauntlet and two painted miniatures showing the final effect of the whole process.

Shortly after I posted my Faceless Stormcasts, I got asked about the recipe for their armor and to make a tutorial about it. It was still pretty fresh in my memory and I even wrote down all the steps, so I thought 'why not?' - this will be yet another of many rust tutorials available on the internet. I know it's relatively long, but I think that all the steps are important and affect the final result - and it is probably actually simpler than the number of steps would suggest.

The photo with the effect that I was trying to recreate can be seen above, on the left picture - the whole thing is supposed to be dark and messy, with some significant rusting, while keeping the overall metallic look.

The miniature used in this tutorial was an old Chaos Sorcerer from Warhammer Quest. I got him a long time ago and I didn't really have any use for him before, so I decided to turn him into a statue here, seeing that his pose is static enough for this purpose.

I started by painting a base of wetblended Boltgun Metal from GW (which is known today as Leadbelcher), Warplock Bronze and some matte black. The blending itself was quick and messy, no need to be smooth with it. The parts that can be seen from above were painted dark silver, bronze was used on the undersides and then black added to the most recessed and covered places. Making it lighter from above and darker on the undersides helps to create the illusion of light coming from above. This arrangement is shown on the picture below.

Note: almost all pictures here are linked to their bigger versions.

picture showing - through the use of colored overlays - various paints that need to be wetblended on a miniature as the basecoat.

Next step is sprinkling with a toothbrush - a method that I have been using for years and which always gives some great messy randomness to miniatures. For anyone unfamiliar with it - I do it by putting the brush in the wash, wiping the excess on the inside edges of the pot (it shouldn't be dripping!) and then flicking the finger on the bristles while pointing them at the miniature - it will spray the mini with random droplets of the shade. Explained much better in a picture below (note how the direction of the sprinkle goes slightly below the direction of the brush's bristles):

Small infographic showing the technique of sprinkling miniatures with wash with a tootbrush.

Also, note that a brush with stiff bristles can be used for this task as well - it's smaller, so it's better used when you need some more control and precision.

It's always good to do the first sprinkle at something else than the miniature, to test if the amount is good - sometimes it's too wet and sometimes it doesn't even fly off the toothbrush. Obviously, this method is very messy and it's good to have something behind the mini to protect your workplace from becoming all splattered with paint. Here is my setup:

Photo showing my setup for miniature sprinkling - using a background of an old box weighted down with some paint pots.

Here is how it looks after sprinkling first with Nuln Oil, letting it dry and then sprinkling it again, with Agrax Earthshade (red dots on the picture above simulate the sprinkling).

Photo showing a miniature with speckled, red overlay representing sprinling - with a tootbrush and a wash paints Agrax Earthshade and Nuln Oil visible on the right.

Now is the time to bring back some of the metallics. I do this by stippling the areas marked red (generally all the exposed areas, especially the ones that can be seen from above the mini - once again, simulating the light with brighter areas on the mini). Stippling is like drybrush, only instead of brushing the mini, you hit it's surface vertically from above and the brush has slightly more paint in it than your typical drybrush. I use for this a synthetic brush with the top part of the bristles cut off, making it flat and perfect for this task.

Photo showing a miniature with more concentrated, red overlay representing stippling - with a flat, round brush - with a said brush and a pot of Boltgun Metal paint visible on the right.

To avoid making it all too clean I sprinkled the mini once again, this time only with Agrax Earthshade.

Another photo showing a miniature with speckled, red overlay representing sprinling - with a tootbrush and a wash paint Agrax Earthshade visible on the right.

Now it's time for some rust! For this, I am using two pigments - one for old rust that's gathered on most of the areas and is very weathered and another for much fresher rust. First one is Burnt Sienna - I am using Vallejo, but other companies' pigments should work the same. I mix it in 1:2 proportion with Vallejo Matt Varnish (needs to be shaken really, really good, can come out glossy if unshaken). After mixing I take an old and tiny brush and put it in large(ish) blobs in all the recesses. Seen below, only around the head:

Photo showing the first step of applying the pigment, with a small amount of it concentrated around the base of the miniature's horns - with a pot of Vallejo Burnt Sienna pigment and Vallejo Matt Varnish visible on the right.

After around half a minute after that, I take a larger brush, take in lots of water in it and then messily brush around the pigment. Most of it would stay in the recess, but the rest should be spread around, creating a dirty, weathered effect. Seen below, only around the head:

Photo showing the second step of applying the pigment, with the small amount of pigment from the previous picture was spread around with a very wet brush.

Then, the process should be repeated on the whole mini. It can be done in one take, especially on a small mini like that (I wanted to show the principle first), but on larger minis, the pigment can dry before you start applying water to it, so plan your painting accordingly.

The amount of rust used in this step is up to you, depending on how rusted you would like your miniature. First time I tried making this tutorial I overdid it and the sorcerer wasn't similar at all to the Faceless - so next time I did it much subtler.

Photo the miniature with the pigment applied all over it, thicker and more visible in the recesses, with small amounts on other surfaces.

When the first layer of rust is dry, it's time for the next layer. Here I used a Sienna pigment, which is lighter and much more yellow. The technique and proportions are the same as before, only this time you shouldn't spread is as much with water, only a little bit. The trick here is to apply it to areas on the mini where the water would gather the most - so all the recess parts that are not on the undersides - I marked those areas with red on the picture below.

Photo showing the areas where the next pigment should be applied, with a red overlay - in the deepest recesses of the model. A pot of Vallejo Sienna pigment and Vallejo Matt Varnish are visible on the right.

Now, the highlights. I used Stormhost Silver, but any other bright silver can be used instead - and because of how bright it is, it should be used sparingly. I applied it as an edge highlight on the most raised areas or as tiny dots on the rivets and other pointy details. As before, shown below in red how I used it:

Photo showing the areas where the extreme metallic highlights should be applied, with a red overlay - in the most raised edges and points. A pot of Stormhost Silver paint is visible on the right.

Because the pigments can flatten the miniature a bit, the final step is to deepen the shaded areas with some Nuln Oil. I applied it on all the undersides of the mini, shown below in red. The trick is to wipe the excess of the wash from the brush (it shouldn't be full and dripping) and brush it towards the darkest, most recessed area (wet paint tends to be the thickest where you take the brush off the mini). This should create a gradient, with a much smoother effect.

Photo showing the areas where the darkening shade should be applied, on the undersides of the miniature, with a soft, red overlay. A pot of Nuln Oil wash paint is visible on the right.

And that's it, the rusted statue is ready. I based him and set him beside the Crusader from the warband that started this whole rusted scheme. This brave chaos sorcerer will be used as a marker in my games - and if I ever need him in some more responsible role, I will just strip him and repaint him.

Photo showing the final comparison of the miniatures - the one from the tutorial on the left and the converted Stormcast Eternal on the right.

Sunday, April 14, 2019

Blood Bowl Star Players - Roxanna Darknail & Torles the Unlucky

Shortly after the Assassins come the Star Players - the last part of the Dreadspear Dragons Blood Bowl team - for now, at least. I have some inducements planned for the evil elves, but first I would like to actually finish the Nurgle team.


The dragons may be a relatively fresh team, but they do employ star players from time to time. One of them is Roxanna Darknail, a big druichii star. She took a liking to the team’s pet dragon - and while she didn’t want to participate in the wreck that was the previous iteration of the group, she is eager to help now that the things are better.

The other one is much less known, but very important for the Dragons - Torles the Unlucky, the last living member of the previous team, still donning the old armor. Although talented and skilled, he couldn’t completely avoid the mismanagement of the past - and kept getting injured on the pitch, collecting more and more injuries. Because of budget cuts - and because people wanted to see him - he was forced to play, no matter his health. Not that he complained - he was skilled enough to be useful and passionate about the sport. Then he would get injured again, starting the whole cycle anew. Soon, he made a whole career out of it - showing up on various pitches - to score against all odds and get injured spectacularly. Commentators still argue if he’s really unlucky or actually very lucky - compared to other elves in his position, he gets mangled more often, while actually not dying in the process!

First one is Roxanna Darknail, an official and completely non-converted miniature from Forge World. She was a tough one - the most important part of her are her hair, the thing I often most struggle with. I tried to make them special with the white braids and some purple highlights, but I will leave it to you to decide if it worked well enough. Besides that, painting her was similar to the other Witch Elves.

Roxanna Darknail - painted miniature from Forge World, a Dark Elf Star Player for Blood Bowl, painted in a purple color scheme and visible from several angles.

And the second one, a 'star player' built by me, created to commemorate a particularly unlucky Dark Elf lineman that my wife had in her BB video game campaign. I kitbashed him out of various bits, greenstuff and other random objects that were laying around my workshop - you can see the WIP version HERE. Painting him was nice enough, but the most interesting part was easily the cast on his leg - I painted various signatures there, from his team-mates to famous Blood Bowl personas from the game lore.

I even came up with some stats for him:

Star Player 'Torles the Unlucky'
MV:6 ST:2 AG:3 AV:9
Skills: Loner, Stand Firm, Sprint, Tackle, Juggernaut, Horns (Wheelchair Momentum)
Cost: 120 000
Usable by Dark Elf and Elven Union teams.

Painted, kitbashed and homebrewed Blood Bowl Star Player for the Dark Elves team, an unlucky, injured player sitting on an elaborate battle-wheelchair

Sunday, April 7, 2019

Underworlds Warband - The Faceless

Finally, my 'Stormcast' warband for Underworlds is finished. They are an effect of an idea I came up with maybe a year ago, to turn some of those golden champions into creepy and enigmatic knights in ornate, but neglected and faceless armor. The conversion process, both the design phase and the sculpting were the most taxing part of the whole project - you can see it all explained HERE, with all the inspirations, concepts and plans for the future.

The painting process was much simpler in comparison. I used this image as a direct example of what I wanted to recreate, inspired by all the miniatures and artwork that gave me this idea in the first place. I started with a dark metallic base, added several layers and colors of rust pigments, then applied some additional shades and bright silver highlights. More typical painting work was used on all the fabrics and leather - and then also covered in pigments and sprinkled with washes to get the dirty look. They turned out mostly how I envisioned them - the only problem that I noticed is that they are easy to mistake on the tabletop when standing near my Garrek's Reavers - they are both dark, muted and dirty! Well, I'll have just to deal with it, because I don't want to change the aesthetic concept just for gameplay convenience!


It always starts the same. First, all the vampires, undead, chaos worshippers, heretics and similar become too much for the nobles to deal with. Not wanting to use their own warriors and troops, leaving them weaker in internal conflicts, they instead organize a ragtag militia of peasants and poor townspeople to hunt them in exchange for money, titles and land. Those bands soon become obsessed with their mission of ‘cleansing’ Vechernya of filth, heretics, undesirables and they start a cult around it. Not long after that, strange knights start joining their ranks - ones that believe their purpose so much that they forge a whole military order around it. Frighteningly effective in combat, they achieve great results in fighting the dangers lurking in the land. All is well until they run out vampires and ghouls - then they start turning on the folk of Vechernya - slaughtering villages and burning people on the slightest of offenses. Growing in numbers, they soon turn out of control, forcing the warring dukes and nobles into forging an alliance and destroying them, usually at a great cost. Then, many years later the whole cycle will start again, spun by the dreams of the Withered King.

This time the knights are known simply as the Faceless - they hide their faces and identities behind elaborate masks and helmets, believing their mission to be more important than their old personas. The fact that nobody ever saw their faces or heard them speaking and lived to tell the tale only strengthens their enigmatic and sinister reputation. Small, yet dangerous groups of those ominous warriors wander through Vechernya searching for any sign of corruption and heresy, no matter how slight or hidden.

First all three faceless as the whole warband. They are all different and turned out pretty characterful, so below this one, you will find much more pictures of them individually.

Heavily converted miniatures, a Stormcast Eternal warband Steelheart's Champions for Warhammer Underworlds: Shadespire, turned into grimdark, rusted, faceless knights, in an aesthetic resembling Dark Souls or AoS28.

Now, all the members - first, the leader. I turned Severin Steelheart into the Crusader, an unrelenting champion fighting to purge Vechernya of all the undesirables. The piece of cloth (backskirt?) behind him was a perfect canvas to really try out some dirtying techniques, with pigments and washes.

Heavily converted miniature of Severin Steelheart for Warhammer Underworlds: Shadespire, turned into a grimdark, faceless knight, resembling Pyramid Head from Silent Hill, in an aesthetic resembling Dark Souls or AoS28.

The next one is Obryn the Bold, which is known in my warband as the Bull - a very diligent, but impatient warrior. He was interesting to paint thanks to the combination of flat and highly sculpted areas on his armor. Weirdly enough, when I was reading the Shadespire cards recently, I was surprised to see that Obryn is described as "bull-hearted". Now I don't know if it subconsciously inspired me a long time ago (and/or I forgot about it) or if it was just an interesting coincidence.

Heavily converted miniature of Stormcast Eternal Obryn the Bold for Warhammer Underworlds: Shadespire, turned into a knight hiding himself in an armor resembling a minotaur, in an aesthetic resembling Dark Souls or AoS28.

And the last one from the band is Angharad Brightshield, turned into the Vulture - a vicious warrior willing to prolong the fight if it means hurting and tormenting her enemy more. Her shield was a delight to paint (as wood usually is for me) and the freehands on the ribbons flowing behind her were a welcome variation from her freehand-less bandmates.

Heavily converted miniature of Stormcast Eternal Angharad Brightshield for Warhammer Underworlds: Shadespire, turned into a grimdark knight hiding her face beneath an elaborate, bird-like armor.

I would love to have a much larger force of Faceless, but seeing how taxing and difficult it is to convert every single one of them, I probably won't be doing that very soon!