-->

Sunday, May 26, 2019

The Beast of Preytov

Today I bring you yet another miniature from my backlog - a Forge World Preyton bought a long time ago. When I started pushing the forest theme in my army I noticed that this particular creature would fit pretty well in my collection, but sadly, at that point, Forge World stopped selling those miniatures. Many months later I managed to catch one on eBay - probably a recast, though - wings were really thin, there were some difficult mold lines, etc. But well, it had to work for me somehow, better this than nothing.

My concept when painting was to create an impression of a mismatched, chaotic beast, so there are many different patterns and hues used (while keeping everything comfortably dark and dirty of course). When I was painting it I was rather unsatisfied with my work, but in the end, it turned out not that bad - especially the wings, the part which I normally dislike to paint, even if it took quite a bit of glazes to get the shade just right.


Living in the Varsavian village of Preytov has many advantages - there’s a small river there, the soil is fertile, there’s plenty of game in the nearby forest and the bandit raids are practically nonexistent. It would be actually perfect - if not for the Beast that made this area it’s hunting grounds. Never looking the same, the creature has some polymorphic abilities, changing into many different animals, though the transitions are never clean - the forms are always mixed and distorted in unnatural ways. Most often it lures potential victims looking and crying like a prey animal and then turning into a large predatory monster to run the unfortunate being down, sometimes growing wings, horns or other additional limbs if necessary. To make it all worse, the Beast is actively malevolent, killing its victims slowly, painfully and messily, without any care for its own injuries. Some brave warriors have tried to kill it - and many even succeeded - but it always comes back somehow. Nevertheless, a small number of people living there have accepted their fate, thinking that losing people to the Beast from time to time while profiting from the otherwise safe and fertile land is preferable to trying their luck in the dangerous, lawless lands of the rest of Varsavia. Because of that, some people believe that the Beast is a violent, but protective god of Preytov - and their blood is the price they pay for their fortune - but the truth is, naturally, unknown.

Preyton from Forge World, painted in dark and muted colors - a miniature winged monster usable in Warhammer Fantasy Battle (WFB) or Age of Sigmar (AoS).

Sunday, May 19, 2019

Gudvanger's Body Puppets

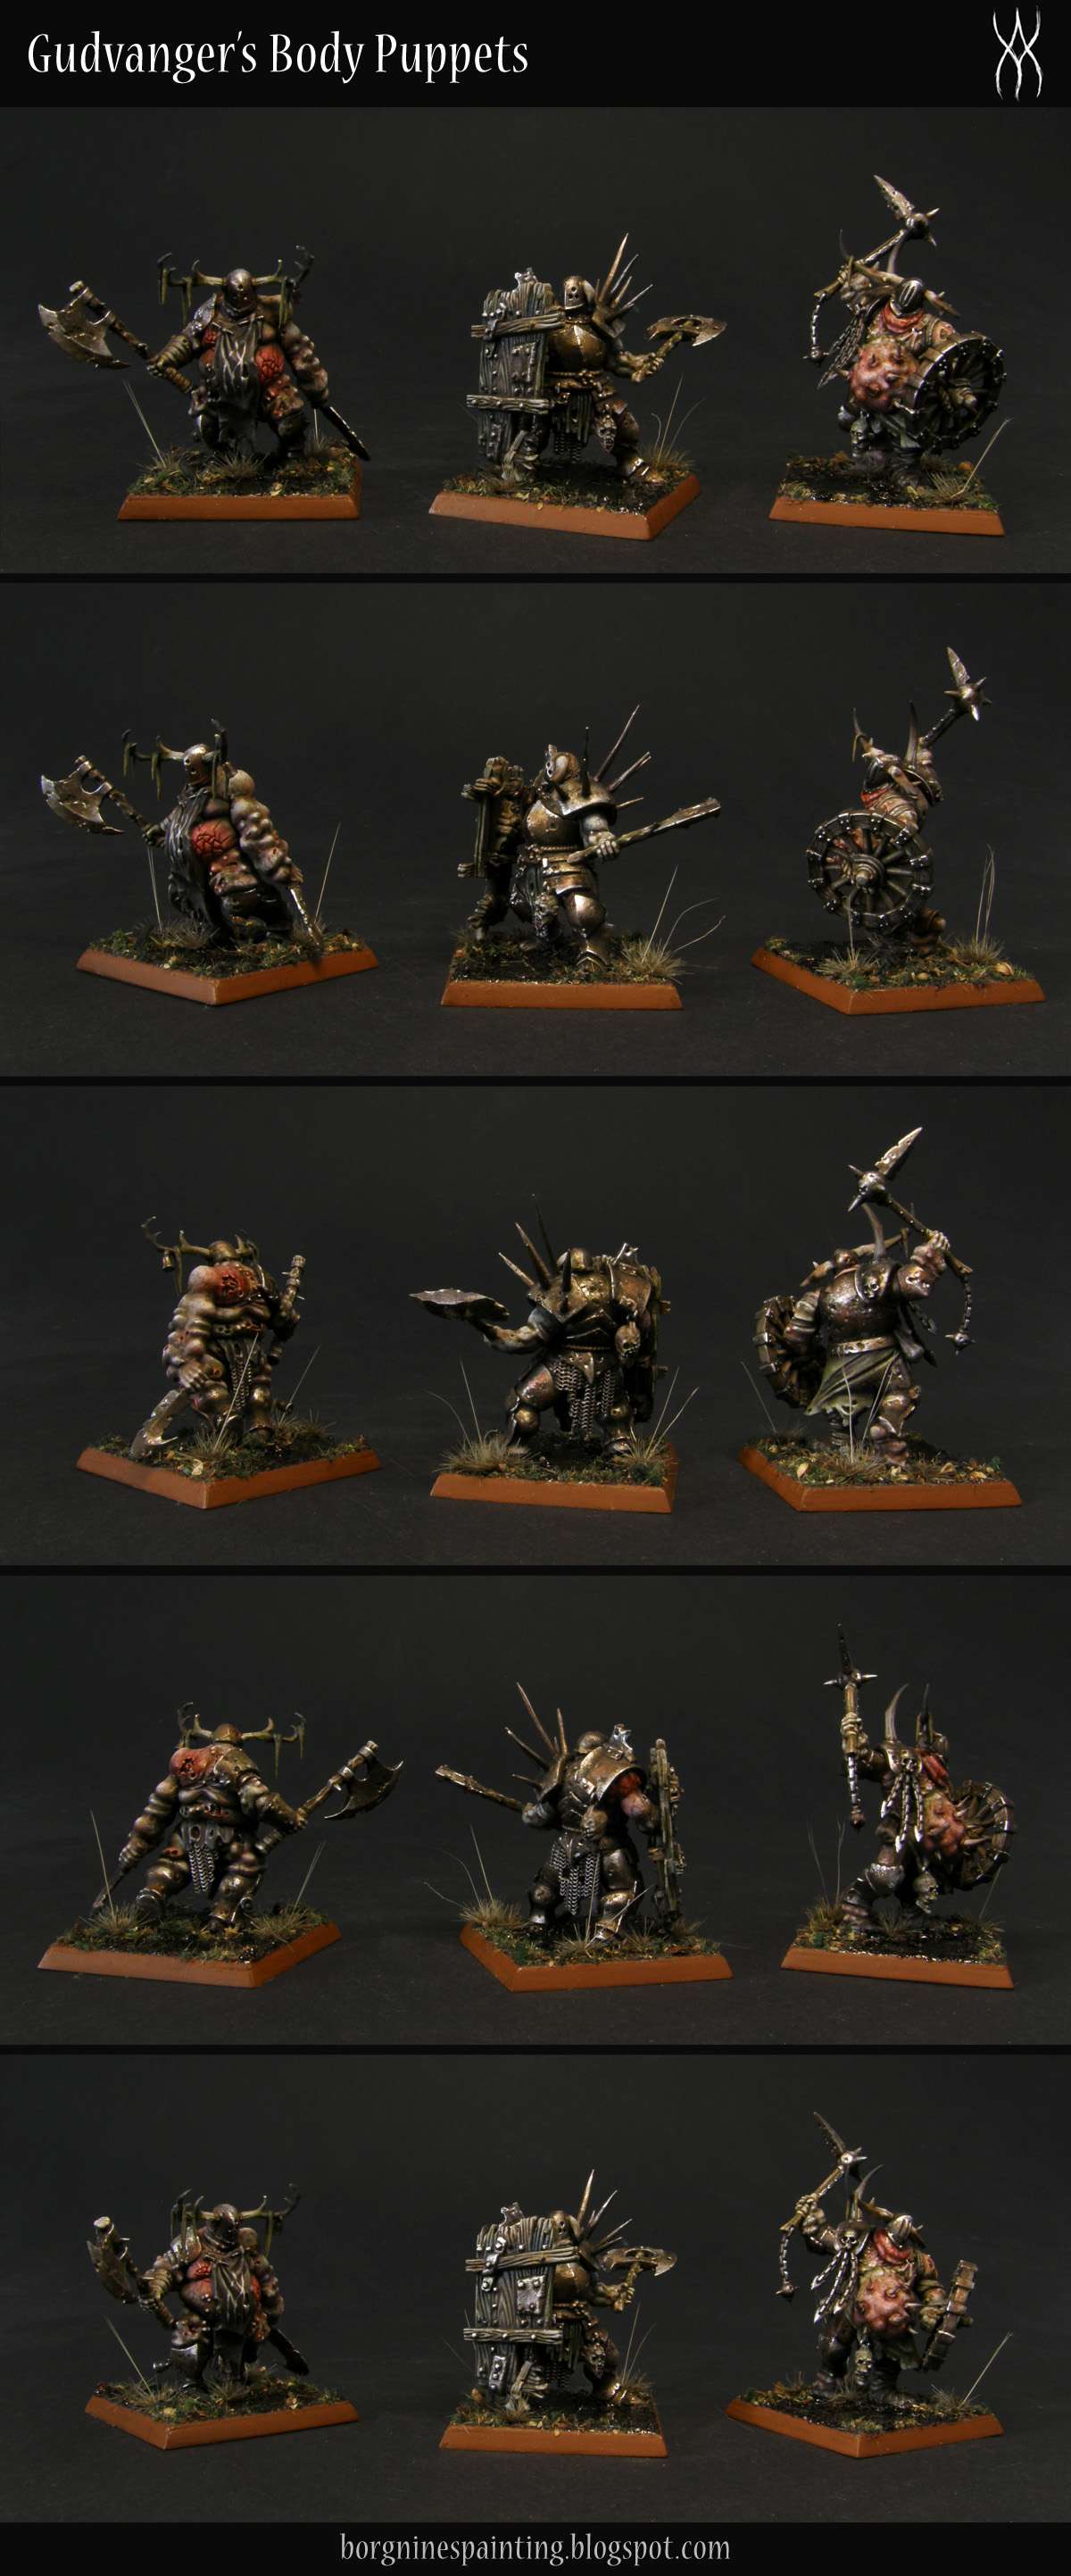
Continuing with the Nurgle theme, here is my (somewhat) non-Nurgle take on the Putrid Blightkings. From the narrative standpoint, they are supposed to be botched clones of Haralamb Gudvanger and just like he, they are bloated and distorted servants of the Lady of the Bog, not Nurgle worshippers - so they keep the bodies and mutations, but all the chaos iconography is filed off. You can see the unpainted, converted minis together with some design principles HERE.

I had a lot of fun building them and painting was the same - it was really enjoyable to paint all the different hues, reddened, mutated flesh, discolorations, boils and lesions. The basecoat was wetblended to achieve a mix of various colors from the beginning, which were then brought together with shades, glazes and highlights.

The bases saw my second use of two-ingredient water effects and I'm pretty satisfied with the results. The resin actually seeped into the sand that I used as the first layer, creating a pretty interesting, muddy impression. I also stuck those thin, long strands into some of the tufts to imitate lone strands of long grass that I noticed in the wetlands during my last vacation - and I think they help to sell the 'bog' effect a little better - what do you think about them?


The horrific Flesh-stitcher Haralamb Gudvanger may be known best for his lumbering monsters, but he considers himself his best handiwork. For countless years he has been building replacement body puppets, which continuously replace him after each death. It all started when he was still learning the secrets of anatomy by himself, fruitlessly looking for a way to cheat death and achieve immortality. Only when he started to study under the Lady of the Bog he discovered that while he can’t stop his own body from eventual deterioration in any acceptable way, he could build a puppet, a duplicate of himself - one so perfect, it could replace him without any loss at all. Since then, every time his body died, a puppet woke in its place, identical to the original, with the same memory and intellect, continuing his work as if nothing happened - everything a secret he keeps from everyone but the Lady herself. Still, the process is difficult and some results are… botched. They are unusable as replacements but those flesh automatons have their use - Gudvanger arms them and commands them to patrol and guard his domain. Thus they lumber tirelessly through the mists around the Black Bog, attacking anyone they stumble upon. To some extent, they believe to be the Flesh-stitcher too, that’s why sometimes they will hack away the hands of their victims, or try to build gruesome compositions out of their victims’ bodies. Terrifyingly strong, resilient and unrelenting in following their creator’s (their own?) commands, they are almost as dangerous as Gudvanger himself.

First, the whole group of six fleshy automatons - a little from above to make the bases easier to see:

Unit of 6 converted Putrid Blightkings miniatures with swamp bases, standing on a unit tray made out of bardboard and balsawood.

And some close-ups of the individual creatures, the first three:

3 converted Putrid Blightkings miniatures painted in a Dark Souls / AoS28 aesthetic viewed from several angles

The second three:

3 converted Putrid Blightkings miniatures painted in a Dark Souls / AoS28 aesthetic viewed from several angles

Sunday, May 12, 2019

Blood Bowl Nurgle Team - Pestigors WIP

After the Rotters for my Nurgle Blood Bowl team, it was time for some Pestigors, the scorers. Those available in the official box look good enough, but there's only two of them and it's the same sculpt - and I wanted four different ones. Thankfully, GW released a chaos team earlier, with four different beastman sculpts - so I got those and converted them to look the part. This basis let me achieve a similar look to the one from the video game - where they are bloated and sick, but still agile and fast. Just like the small guys, they have all leveled once and I had a lot of fun applying various skills, upgrades and mutations to them.

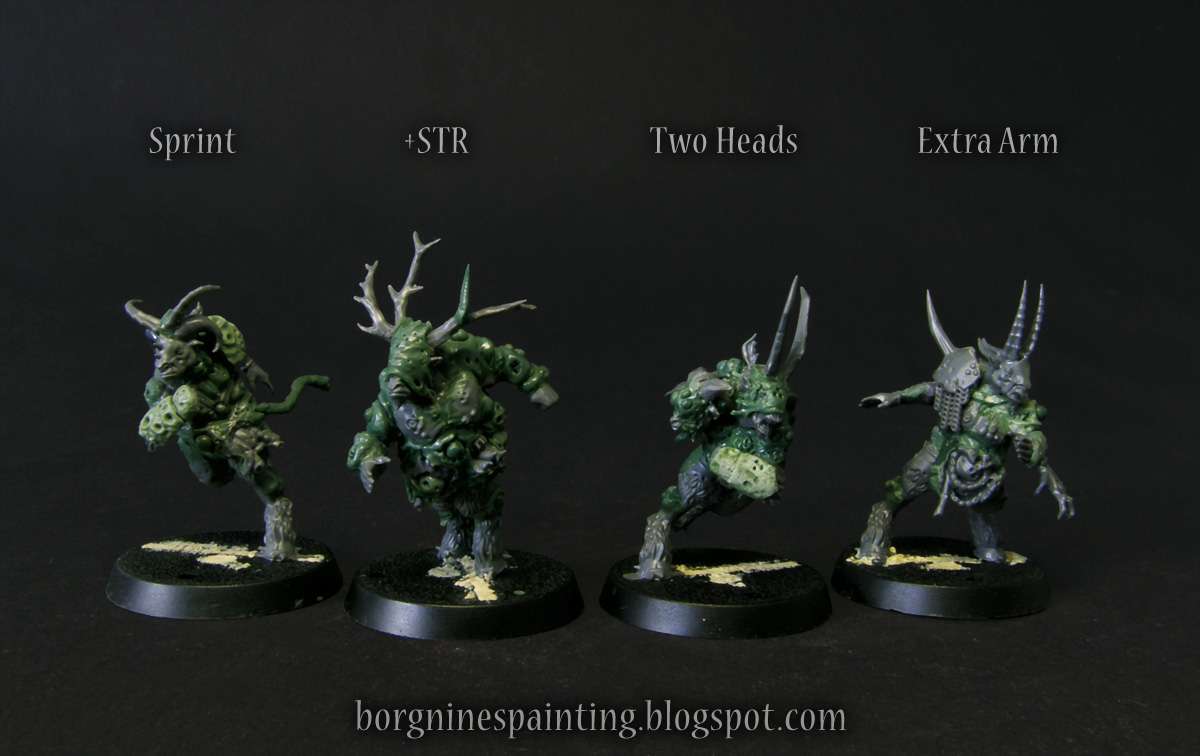
Here are they all together:

4 unpainted Pestigors of Nurgle for use in Blood Bowl, converted from the Doom Lords Beastmen with greenstuff and bits

And the close-ups.

Here is the one with Sprint and one with Extra Hands skills. To show Sprint, I wanted to convey some sense of speed - and the most obvious way to do that with Nurgle was to just leave some random intestine trailing behind him, as he's risking running that one extra step. The second one has a plaguebearer hand grafted on his back - also an idea taken from the video game. Besides that, they both got some smaller conversions, like bloated bellies, lesions, corroded armor plates and other such typical Nurgle pleasantries.

2 converted, unpainted Pestigors of Nurgle for use in Blood Bowl, one with the 'Sprint' skill, other with 'Extra Hands'

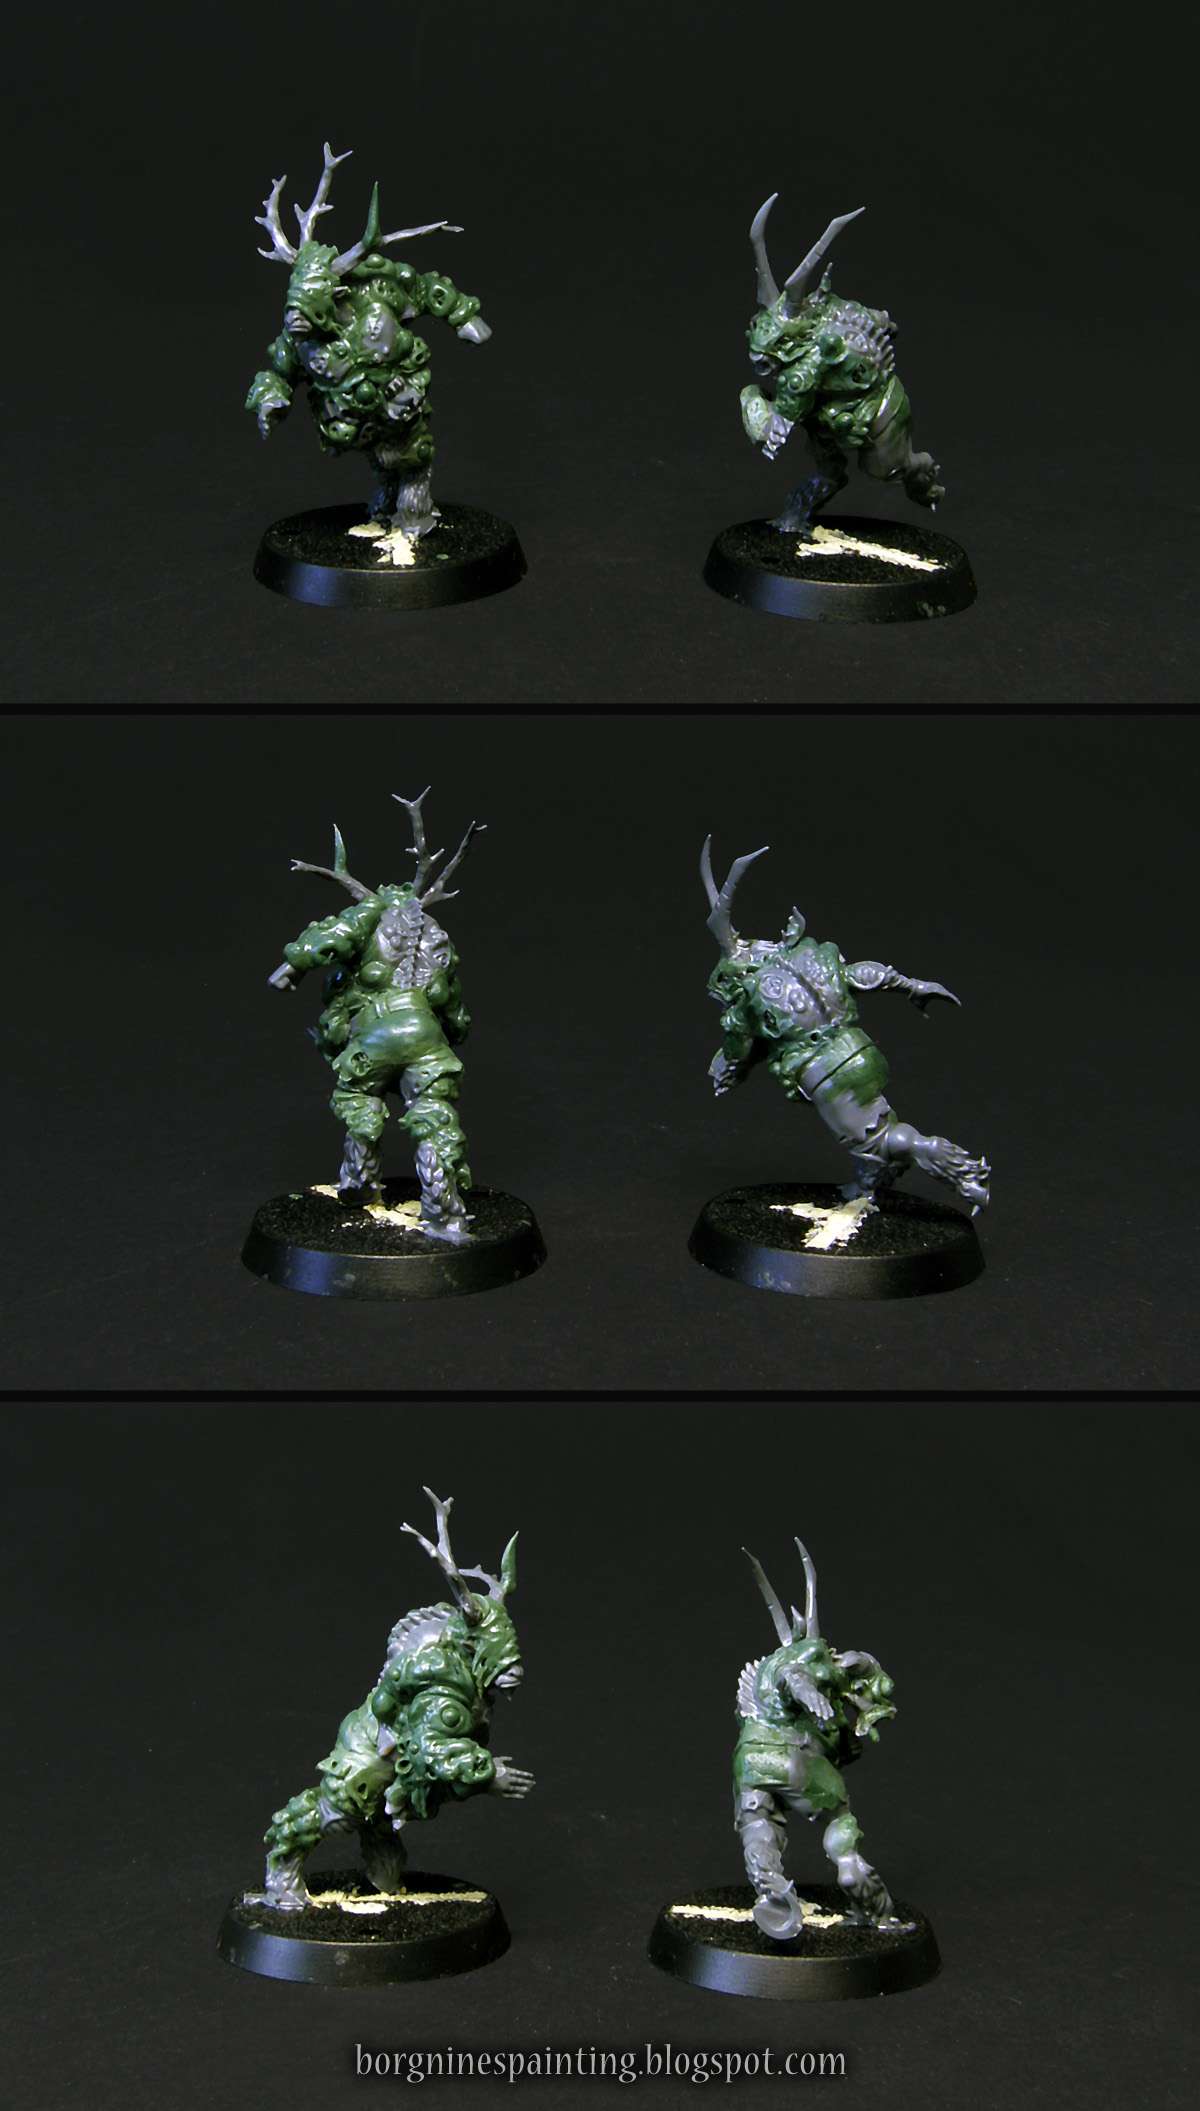
And the second pair, one with +Strength and one with Two Heads. The strong one was easy and enjoyable - I just piled lots and lots of greenstuff on him, kinda like a fatsuit, to add more bulk and power to his rather slender build. Everything textured with grandfather's blessings of course. The second one follows the idea from the video game - the additional head hangs close to the first one, a mutated and malformed one, screaming in pain. The last picture shows it the best of all the possible angles - it should be much clearer once they are all painted.

2 converted, unpainted Pestigors of Nurgle for use in Blood Bowl, one with the additional Strength, other with 'Two Heads' skill

Sunday, May 5, 2019

Dungeon Twister Miniatures

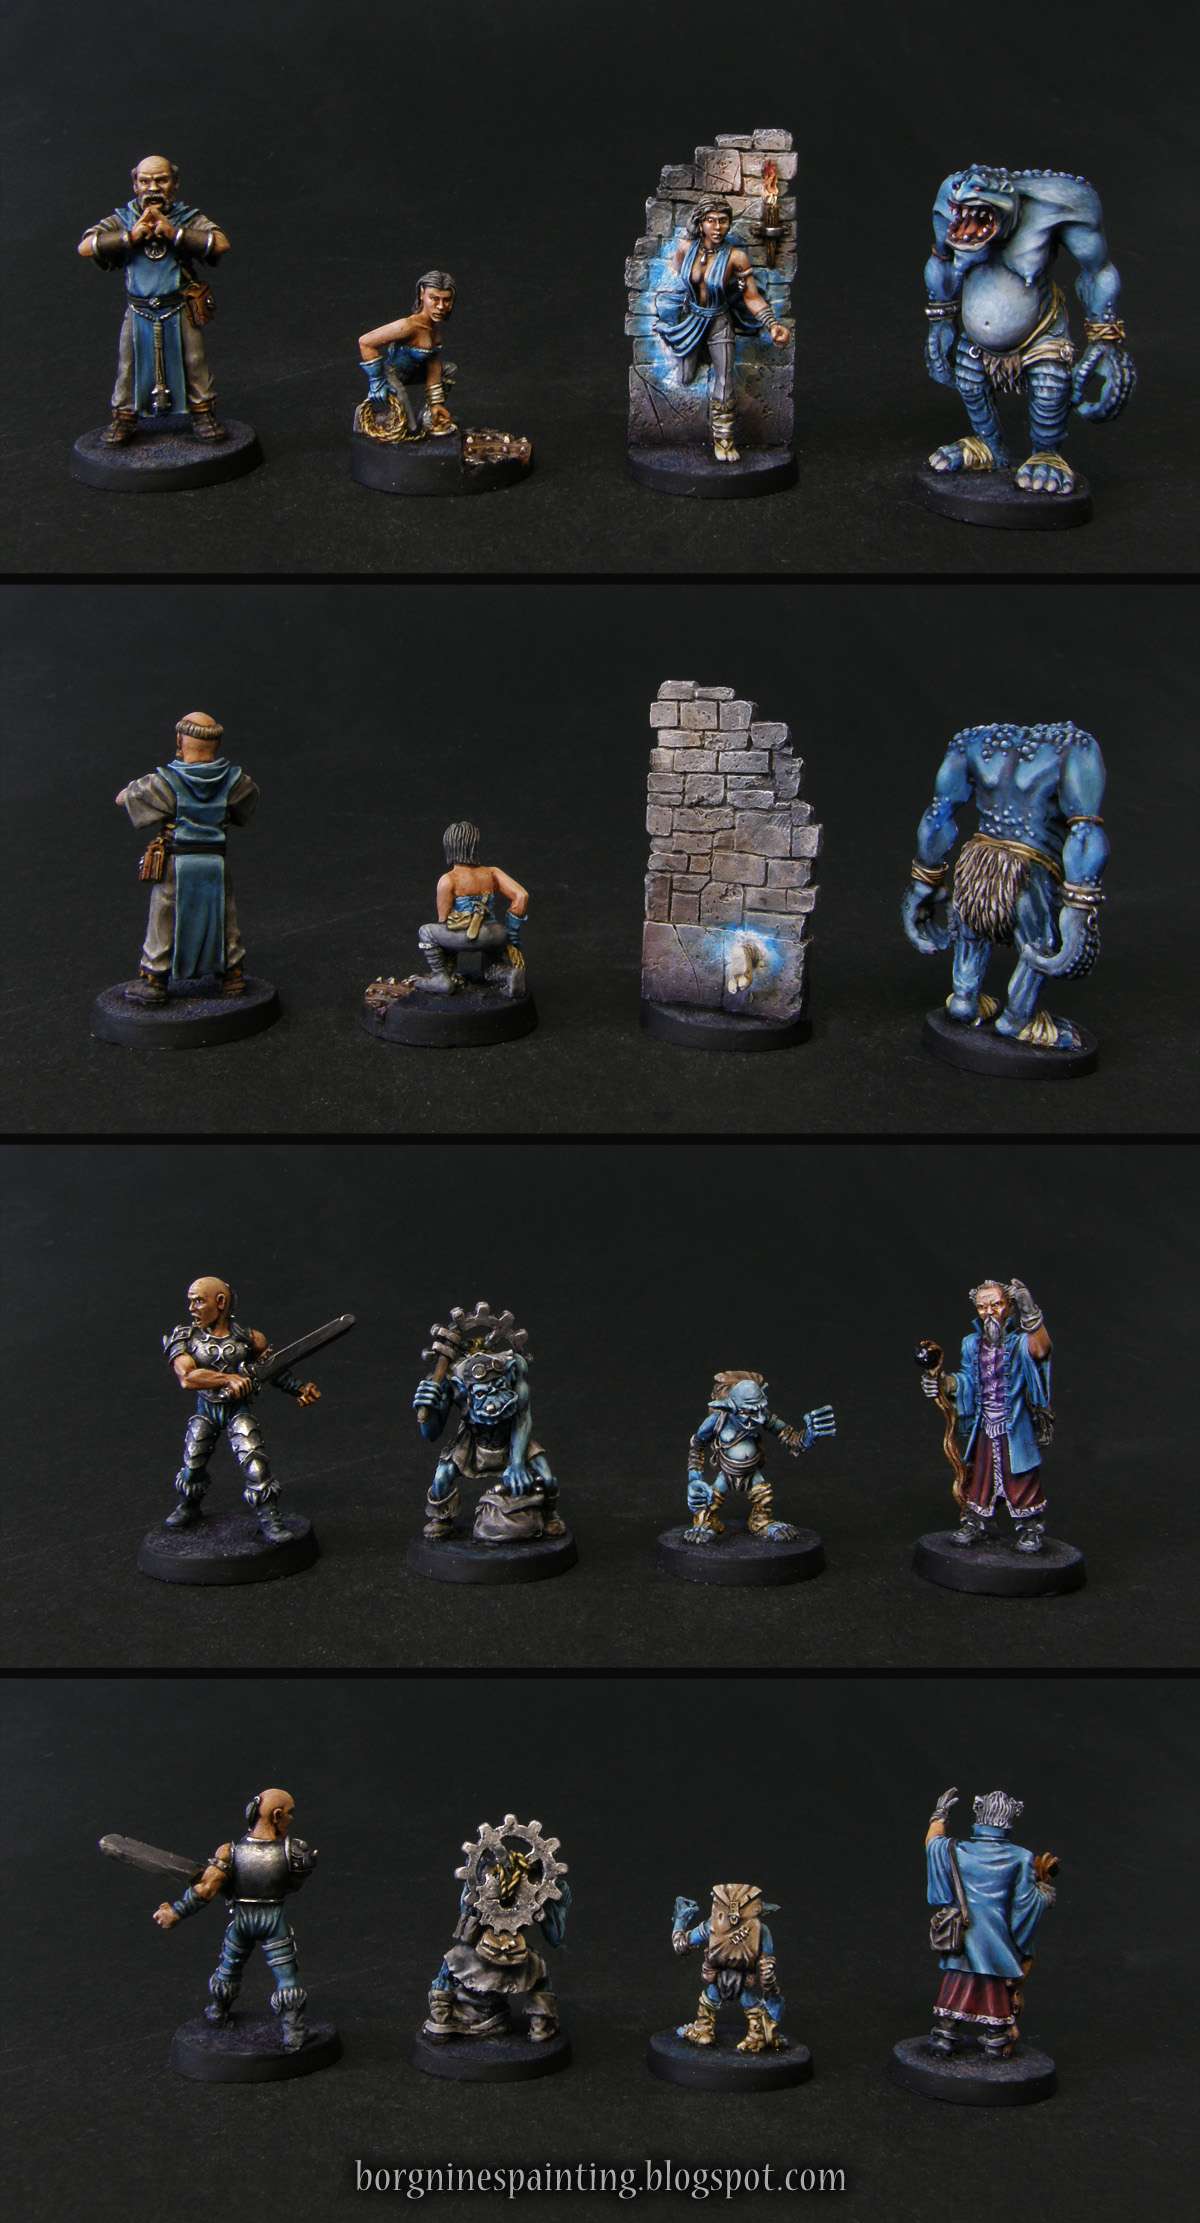
Another side-project - miniatures from the Dungeon Twister board game, painted as a (late) birthday gift for a friend.

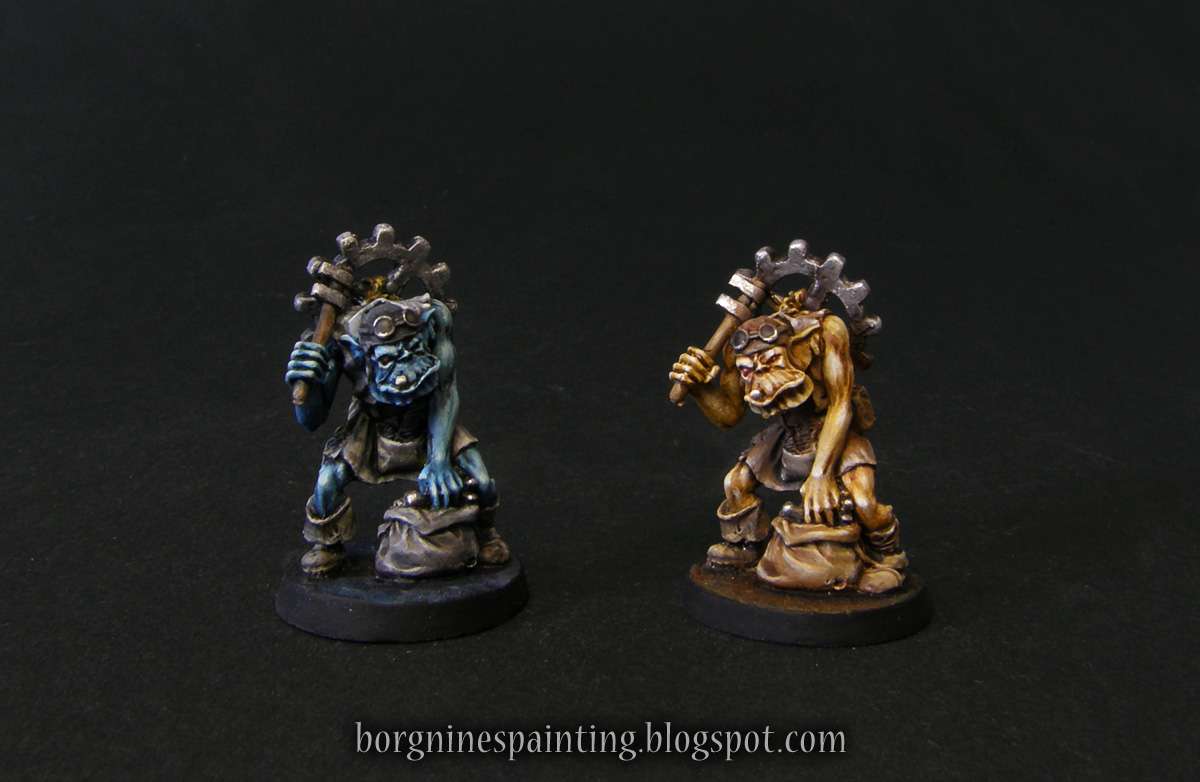
The game is about two teams of diverse adventurers and creatures who got teleported by an evil wizard into a dungeon - after which they try to escape while fighting each other. Each team is composed of the same 8 types - each miniature is duplicated and only color makes them different. This proved to be a unique painting challenge - to paint 8 miniatures using yellow as the main color and then paint the same 8 miniatures using a blue scheme. You can see the comparison below, on the Mekanorc, my favorite miniature from the whole bunch:

Two Mekanorcs painted for use in Dungeon Twister game, one yellow, one blue

The miniature themselves are somewhat hit-and-miss - some of them are very good, while others have weird proportions or anatomy. The quality differs a bit too, but it wasn't anything too noticeable. Still, the sculpts are clear and the detail is sharp, so the work on them was pleasant enough, especially seeing that I went through them relatively quickly. My wife also helped with the base colors, so that's something new too!

I also wanted to mention that I never encountered such hard-to-work resin ever in my life - paint was getting scraped off the miniatures after the slightest touch, worse than with metal minis! That's why I varnished them pretty thickly afterward, hopefully they'll be able to survive handling on the tabletop.

Here is the Blue Team:

Showcase of 8 fantasy miniatures from Dungeon Twister, the whole blue team

And the Yellow Team:

Showcase of 8 fantasy miniatures from Dungeon Twister, the whole yellow team

And the picture of all of them together.

All the miniatures for use in Dungeon Twister boardgame, both blue and yellow team together

Sunday, April 28, 2019

The Bogatyrs of Varsavia - WIP

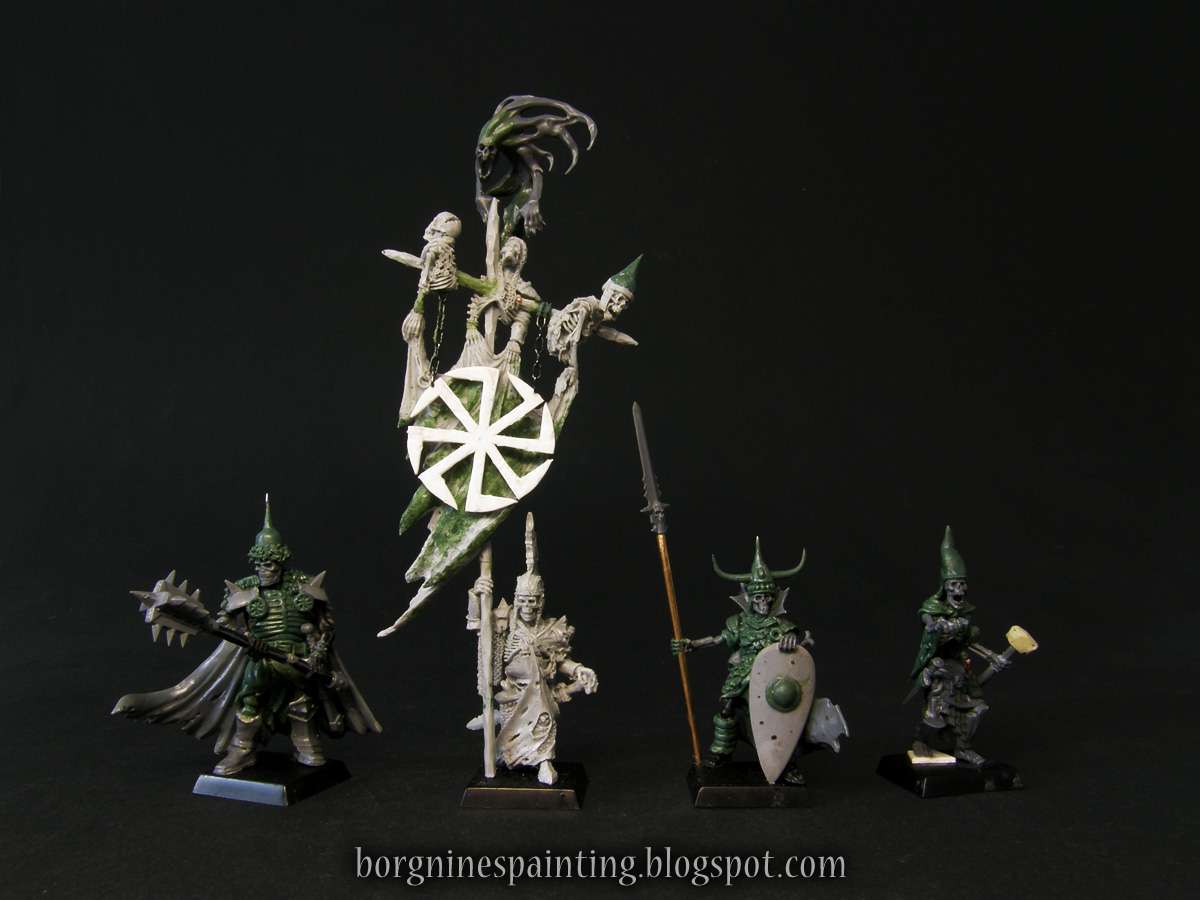
Time has come to finally get this project started, after years of slowly planning it and gathering bits: kitbashed wight bogatyrs (heroes), because those are always fun! Here they are all together, below I will explain every one of them and how they came to be.


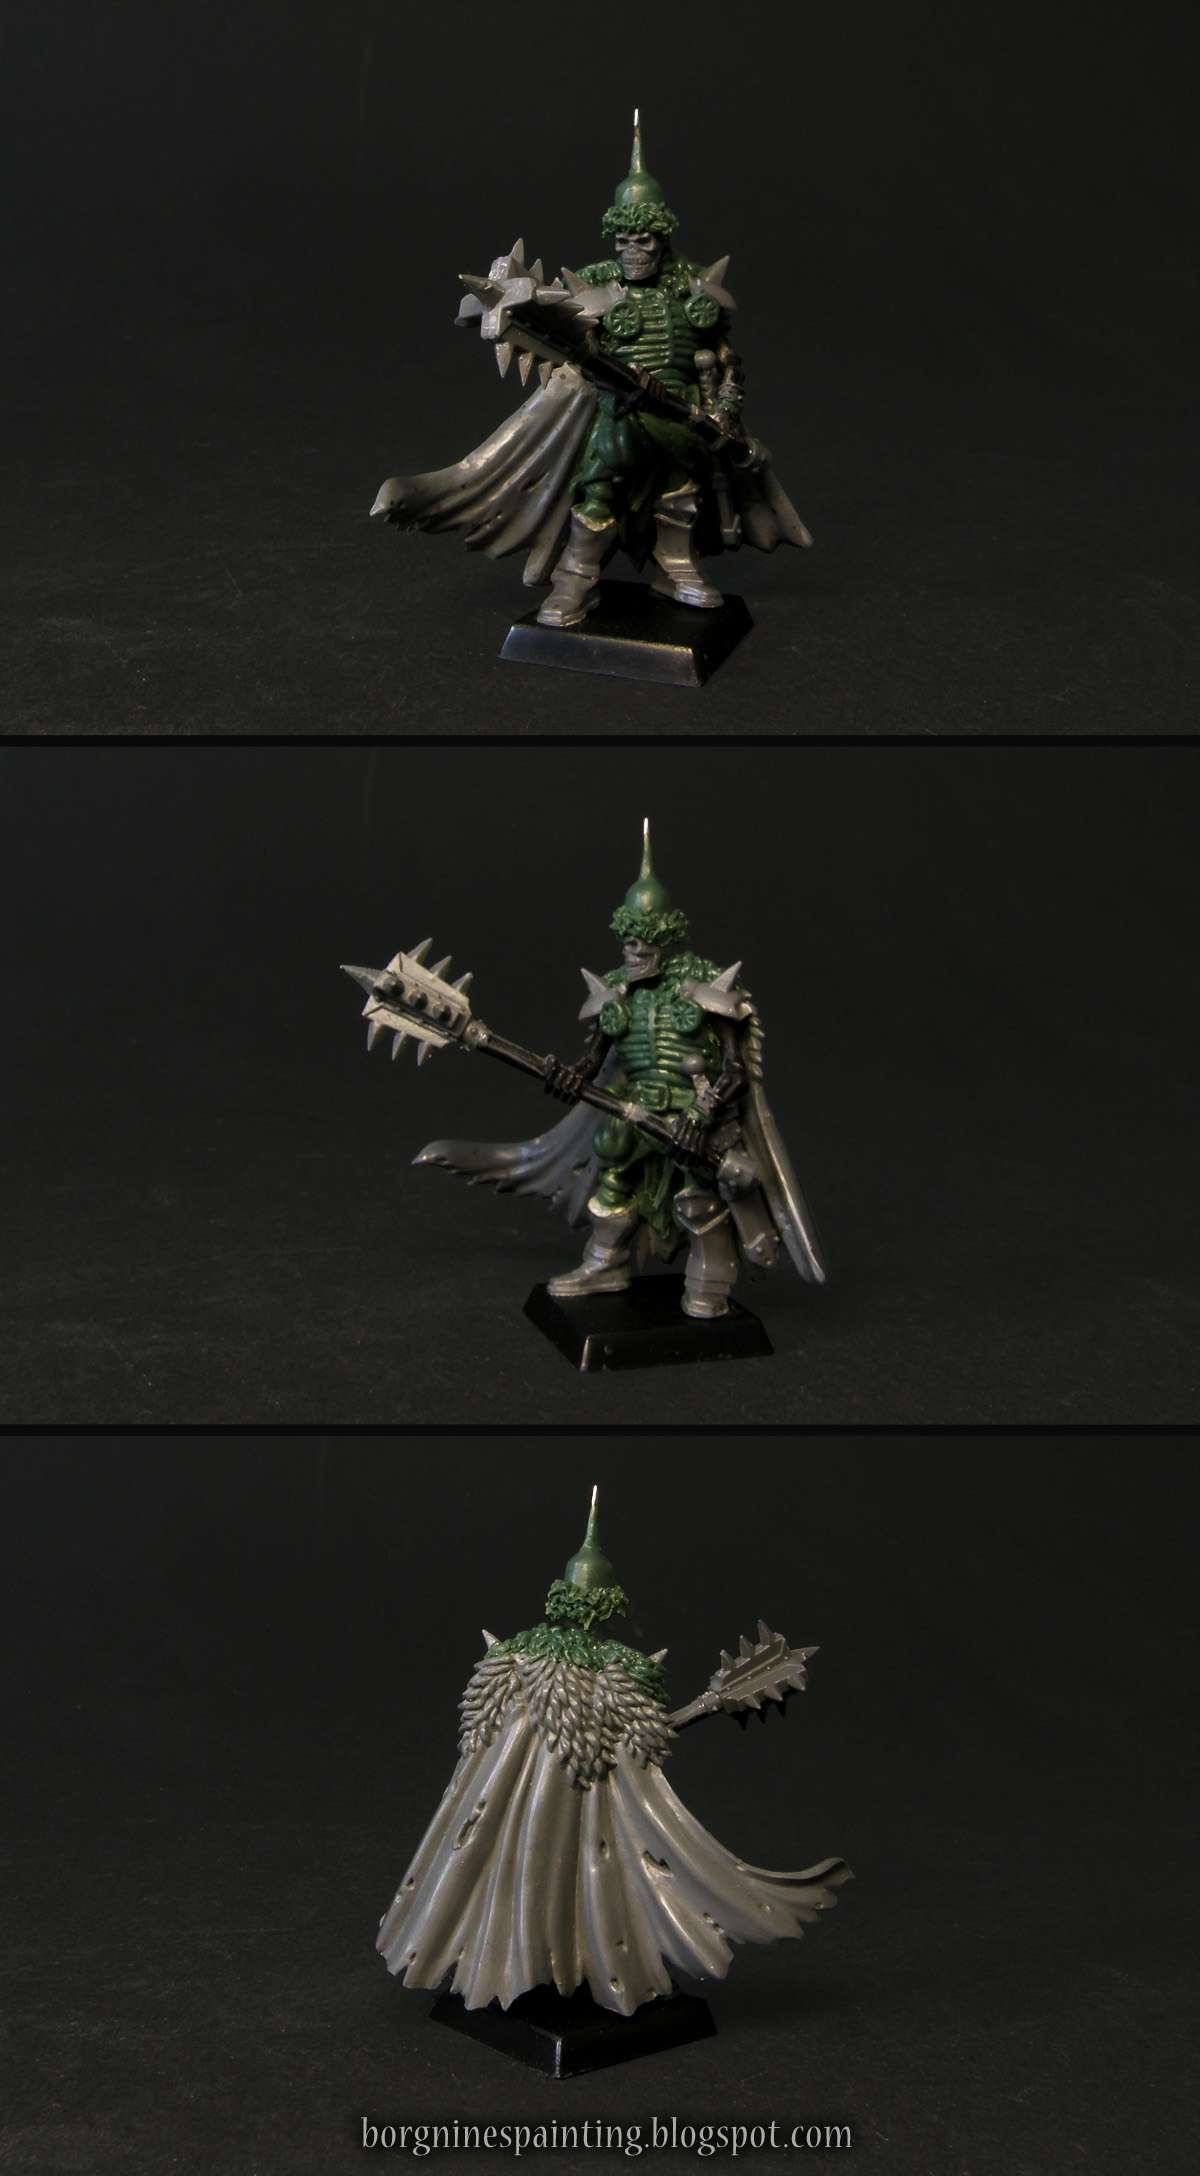
Now, the singular heroes. The one that started it all is Yarema, the bodyguard giant.

The whole concept for him came from this cape - I saw it on an auction site long time ago and bought it to kitbash a wight, mostly because other undead heroes had similar capes, like Zlyshko or Kiril. Then, when it came, I realized how big are space marine capes! It barely fits on a 20x20mm base, but I didn't want to cut it or change too much, so I created a whole character around it - an imposing giant of a wight known for bodyguarding ancient kings and princes.

I wanted to use some other bits to build his body, but they were all too small, so I had to sculpt him mostly from scratch. His head is also made out of one of those older skulls, ones which were much bigger - I tried using a modern skull, but with that giant torso and cape, his proportions were becoming comical. Interestingly enough, his hands were taken from a TK charioteer, a miniature that was laying around in my drawer for more than 12 years now! It's good that his parts have found some purpose.

EDIT: The painted miniature can be seen HERE.

An unpainted, kitbashed Wight King miniature, carrying a two-handed mace, with a flowing cape and armor made out of greenstuff.

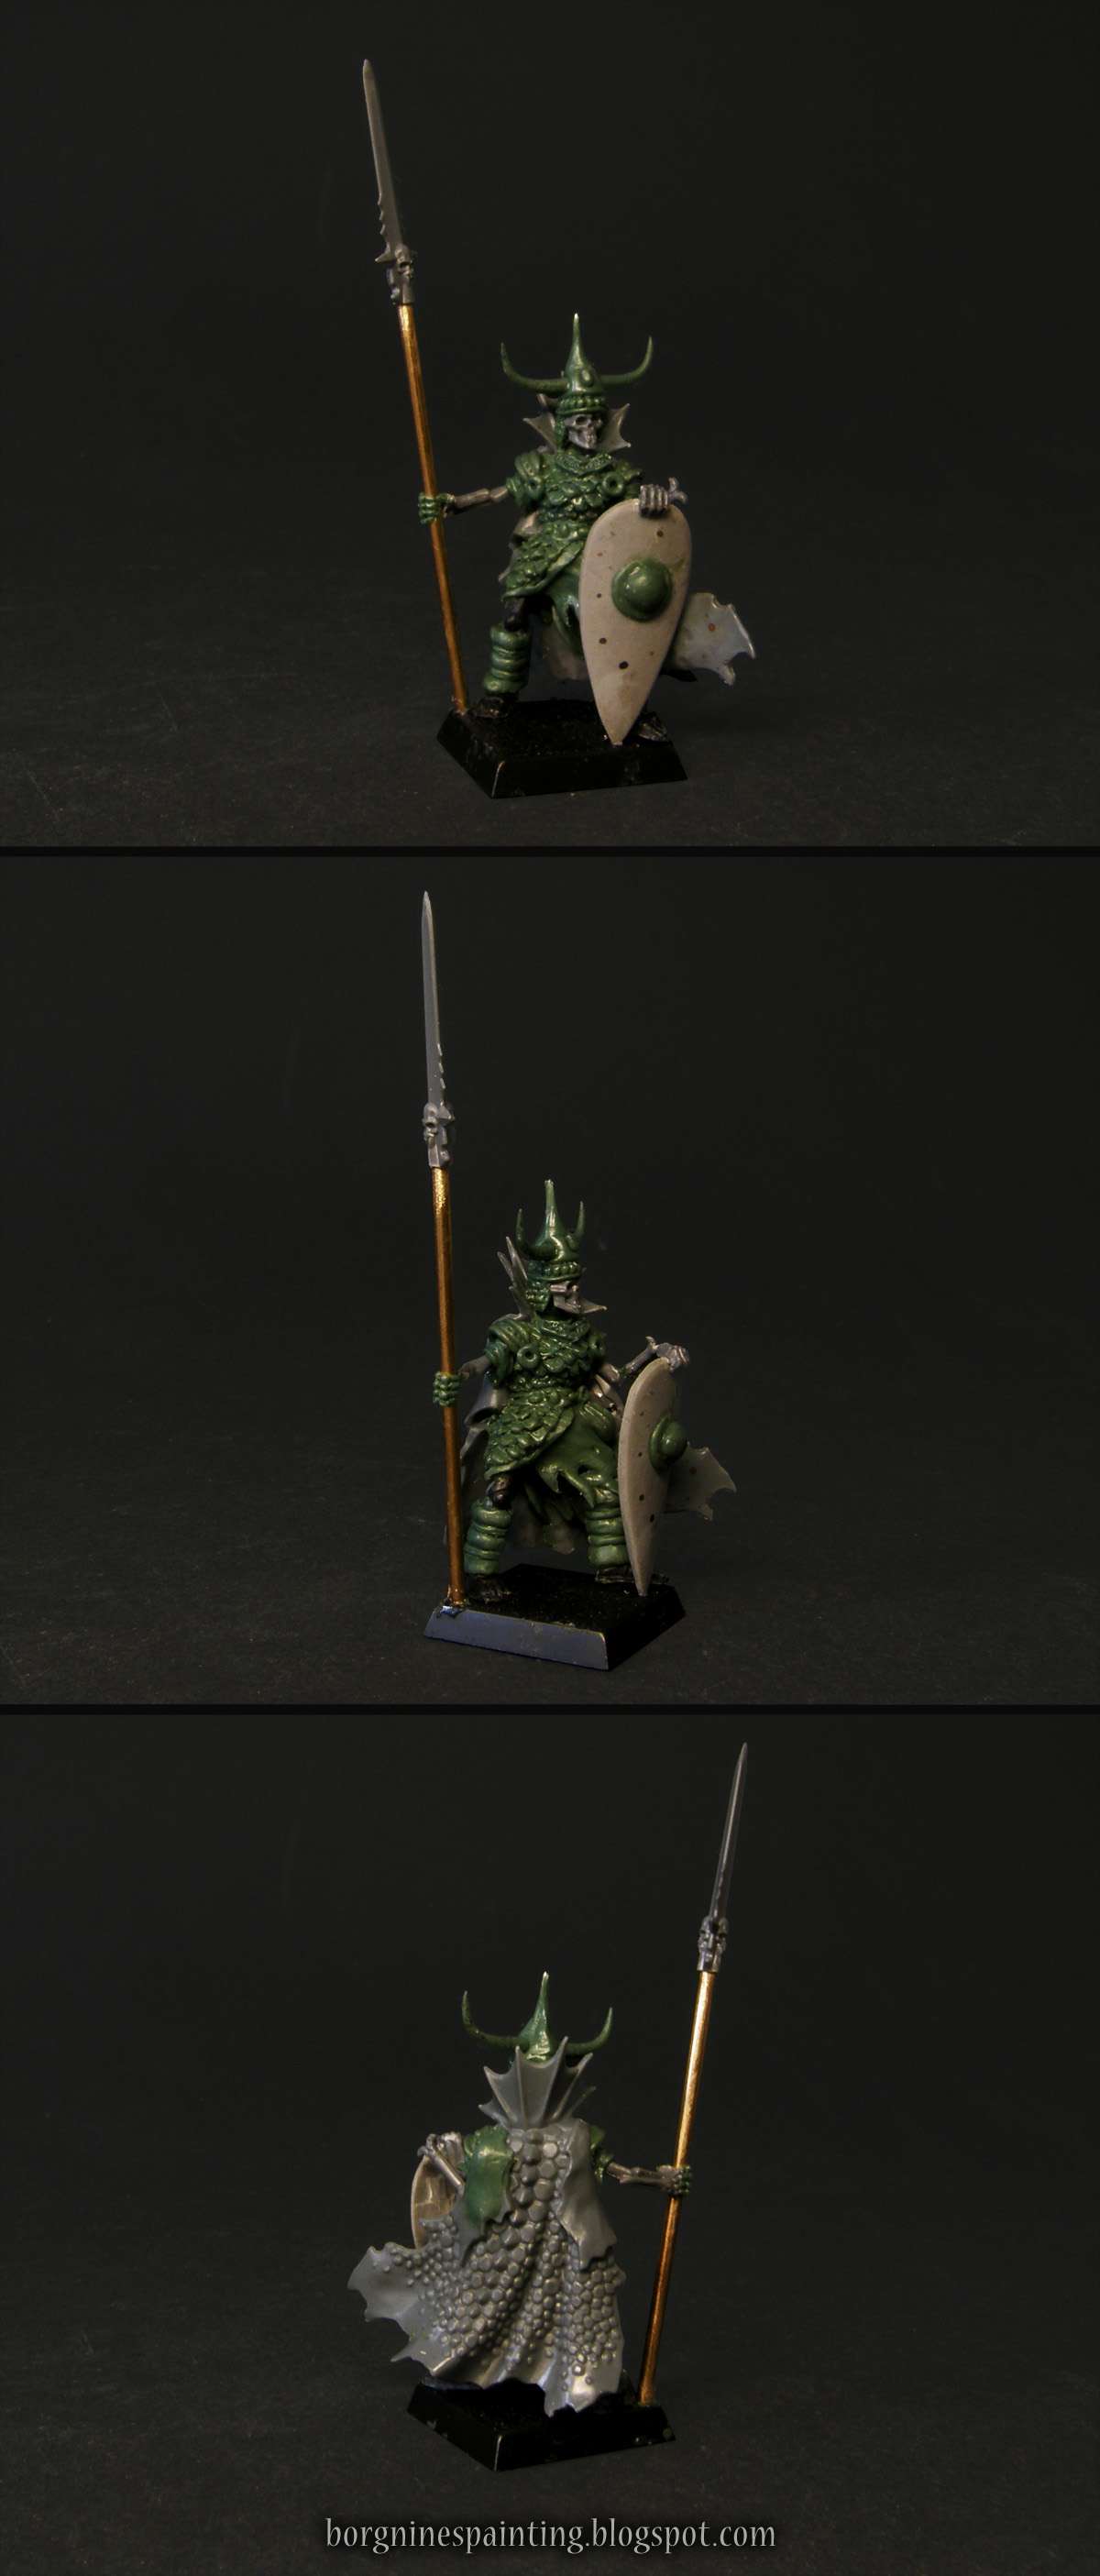
Next one is the fearless heroine, Drachitsa the Dragonslayer.

Similarly to Yarema above, her whole concept started with the cape - I bought several of those because of the potentially-useful dragonskin texture and those high collars. After getting them I came up with the idea of another wight hero who would drape themselves in the skin, to create some kind of monster-slayer - because it's both a good concept for a wargame character and because it's such a well-known trope for a fairy-tale hero of old. Her legs were taken from the same charioteer that gave his arms to Yarema.

EDIT: The painted miniature can be seen HERE.

An unpainted, kitbashed Wight King miniature, carrying a spear made out of a brass rod, kite shield and wearing a flowing dragonskin cape.

Then, the standard bearer, Vekoslav.

I used here the single only Vampire Counts model ever released by Forge World, a Battle Standard Bearer. The model is nice, well made and I didn't want to convert it in any way, but the standard with sculpted vampiric iconography was a bit problematic - not fitting in any way with my other wights. The simplest solution would be to file it all smooth and cover it with freehands as I always do with those dusty skeletons, but I already had standards like that and this one should stand out as THE most important one in the whole army.

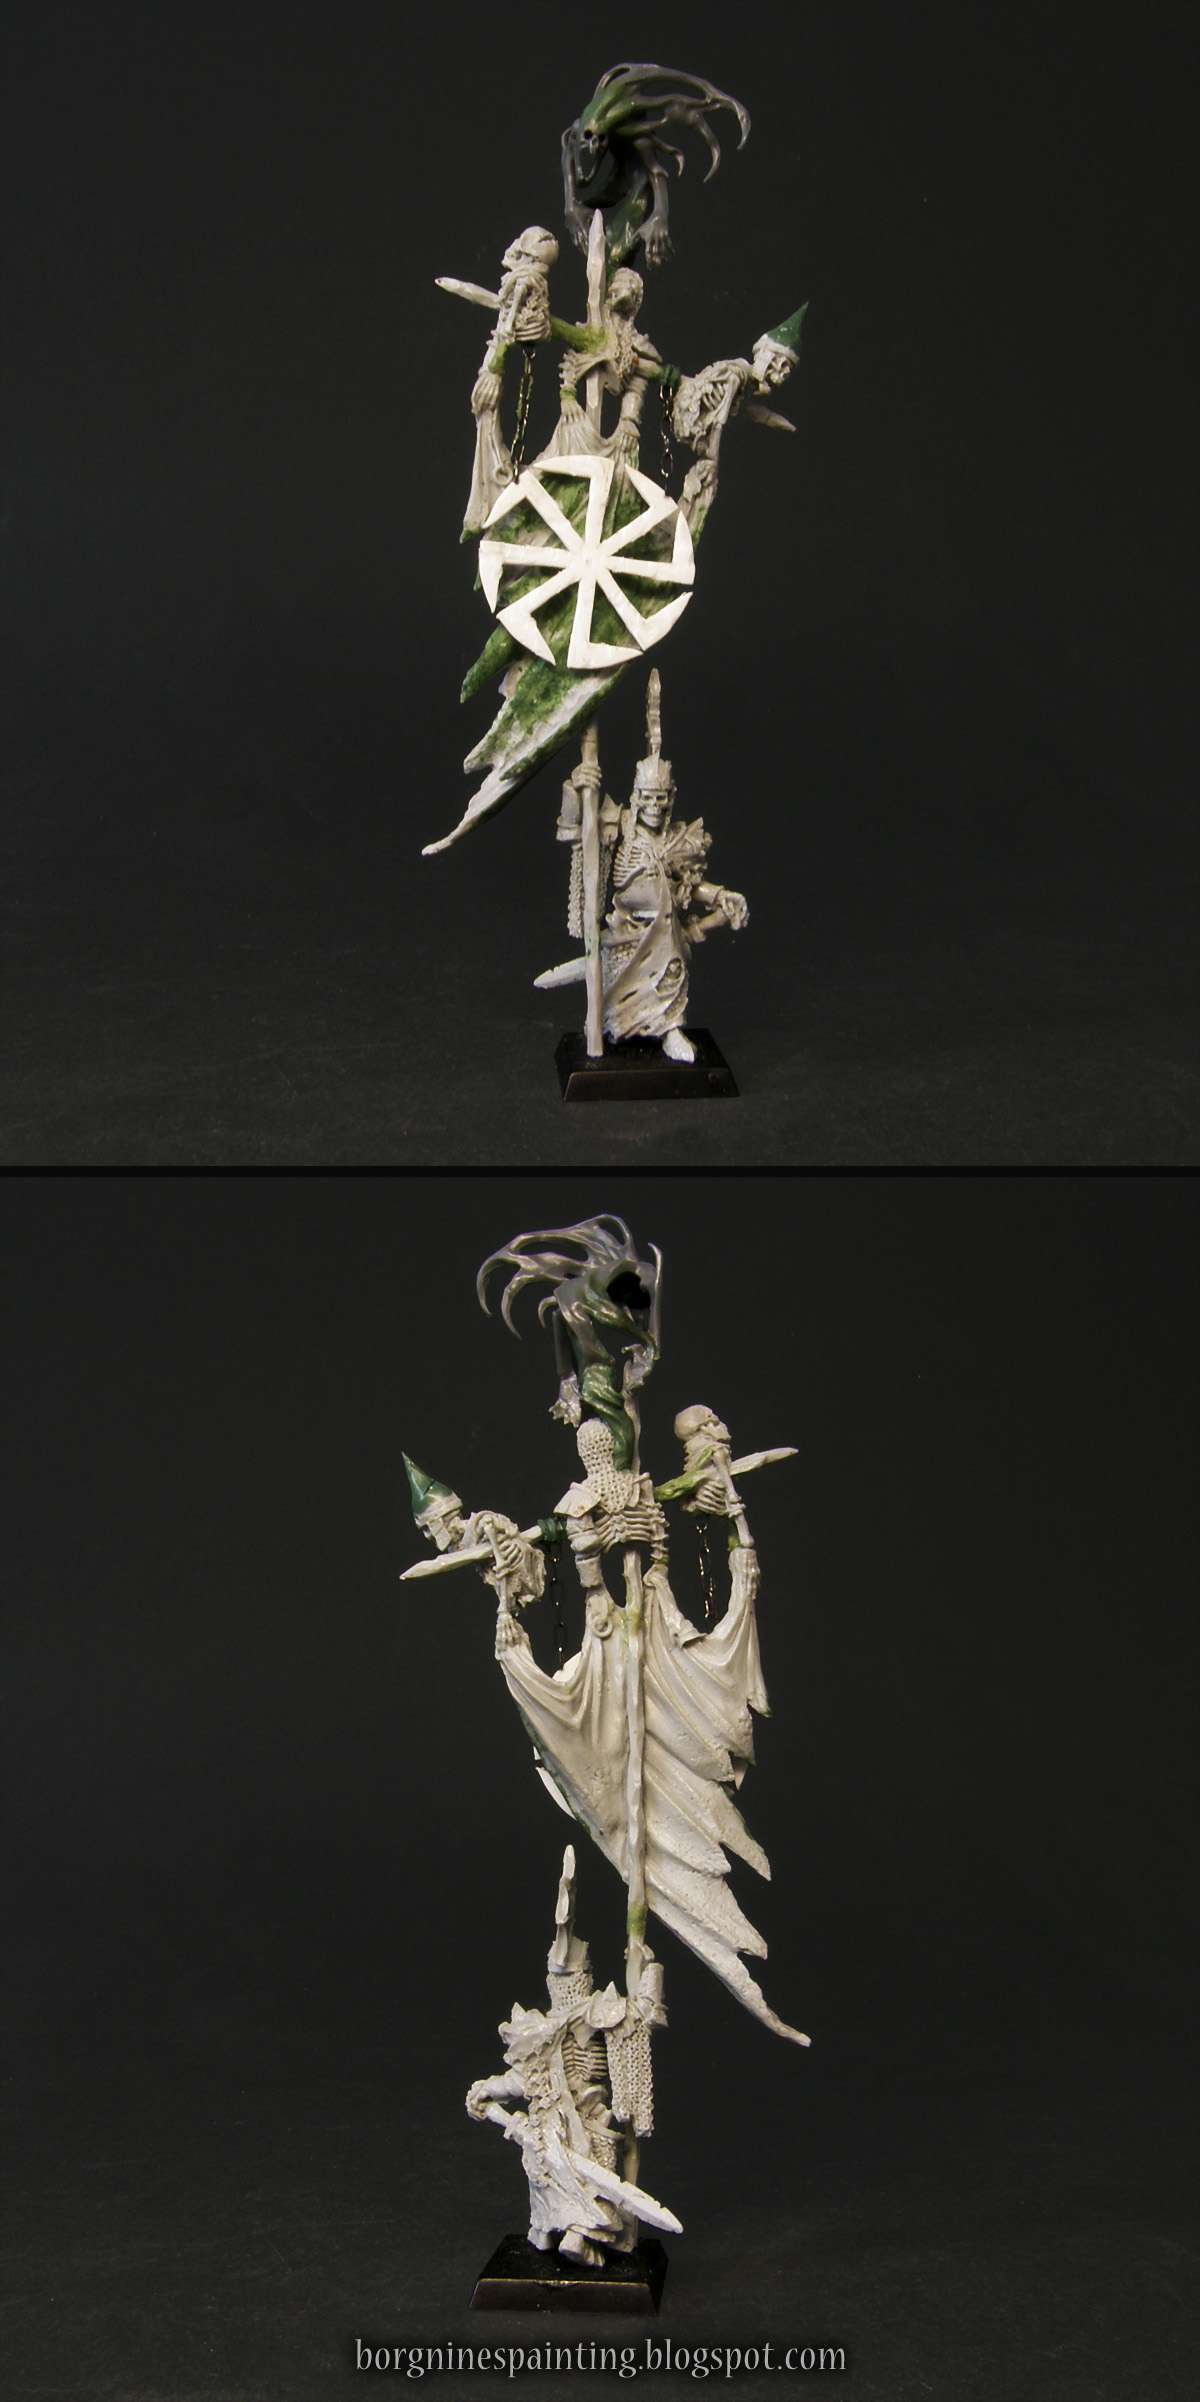
To achieve that, I decided to give it an additional dimension - instead of yellow markings on a black background, I will have a separate golden sigil hanging in front of a black flag. Wanting to push it even further, I dug up Nagash's unused hand, one with the ghost springing out of it and mounted it on top of the standard. This will be kind of a more reserved version of another Battle Standard Bearer I did in the past.

An unpainted Wight King miniature from Forge World, slightly converted - with a plasticard sigil hanging in front of the banner.

And the last one, Drazhan the Younger, the wight construct-architect.

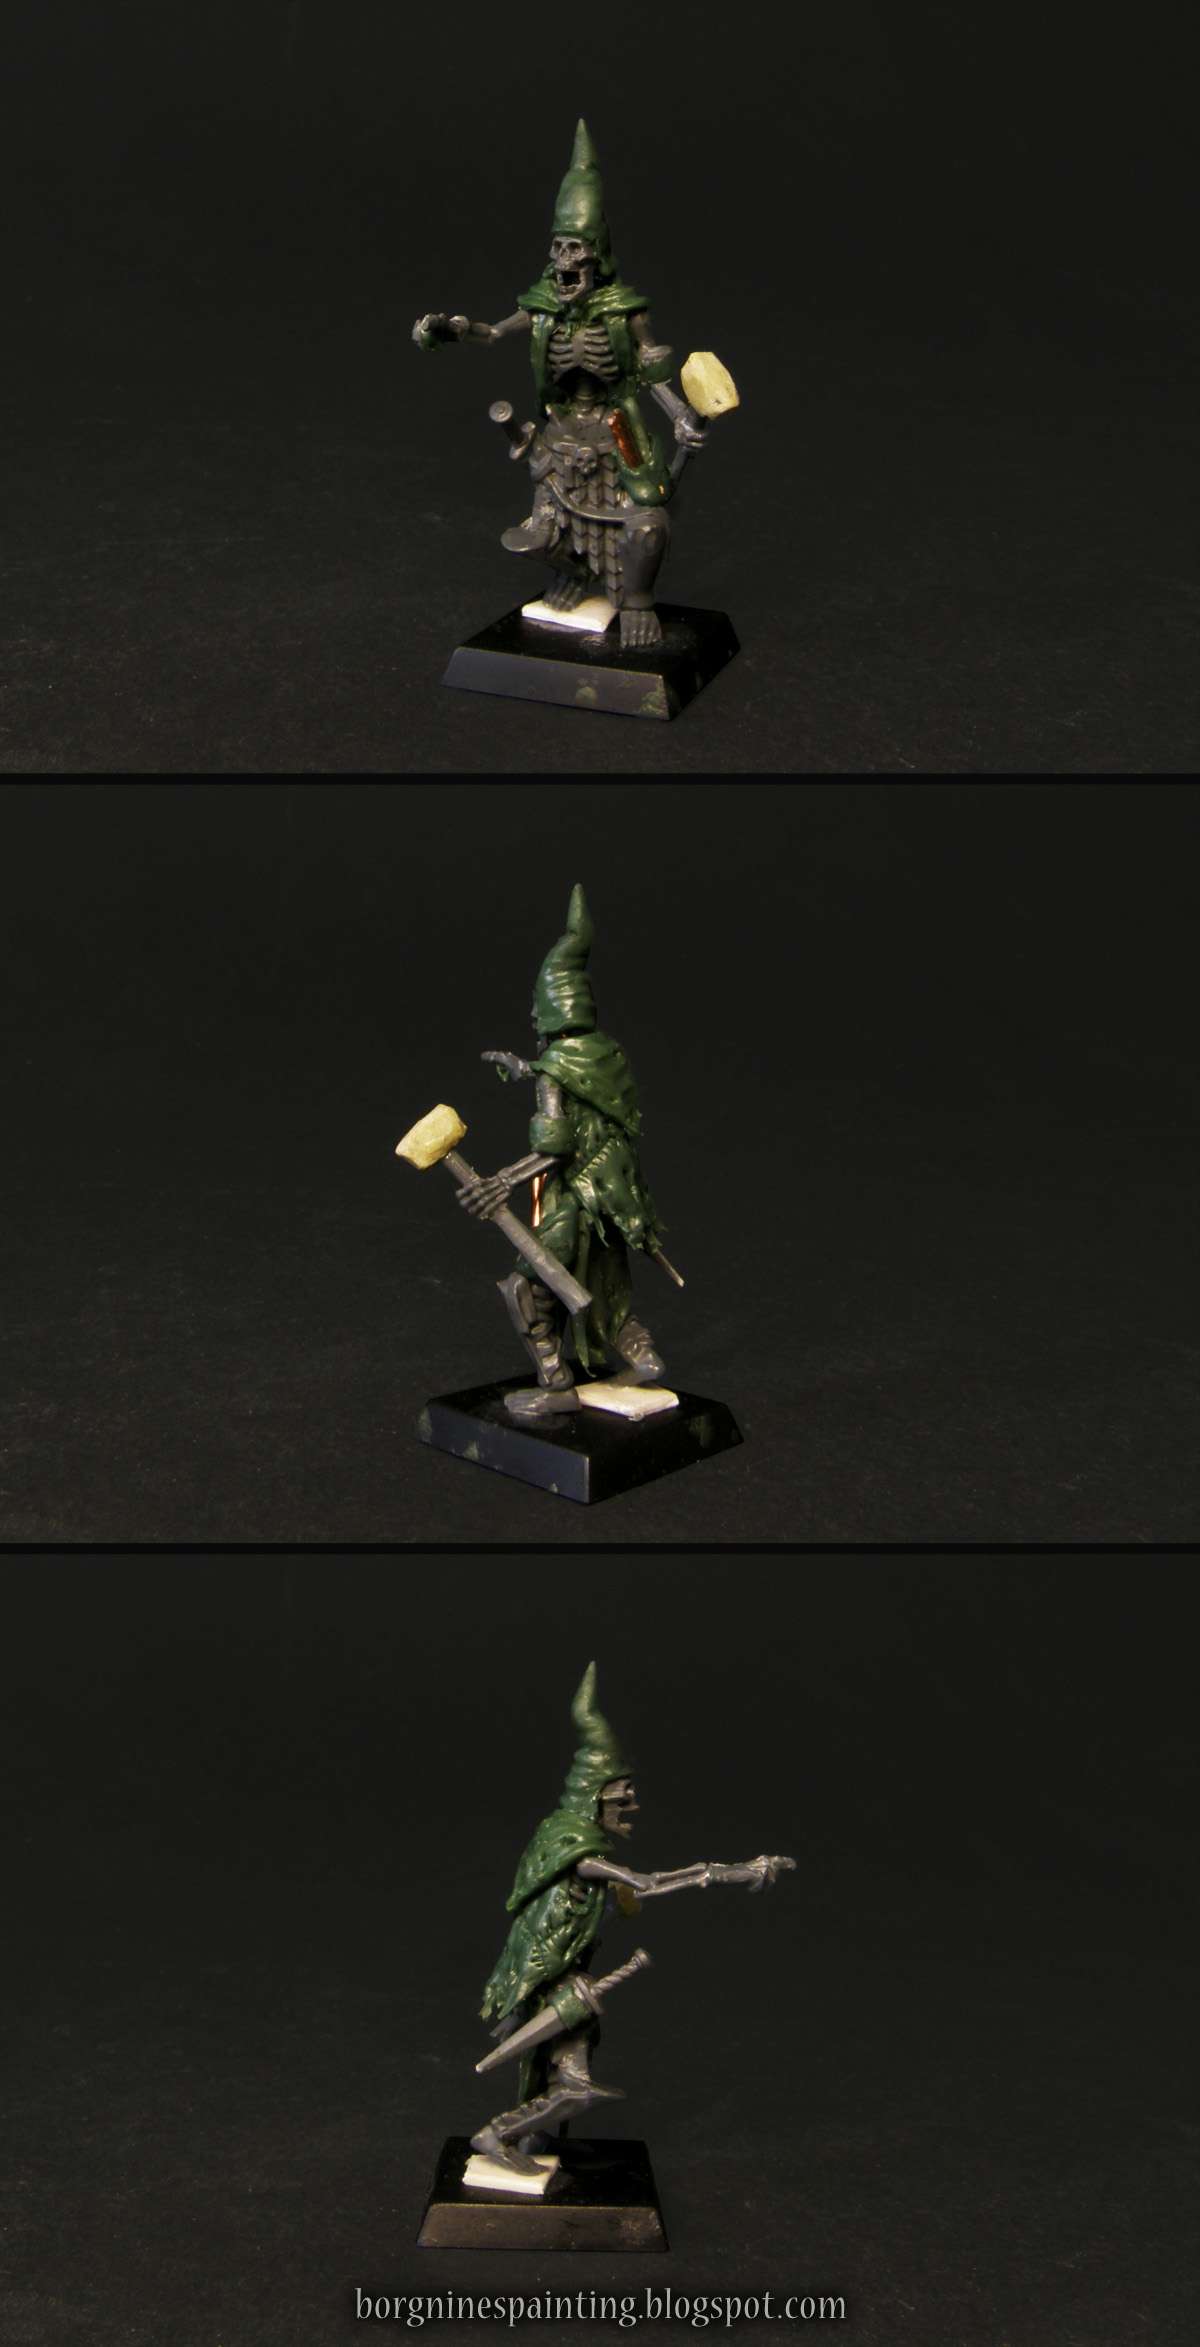
This one will be my version of a Necrotect from the Tomb Kings armybook. Original GW miniature of him is equipped with a whip - and while I think it fits the image of ancient Egypt that TK had, it didn't fit in any way in my army. I wanted him to be a sculptor and a constructor, so I gave him a hammer, a fancy hat (inspired by the hat of the TK Necrotect) and a pointing hand - now he should look like the responsible, authoritative person on the construction site. The base for this kitbash was one of the skeletons that came with the Necrosphinx kit - both because the pose and proportions were good for this purpose and because it reflects his TK roots. He will be also a narrative excuse to build more constructs for this faction - I have a lot of ideas for those!

EDIT: The painted miniature can be seen HERE.

An unpainted, kitbashed Necrotect miniature made to fit in a Vampire Counts collection - wearing a pointy hat and holding a hammer.

Sunday, April 21, 2019

Dark Rusted Metal Tutorial

Title card of the tutorial, showing a photo reference with a rusted gauntlet and two painted miniatures showing the final effect of the whole process.

Shortly after I posted my Faceless Stormcasts, I got asked about the recipe for their armor and to make a tutorial about it. It was still pretty fresh in my memory and I even wrote down all the steps, so I thought 'why not?' - this will be yet another of many rust tutorials available on the internet. I know it's relatively long, but I think that all the steps are important and affect the final result - and it is probably actually simpler than the number of steps would suggest.

The photo with the effect that I was trying to recreate can be seen above, on the left picture - the whole thing is supposed to be dark and messy, with some significant rusting, while keeping the overall metallic look.

The miniature used in this tutorial was an old Chaos Sorcerer from Warhammer Quest. I got him a long time ago and I didn't really have any use for him before, so I decided to turn him into a statue here, seeing that his pose is static enough for this purpose.

I started by painting a base of wetblended Boltgun Metal from GW (which is known today as Leadbelcher), Warplock Bronze and some matte black. The blending itself was quick and messy, no need to be smooth with it. The parts that can be seen from above were painted dark silver, bronze was used on the undersides and then black added to the most recessed and covered places. Making it lighter from above and darker on the undersides helps to create the illusion of light coming from above. This arrangement is shown on the picture below.

Note: almost all pictures here are linked to their bigger versions.

picture showing - through the use of colored overlays - various paints that need to be wetblended on a miniature as the basecoat.

Next step is sprinkling with a toothbrush - a method that I have been using for years and which always gives some great messy randomness to miniatures. For anyone unfamiliar with it - I do it by putting the brush in the wash, wiping the excess on the inside edges of the pot (it shouldn't be dripping!) and then flicking the finger on the bristles while pointing them at the miniature - it will spray the mini with random droplets of the shade. Explained much better in a picture below (note how the direction of the sprinkle goes slightly below the direction of the brush's bristles):

Small infographic showing the technique of sprinkling miniatures with wash with a tootbrush.

Also, note that a brush with stiff bristles can be used for this task as well - it's smaller, so it's better used when you need some more control and precision.

It's always good to do the first sprinkle at something else than the miniature, to test if the amount is good - sometimes it's too wet and sometimes it doesn't even fly off the toothbrush. Obviously, this method is very messy and it's good to have something behind the mini to protect your workplace from becoming all splattered with paint. Here is my setup:

Photo showing my setup for miniature sprinkling - using a background of an old box weighted down with some paint pots.

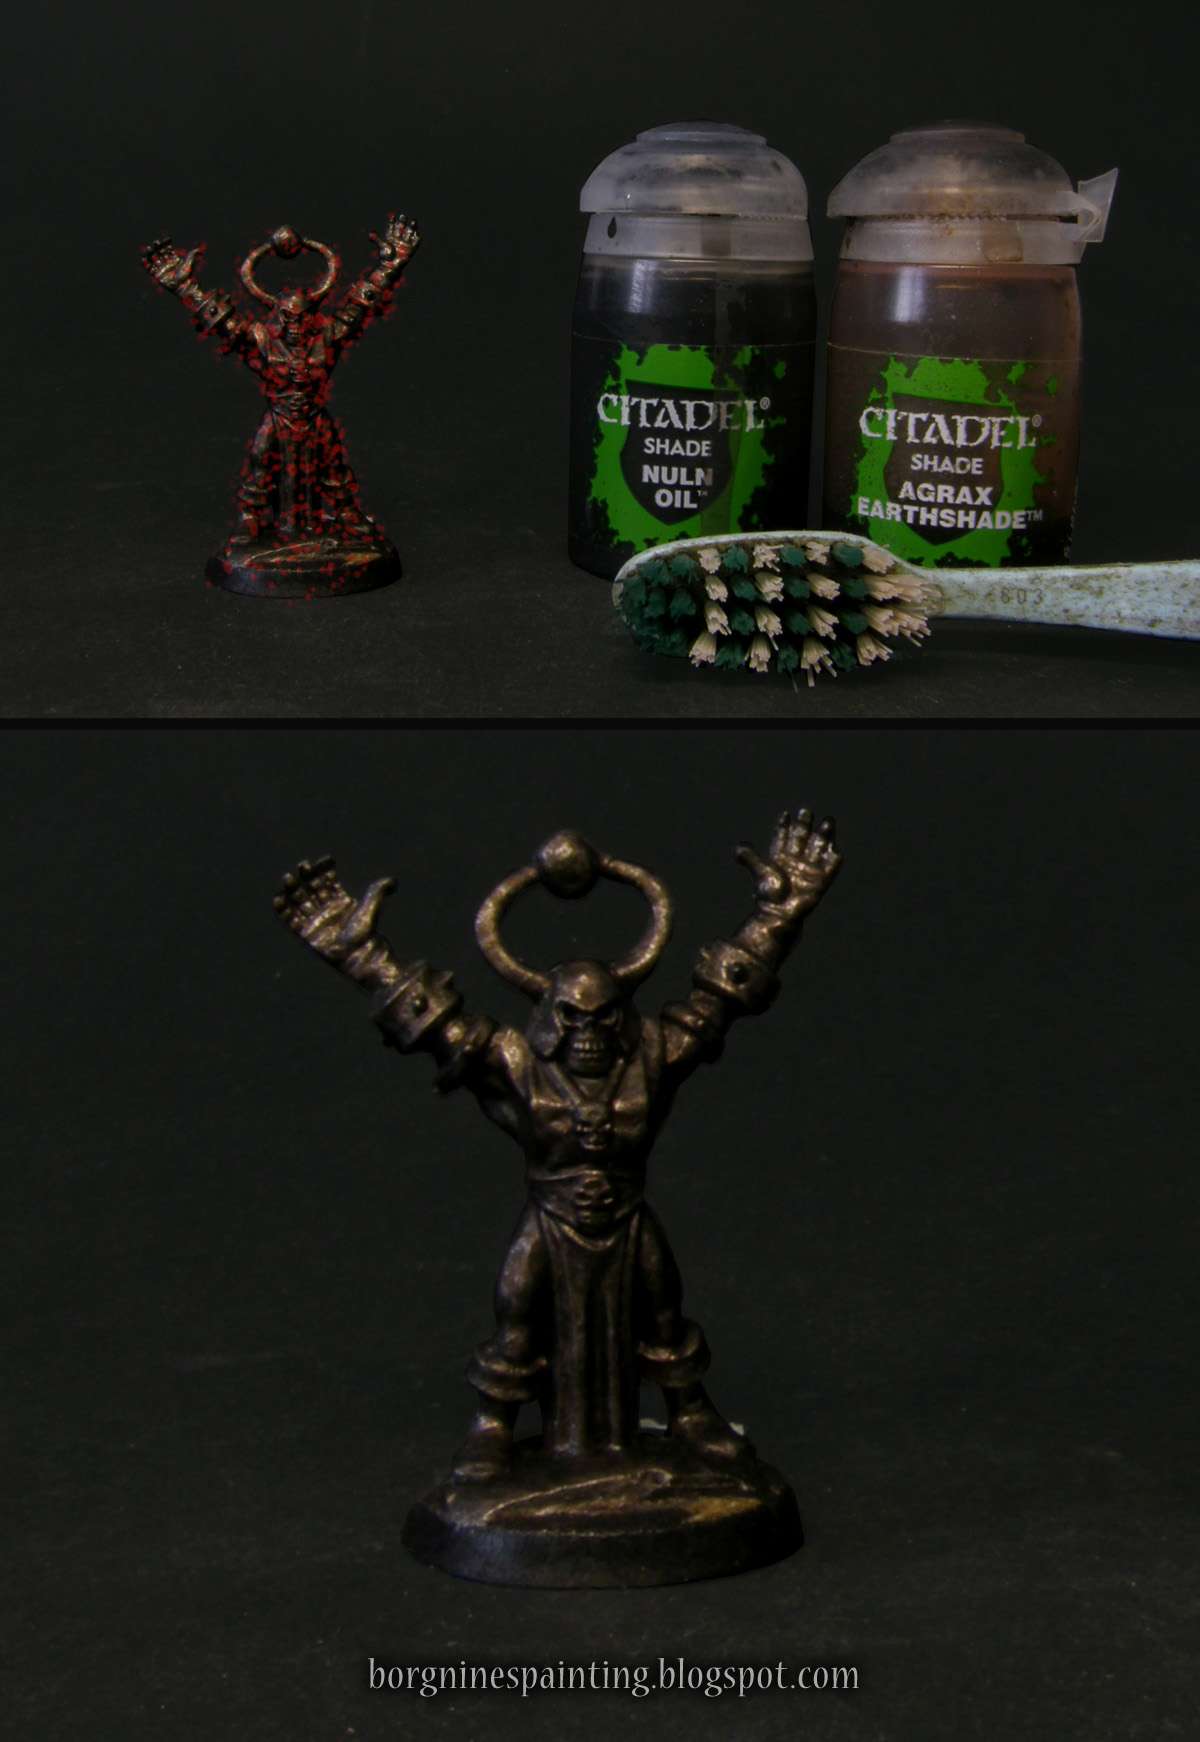
Here is how it looks after sprinkling first with Nuln Oil, letting it dry and then sprinkling it again, with Agrax Earthshade (red dots on the picture above simulate the sprinkling).

Photo showing a miniature with speckled, red overlay representing sprinling - with a tootbrush and a wash paints Agrax Earthshade and Nuln Oil visible on the right.

Now is the time to bring back some of the metallics. I do this by stippling the areas marked red (generally all the exposed areas, especially the ones that can be seen from above the mini - once again, simulating the light with brighter areas on the mini). Stippling is like drybrush, only instead of brushing the mini, you hit it's surface vertically from above and the brush has slightly more paint in it than your typical drybrush. I use for this a synthetic brush with the top part of the bristles cut off, making it flat and perfect for this task.

Photo showing a miniature with more concentrated, red overlay representing stippling - with a flat, round brush - with a said brush and a pot of Boltgun Metal paint visible on the right.

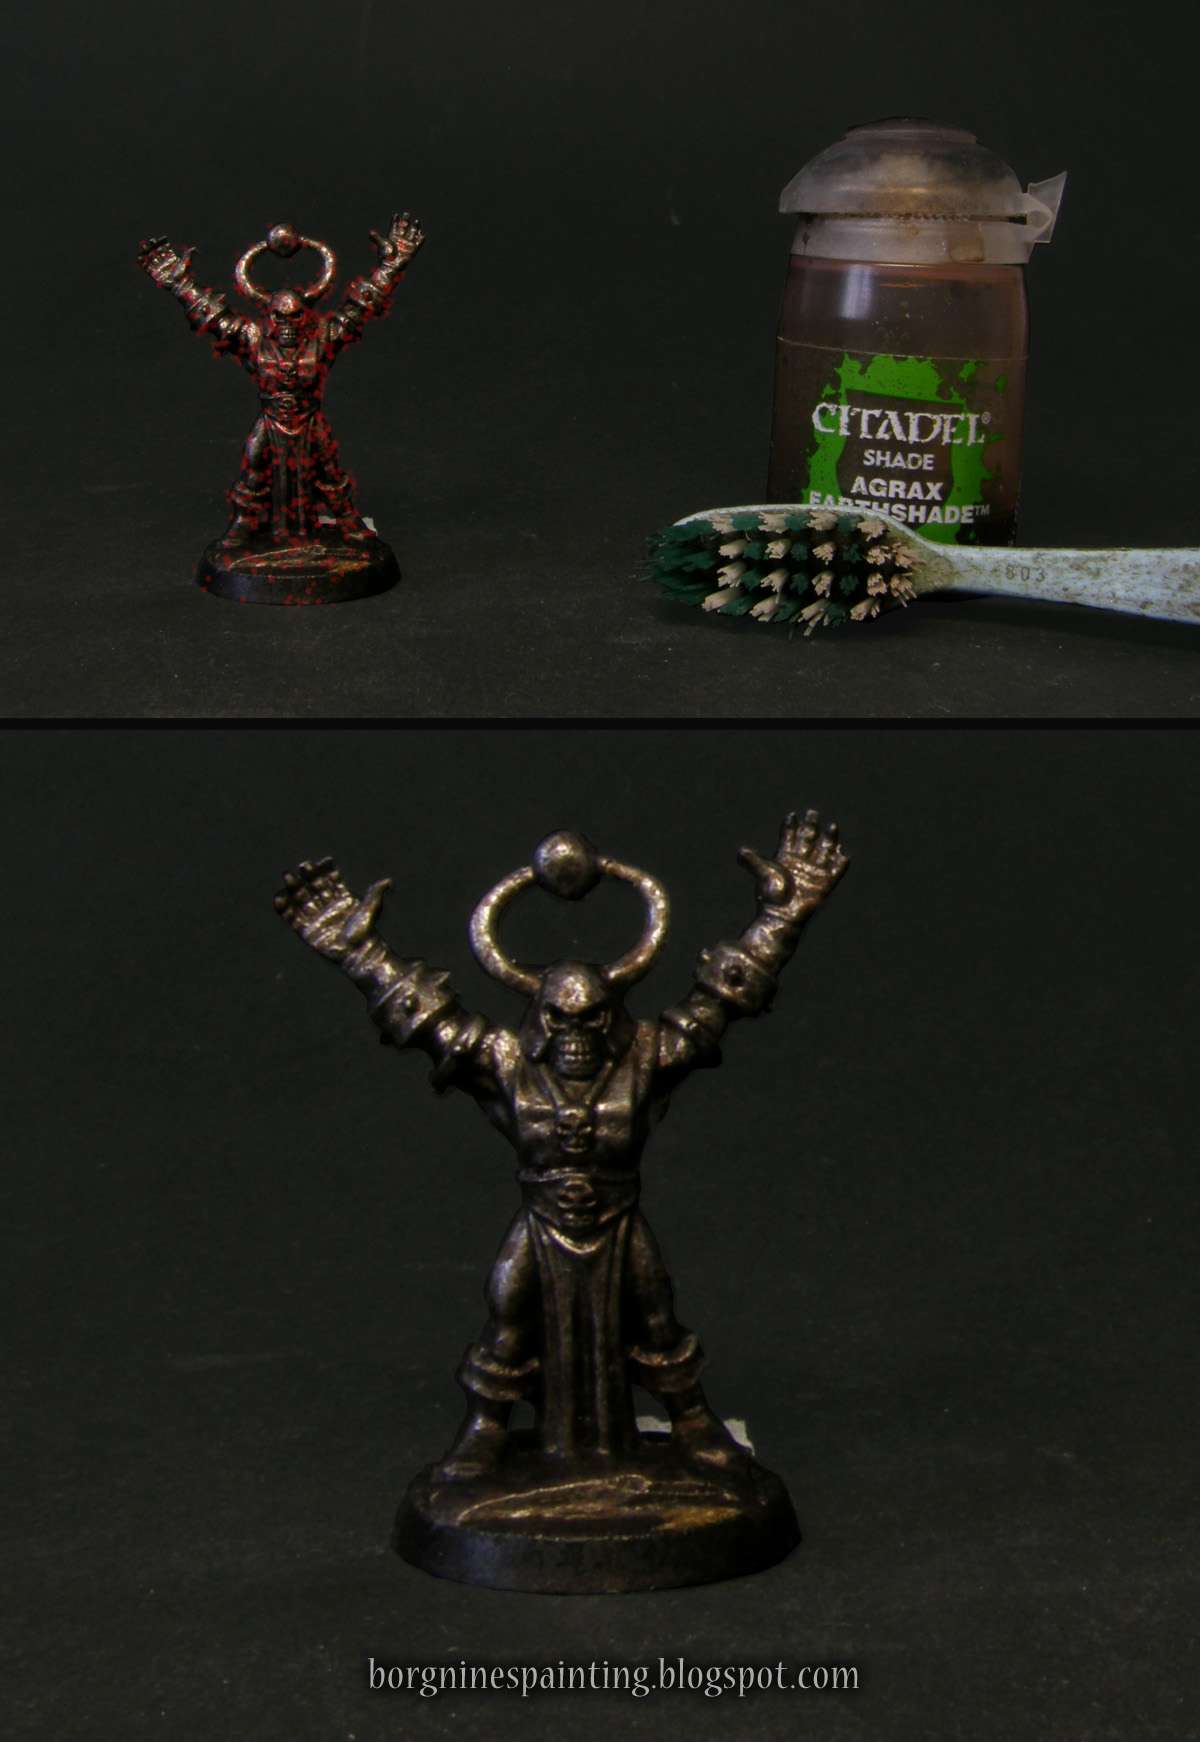
To avoid making it all too clean I sprinkled the mini once again, this time only with Agrax Earthshade.

Another photo showing a miniature with speckled, red overlay representing sprinling - with a tootbrush and a wash paint Agrax Earthshade visible on the right.

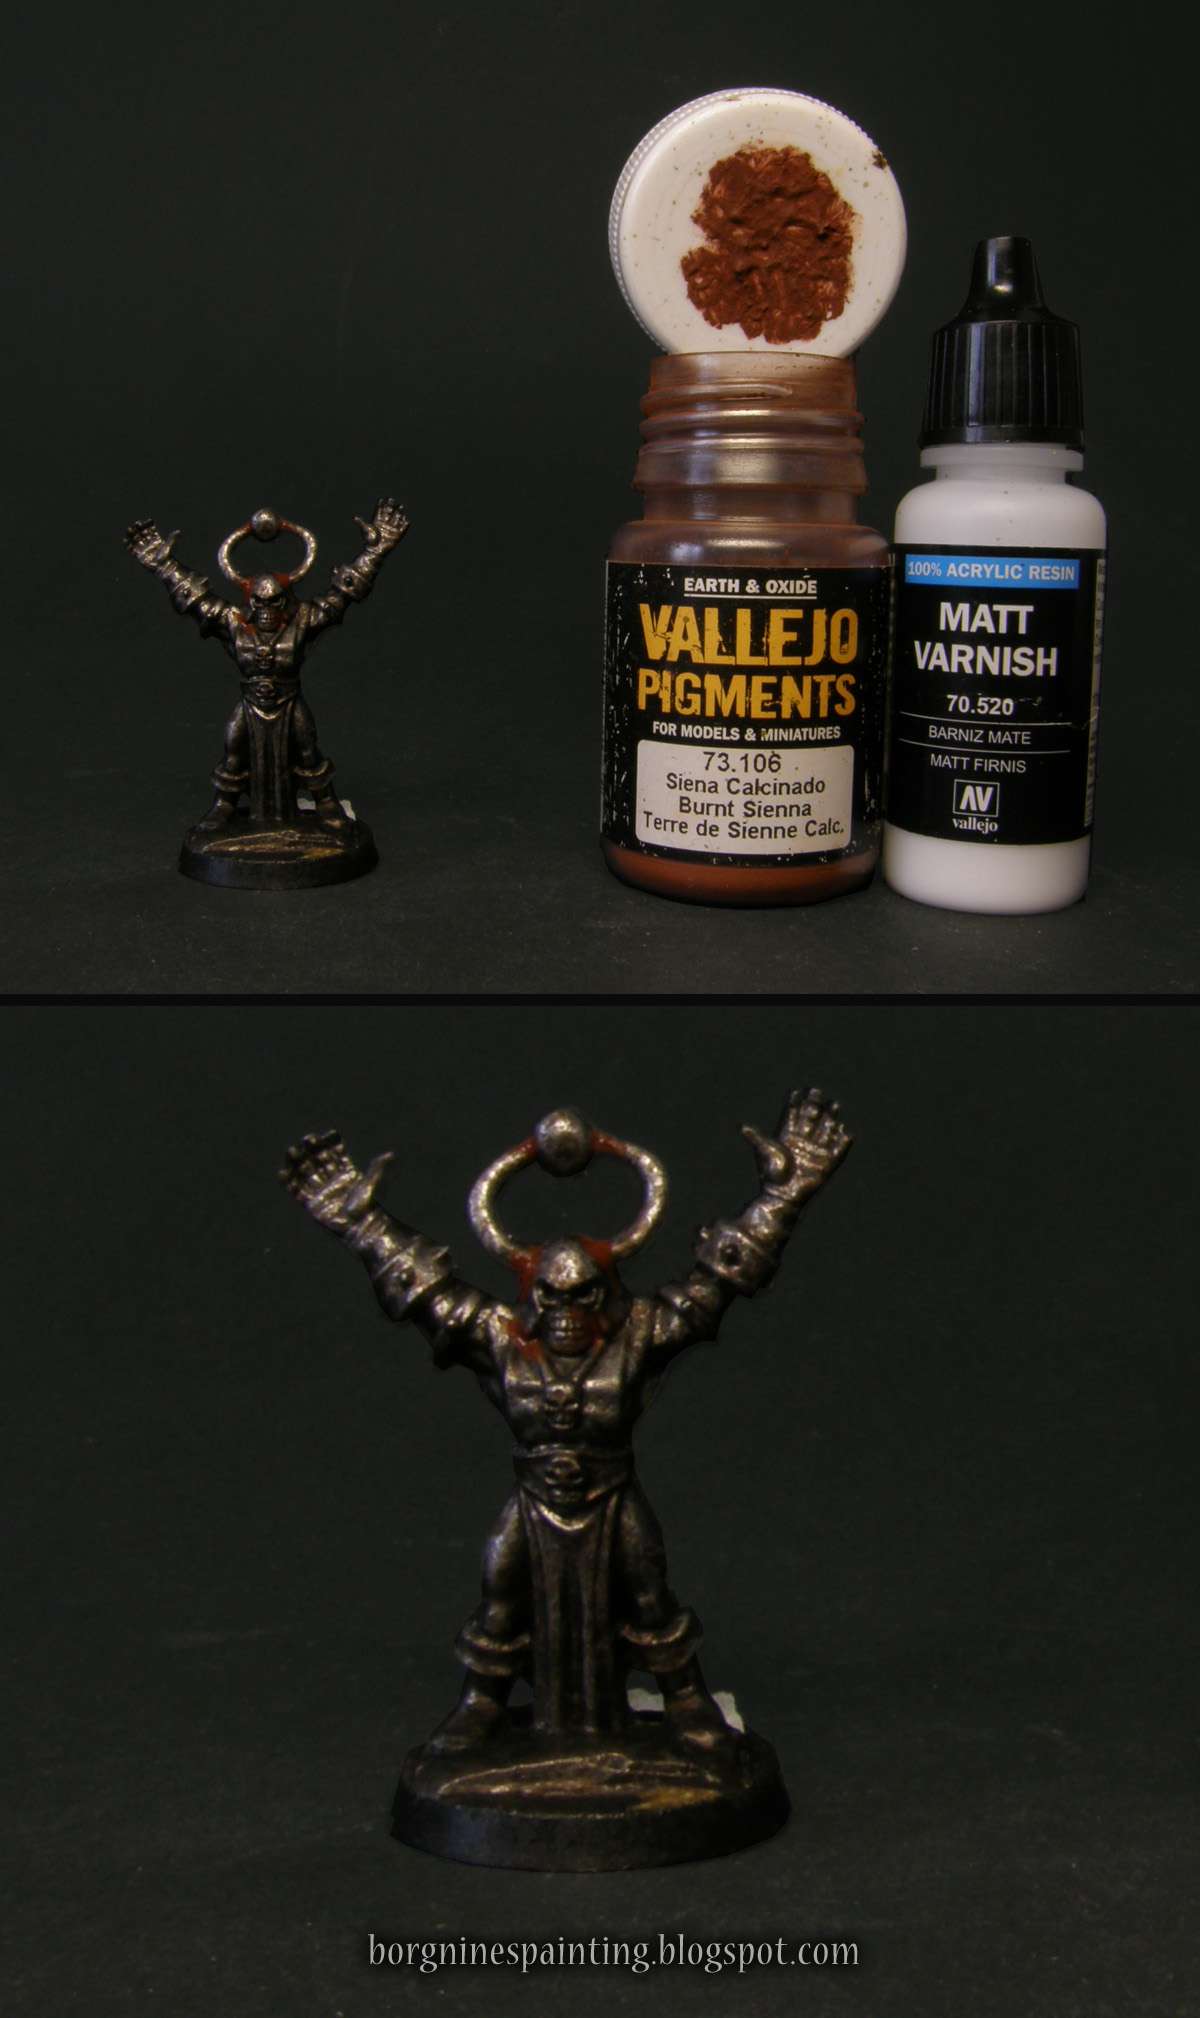
Now it's time for some rust! For this, I am using two pigments - one for old rust that's gathered on most of the areas and is very weathered and another for much fresher rust. First one is Burnt Sienna - I am using Vallejo, but other companies' pigments should work the same. I mix it in 1:2 proportion with Vallejo Matt Varnish (needs to be shaken really, really good, can come out glossy if unshaken). After mixing I take an old and tiny brush and put it in large(ish) blobs in all the recesses. Seen below, only around the head:

Photo showing the first step of applying the pigment, with a small amount of it concentrated around the base of the miniature's horns - with a pot of Vallejo Burnt Sienna pigment and Vallejo Matt Varnish visible on the right.

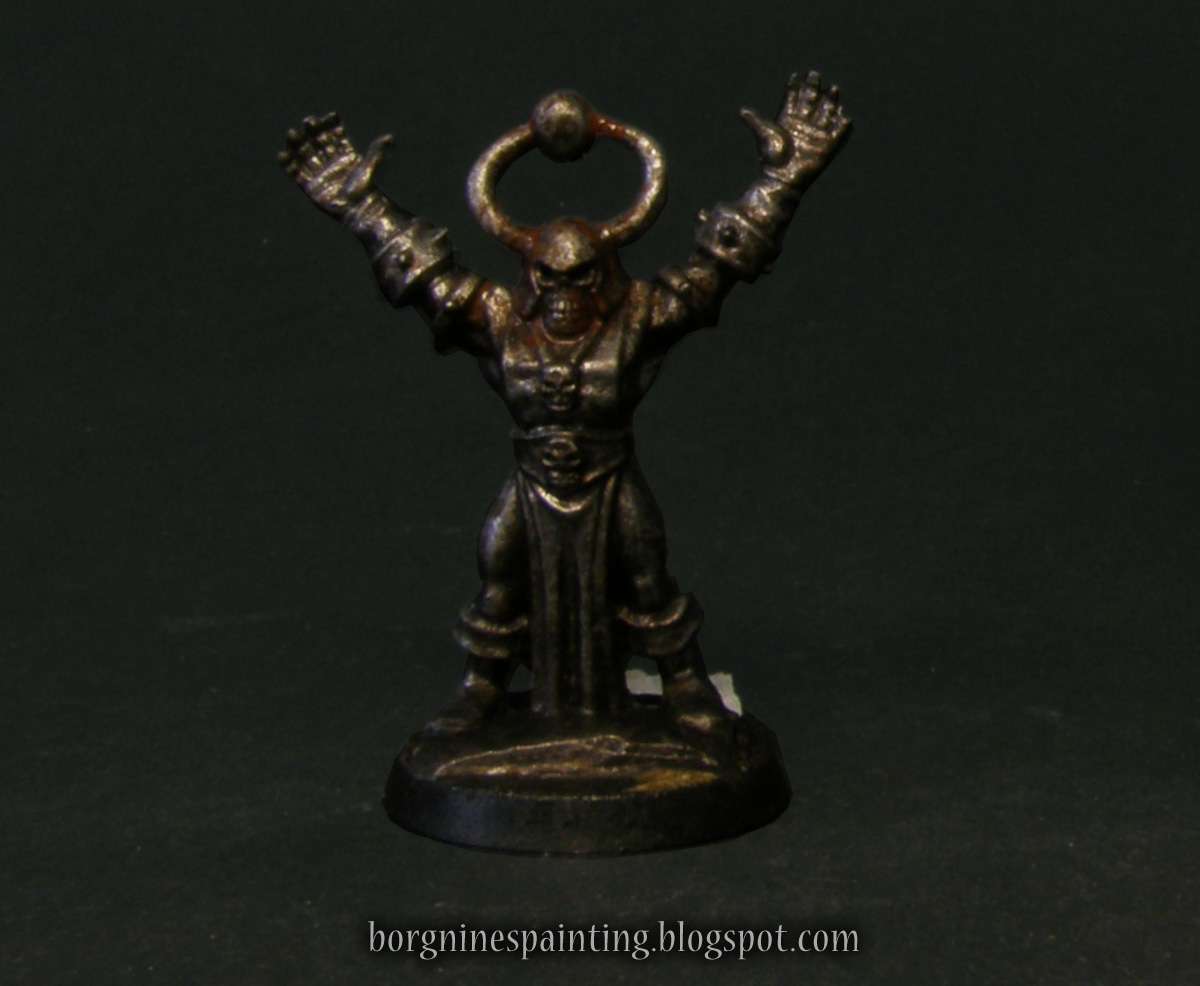
After around half a minute after that, I take a larger brush, take in lots of water in it and then messily brush around the pigment. Most of it would stay in the recess, but the rest should be spread around, creating a dirty, weathered effect. Seen below, only around the head:

Photo showing the second step of applying the pigment, with the small amount of pigment from the previous picture was spread around with a very wet brush.

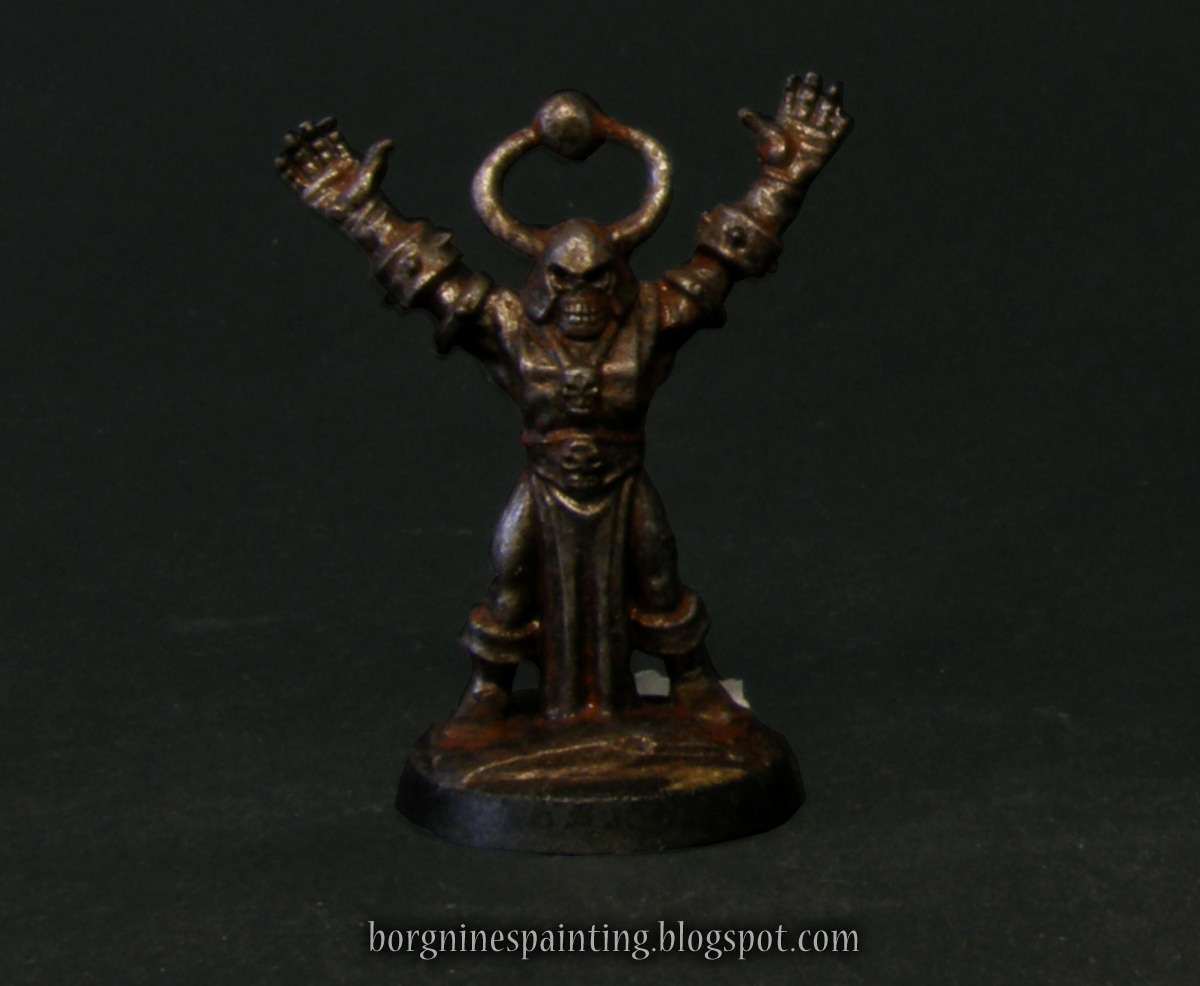
Then, the process should be repeated on the whole mini. It can be done in one take, especially on a small mini like that (I wanted to show the principle first), but on larger minis, the pigment can dry before you start applying water to it, so plan your painting accordingly.

The amount of rust used in this step is up to you, depending on how rusted you would like your miniature. First time I tried making this tutorial I overdid it and the sorcerer wasn't similar at all to the Faceless - so next time I did it much subtler.

Photo the miniature with the pigment applied all over it, thicker and more visible in the recesses, with small amounts on other surfaces.

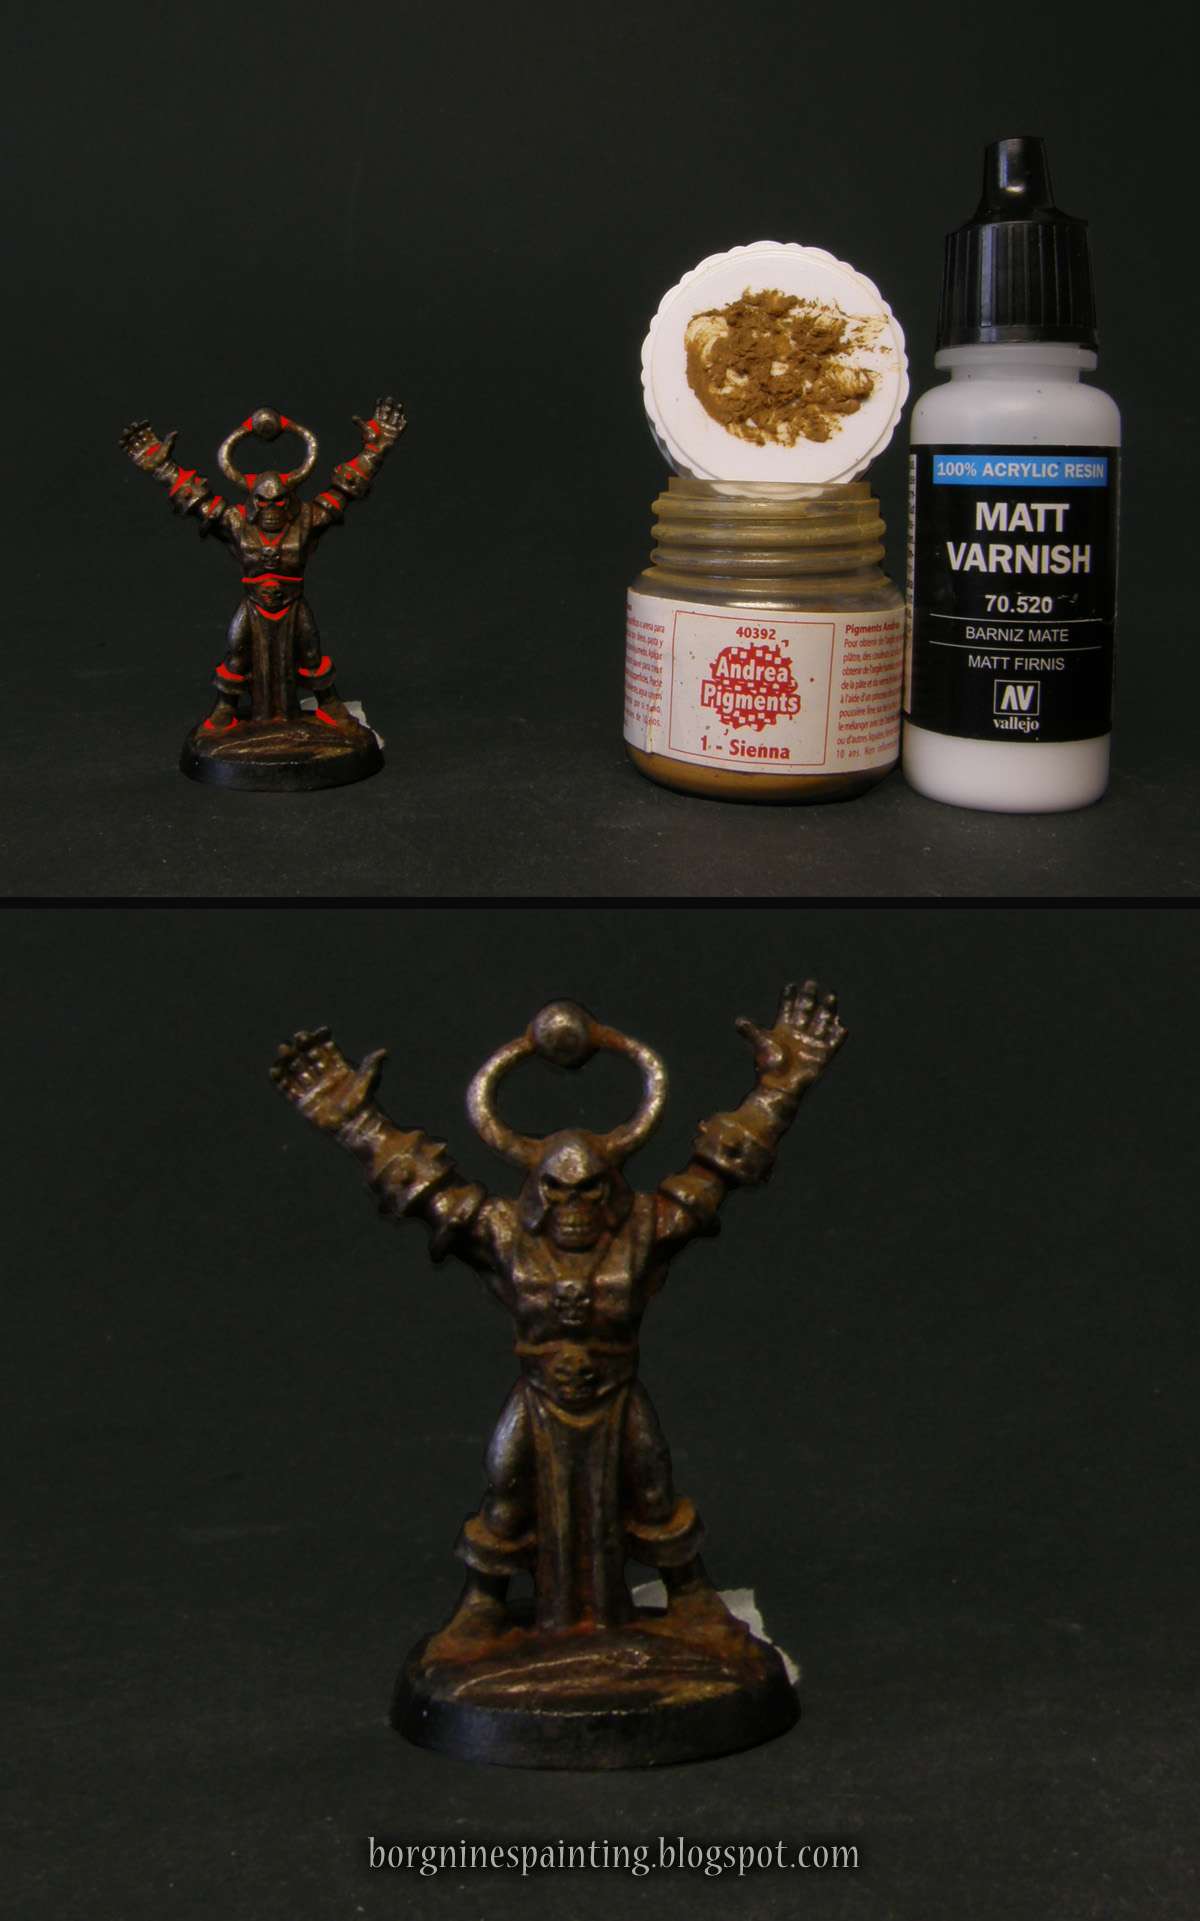
When the first layer of rust is dry, it's time for the next layer. Here I used a Sienna pigment, which is lighter and much more yellow. The technique and proportions are the same as before, only this time you shouldn't spread is as much with water, only a little bit. The trick here is to apply it to areas on the mini where the water would gather the most - so all the recess parts that are not on the undersides - I marked those areas with red on the picture below.

Photo showing the areas where the next pigment should be applied, with a red overlay - in the deepest recesses of the model. A pot of Vallejo Sienna pigment and Vallejo Matt Varnish are visible on the right.

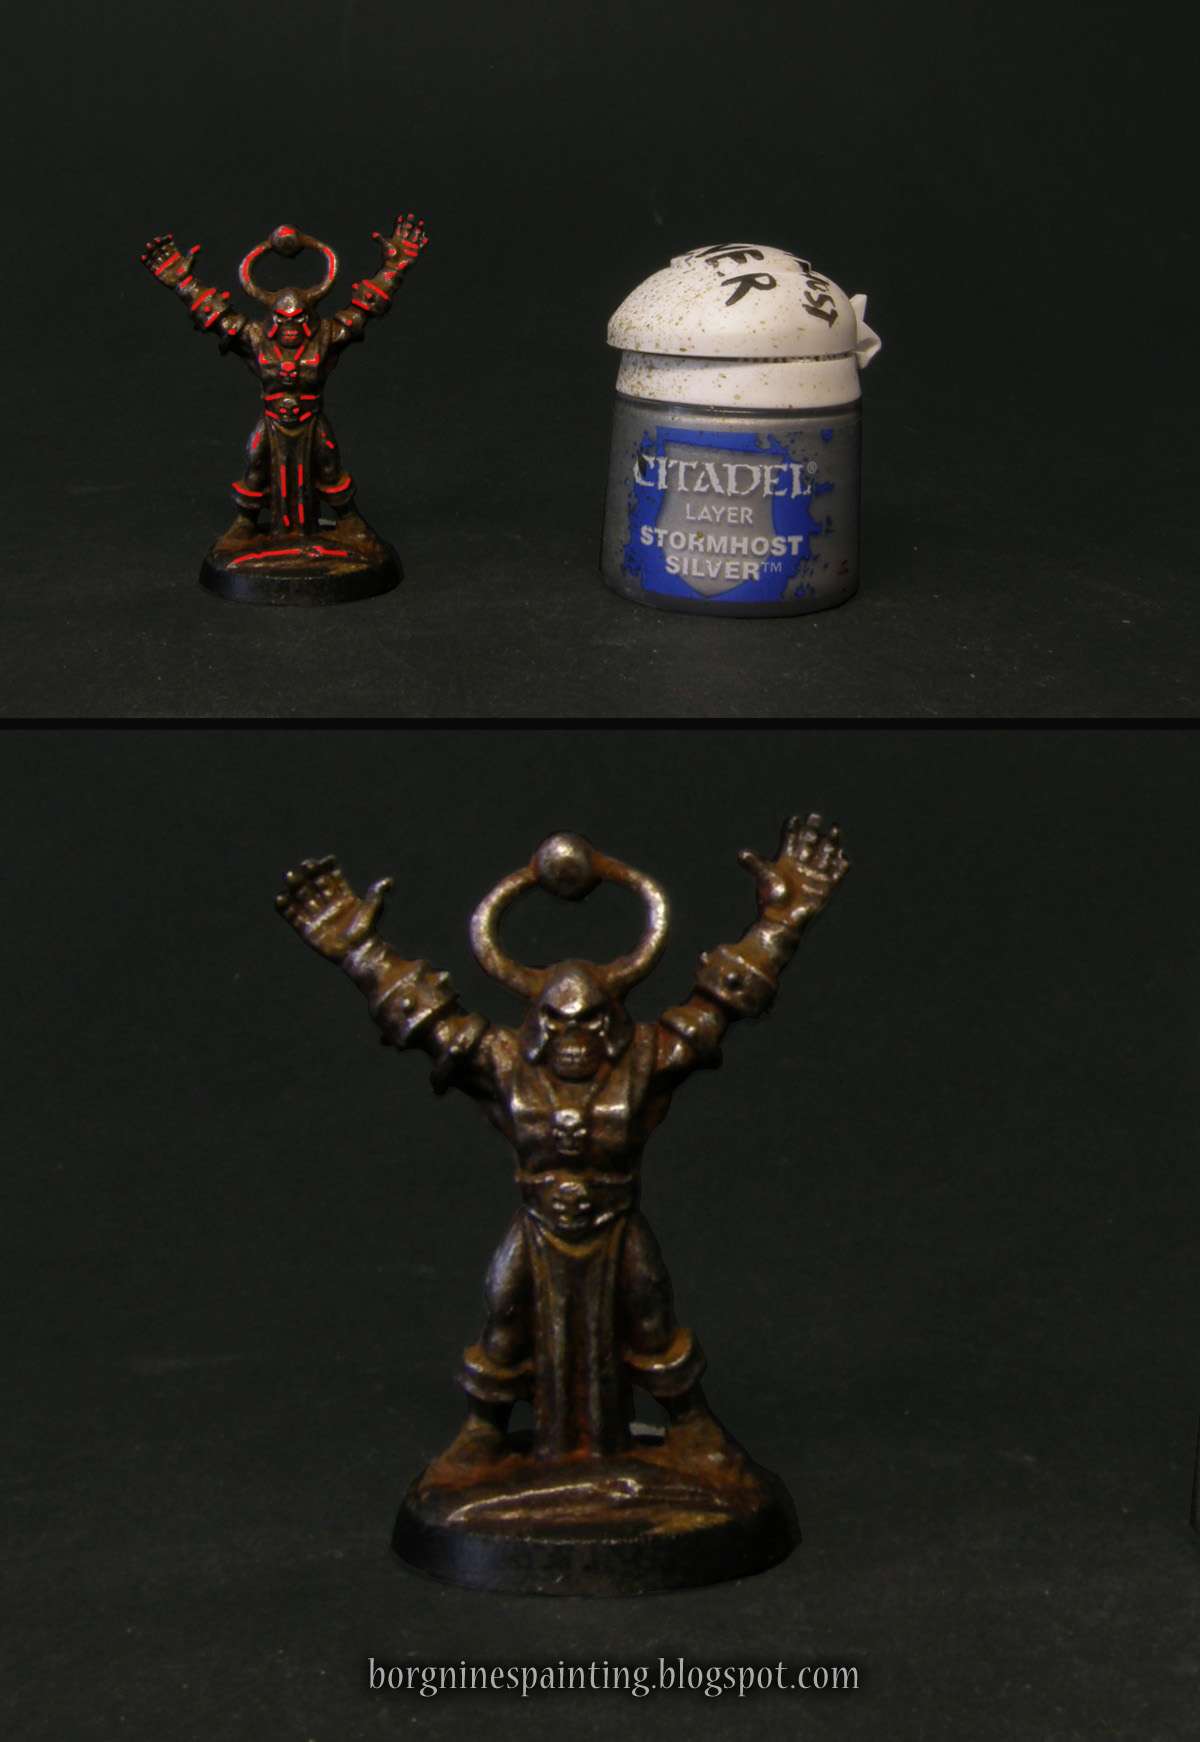
Now, the highlights. I used Stormhost Silver, but any other bright silver can be used instead - and because of how bright it is, it should be used sparingly. I applied it as an edge highlight on the most raised areas or as tiny dots on the rivets and other pointy details. As before, shown below in red how I used it:

Photo showing the areas where the extreme metallic highlights should be applied, with a red overlay - in the most raised edges and points. A pot of Stormhost Silver paint is visible on the right.

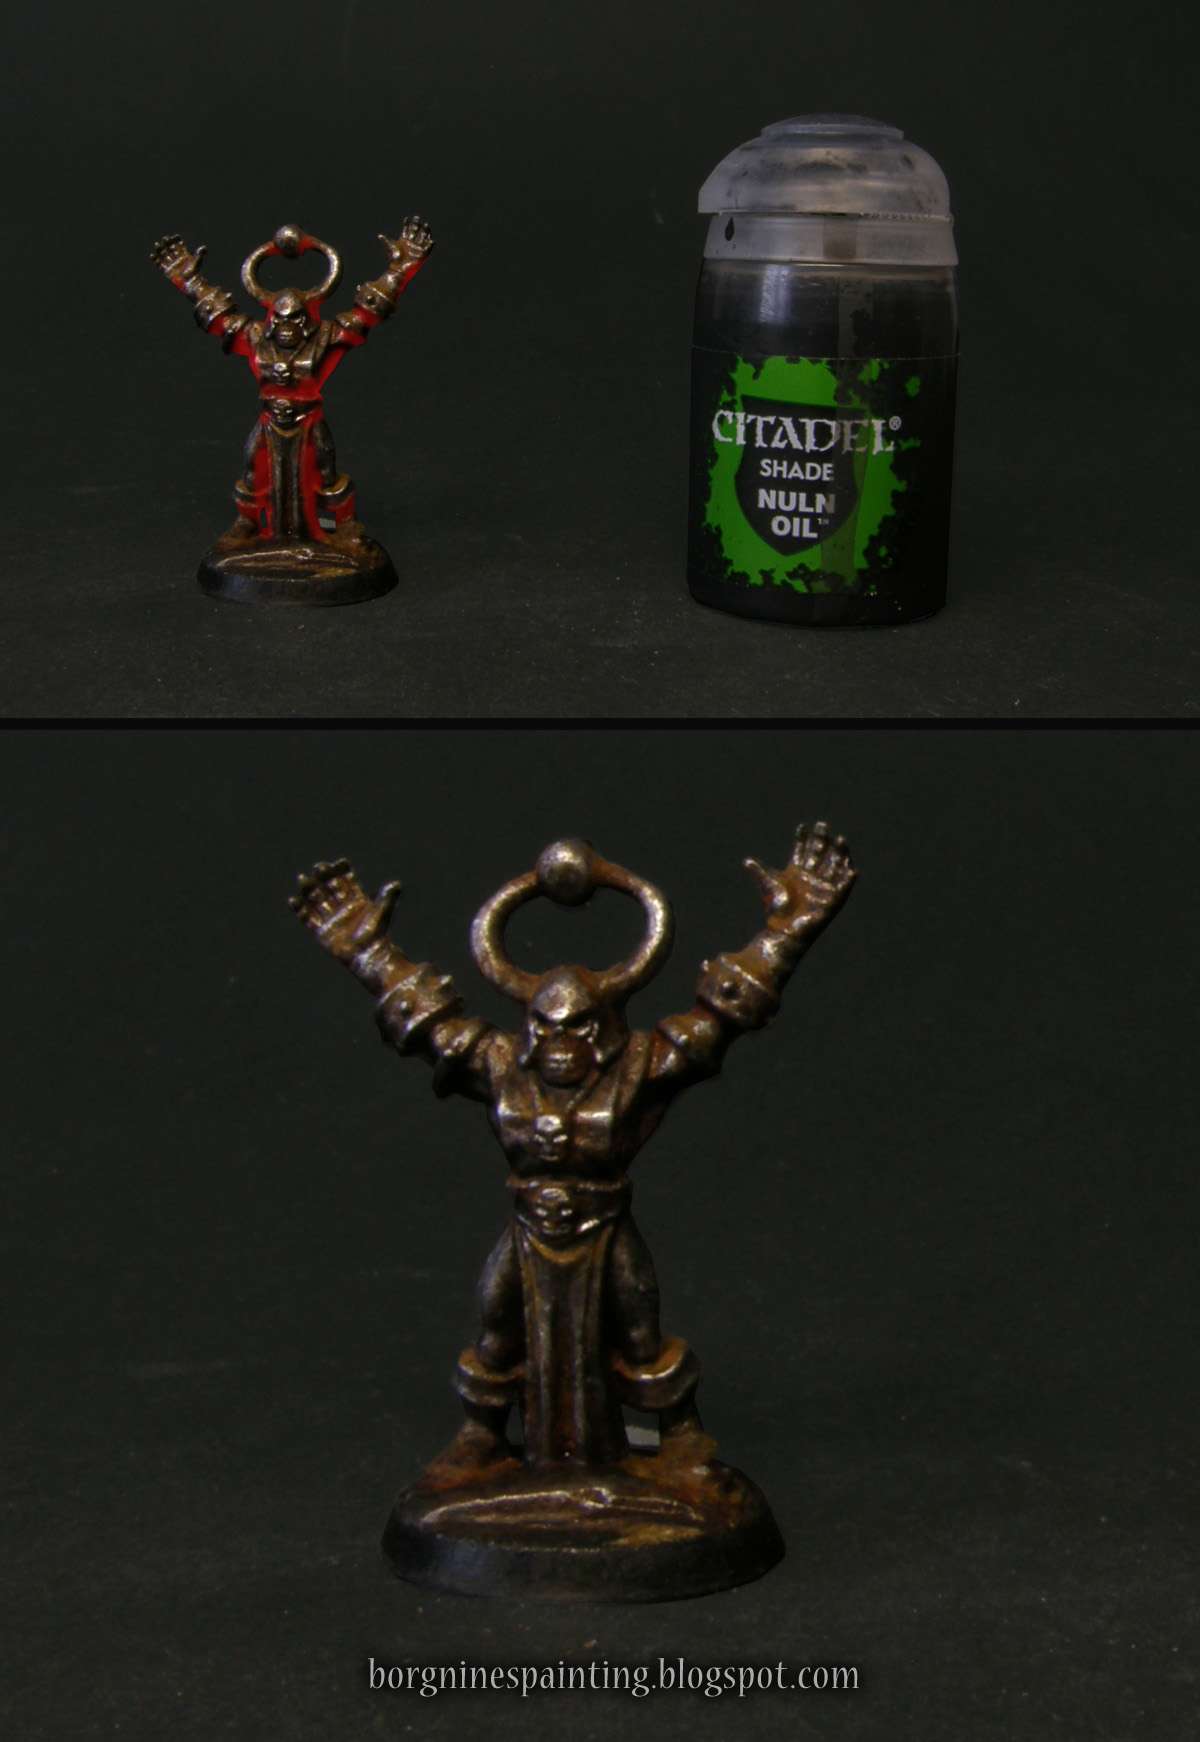
Because the pigments can flatten the miniature a bit, the final step is to deepen the shaded areas with some Nuln Oil. I applied it on all the undersides of the mini, shown below in red. The trick is to wipe the excess of the wash from the brush (it shouldn't be full and dripping) and brush it towards the darkest, most recessed area (wet paint tends to be the thickest where you take the brush off the mini). This should create a gradient, with a much smoother effect.

Photo showing the areas where the darkening shade should be applied, on the undersides of the miniature, with a soft, red overlay. A pot of Nuln Oil wash paint is visible on the right.

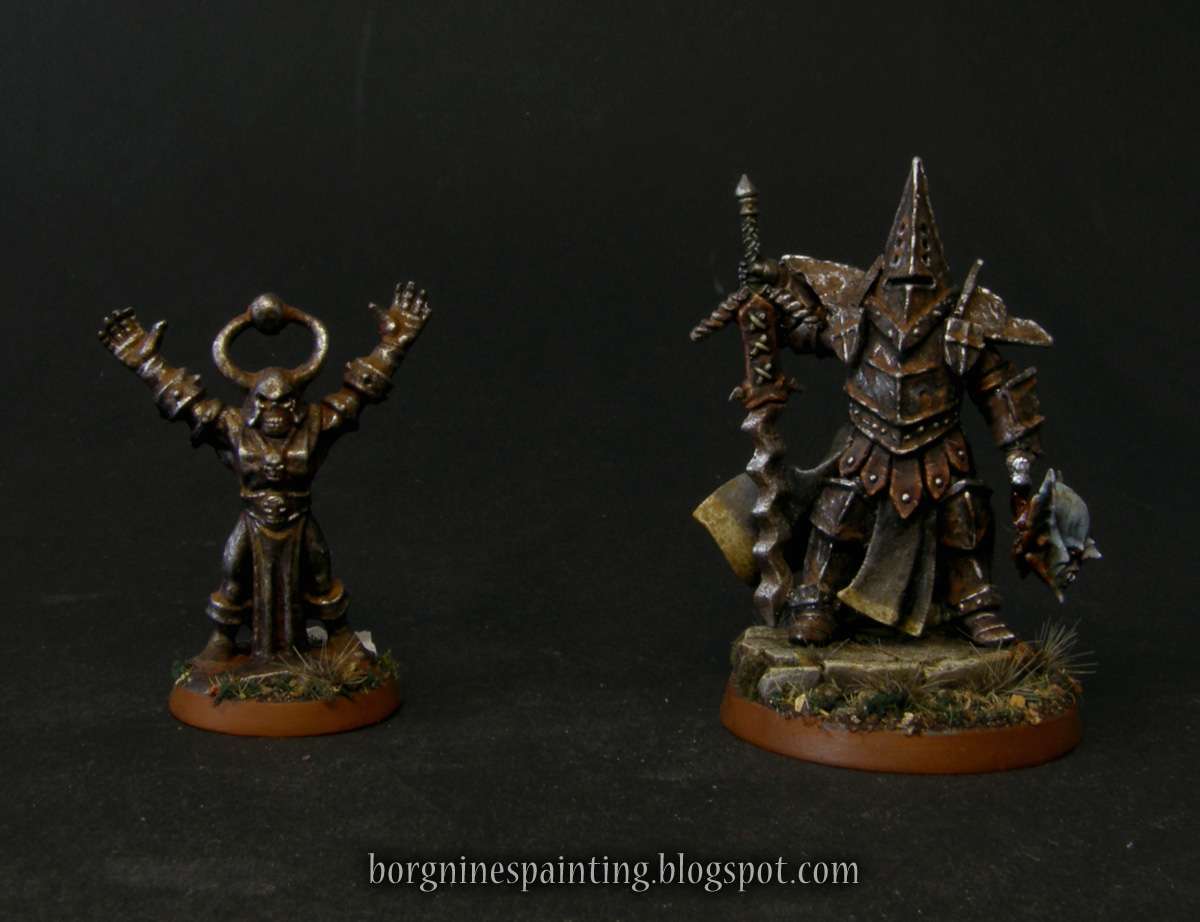
And that's it, the rusted statue is ready. I based him and set him beside the Crusader from the warband that started this whole rusted scheme. This brave chaos sorcerer will be used as a marker in my games - and if I ever need him in some more responsible role, I will just strip him and repaint him.

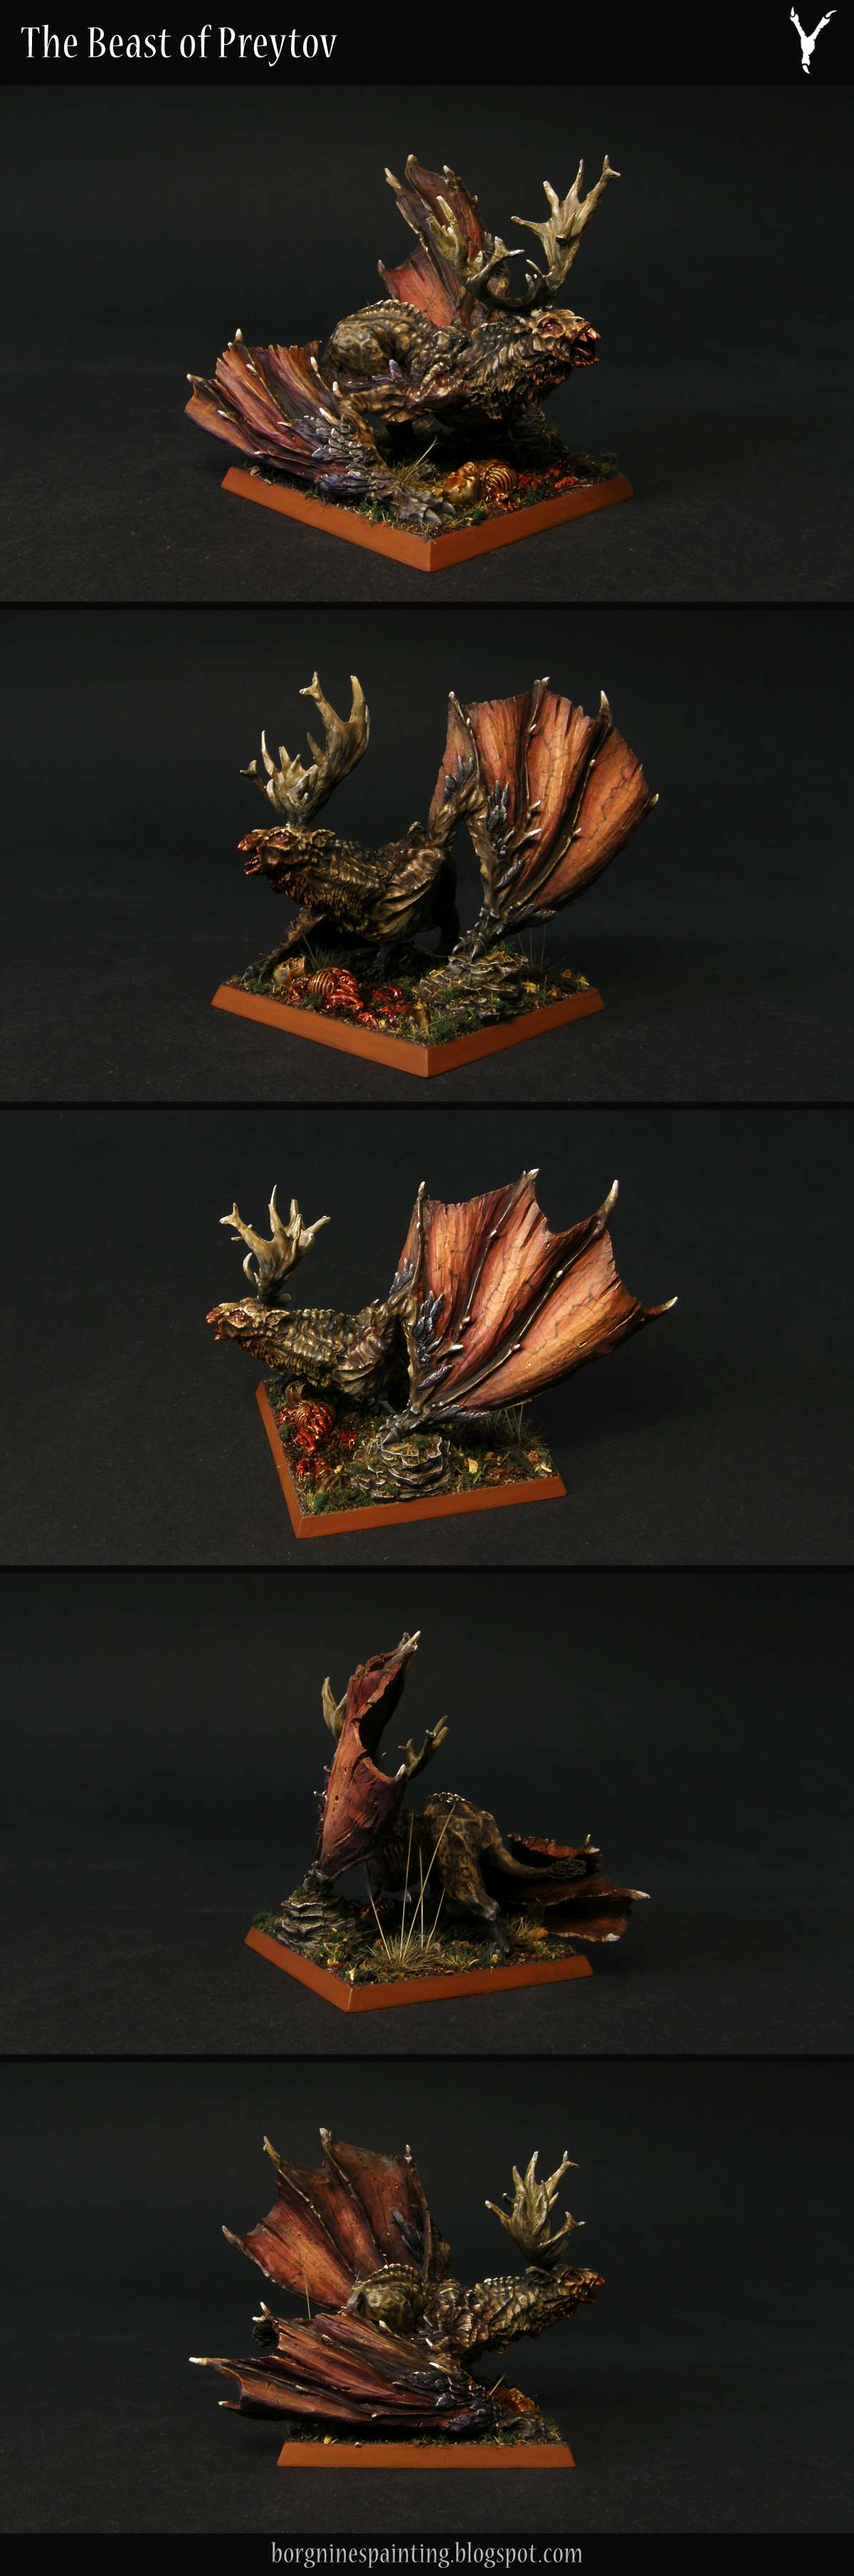
Photo showing the final comparison of the miniatures - the one from the tutorial on the left and the converted Stormcast Eternal on the right.

Sunday, April 14, 2019

Blood Bowl Star Players - Roxanna Darknail & Torles the Unlucky

Shortly after the Assassins come the Star Players - the last part of the Dreadspear Dragons Blood Bowl team - for now, at least. I have some inducements planned for the evil elves, but first I would like to actually finish the Nurgle team.


The dragons may be a relatively fresh team, but they do employ star players from time to time. One of them is Roxanna Darknail, a big druichii star. She took a liking to the team’s pet dragon - and while she didn’t want to participate in the wreck that was the previous iteration of the group, she is eager to help now that the things are better.

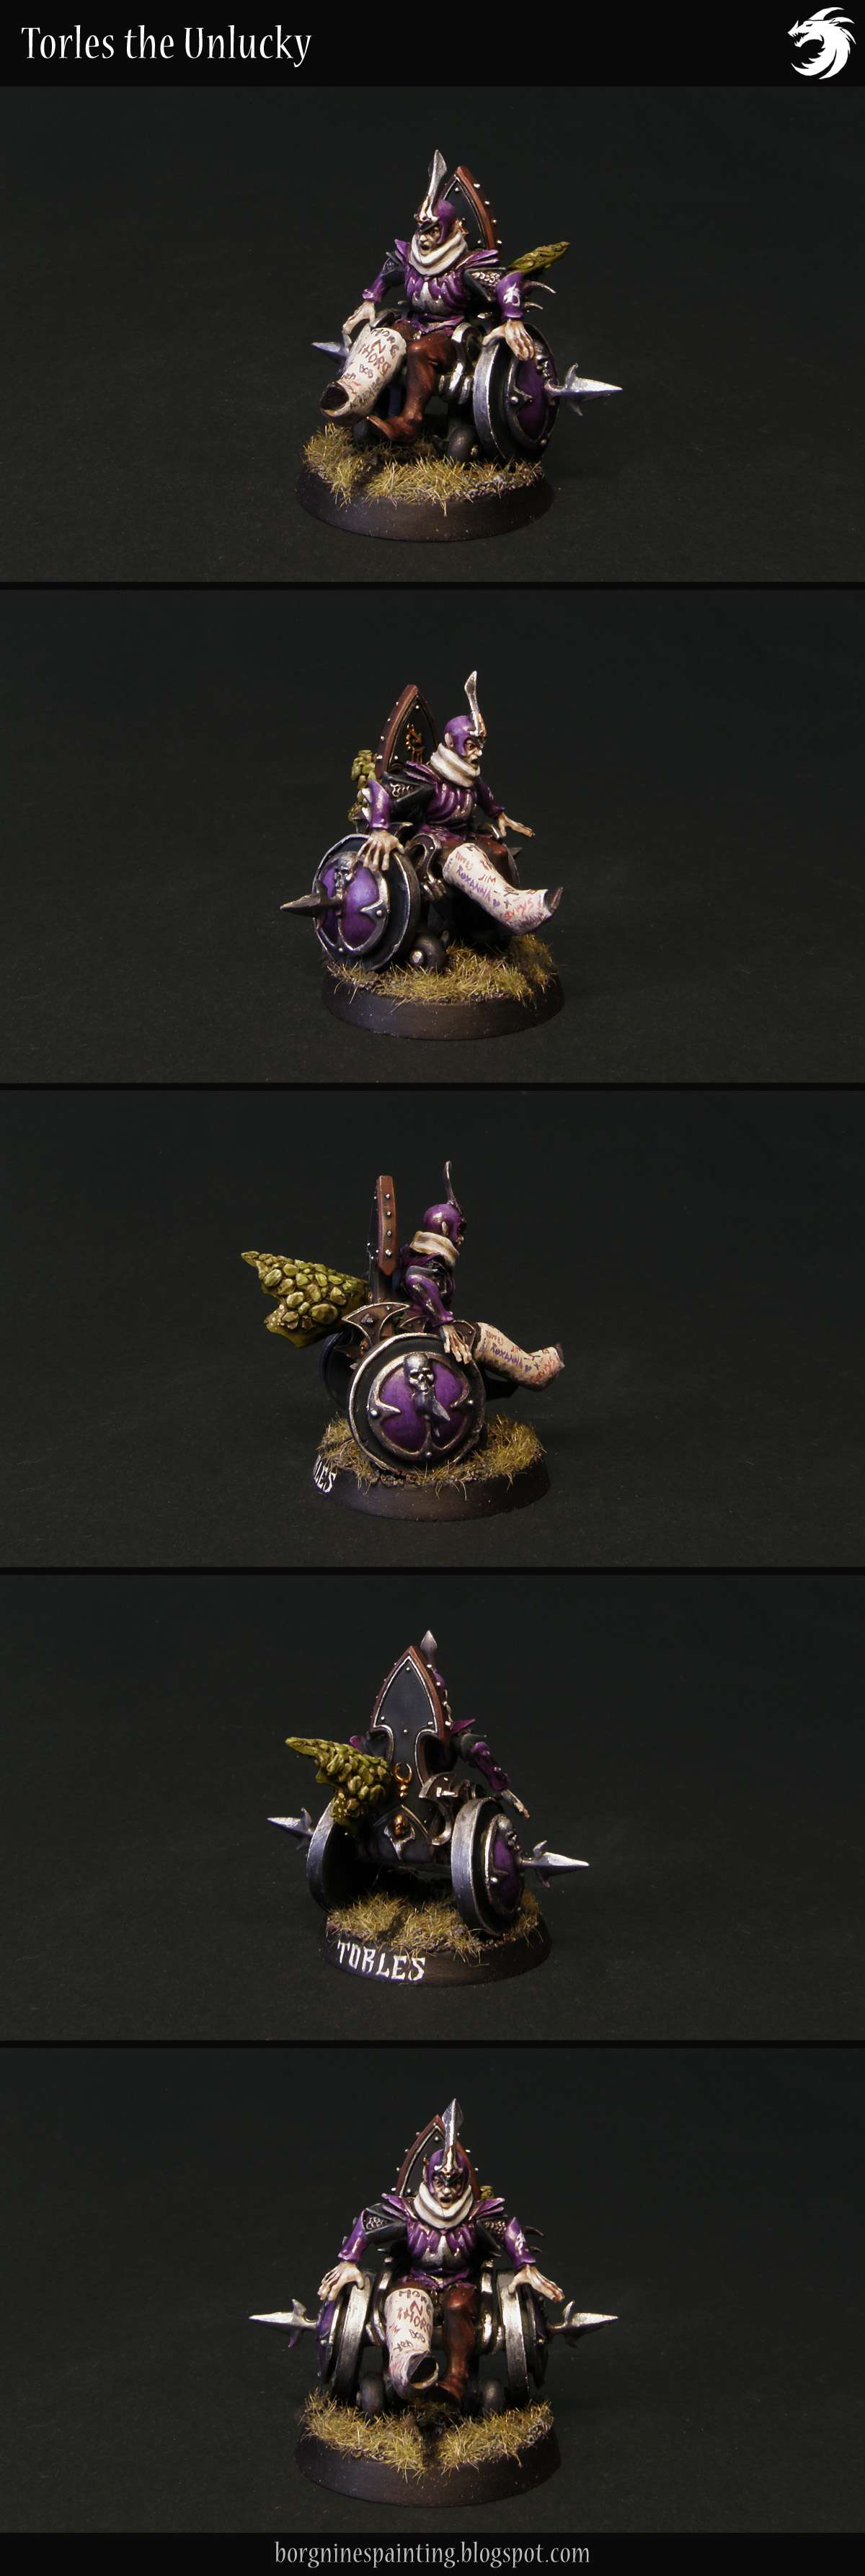
The other one is much less known, but very important for the Dragons - Torles the Unlucky, the last living member of the previous team, still donning the old armor. Although talented and skilled, he couldn’t completely avoid the mismanagement of the past - and kept getting injured on the pitch, collecting more and more injuries. Because of budget cuts - and because people wanted to see him - he was forced to play, no matter his health. Not that he complained - he was skilled enough to be useful and passionate about the sport. Then he would get injured again, starting the whole cycle anew. Soon, he made a whole career out of it - showing up on various pitches - to score against all odds and get injured spectacularly. Commentators still argue if he’s really unlucky or actually very lucky - compared to other elves in his position, he gets mangled more often, while actually not dying in the process!

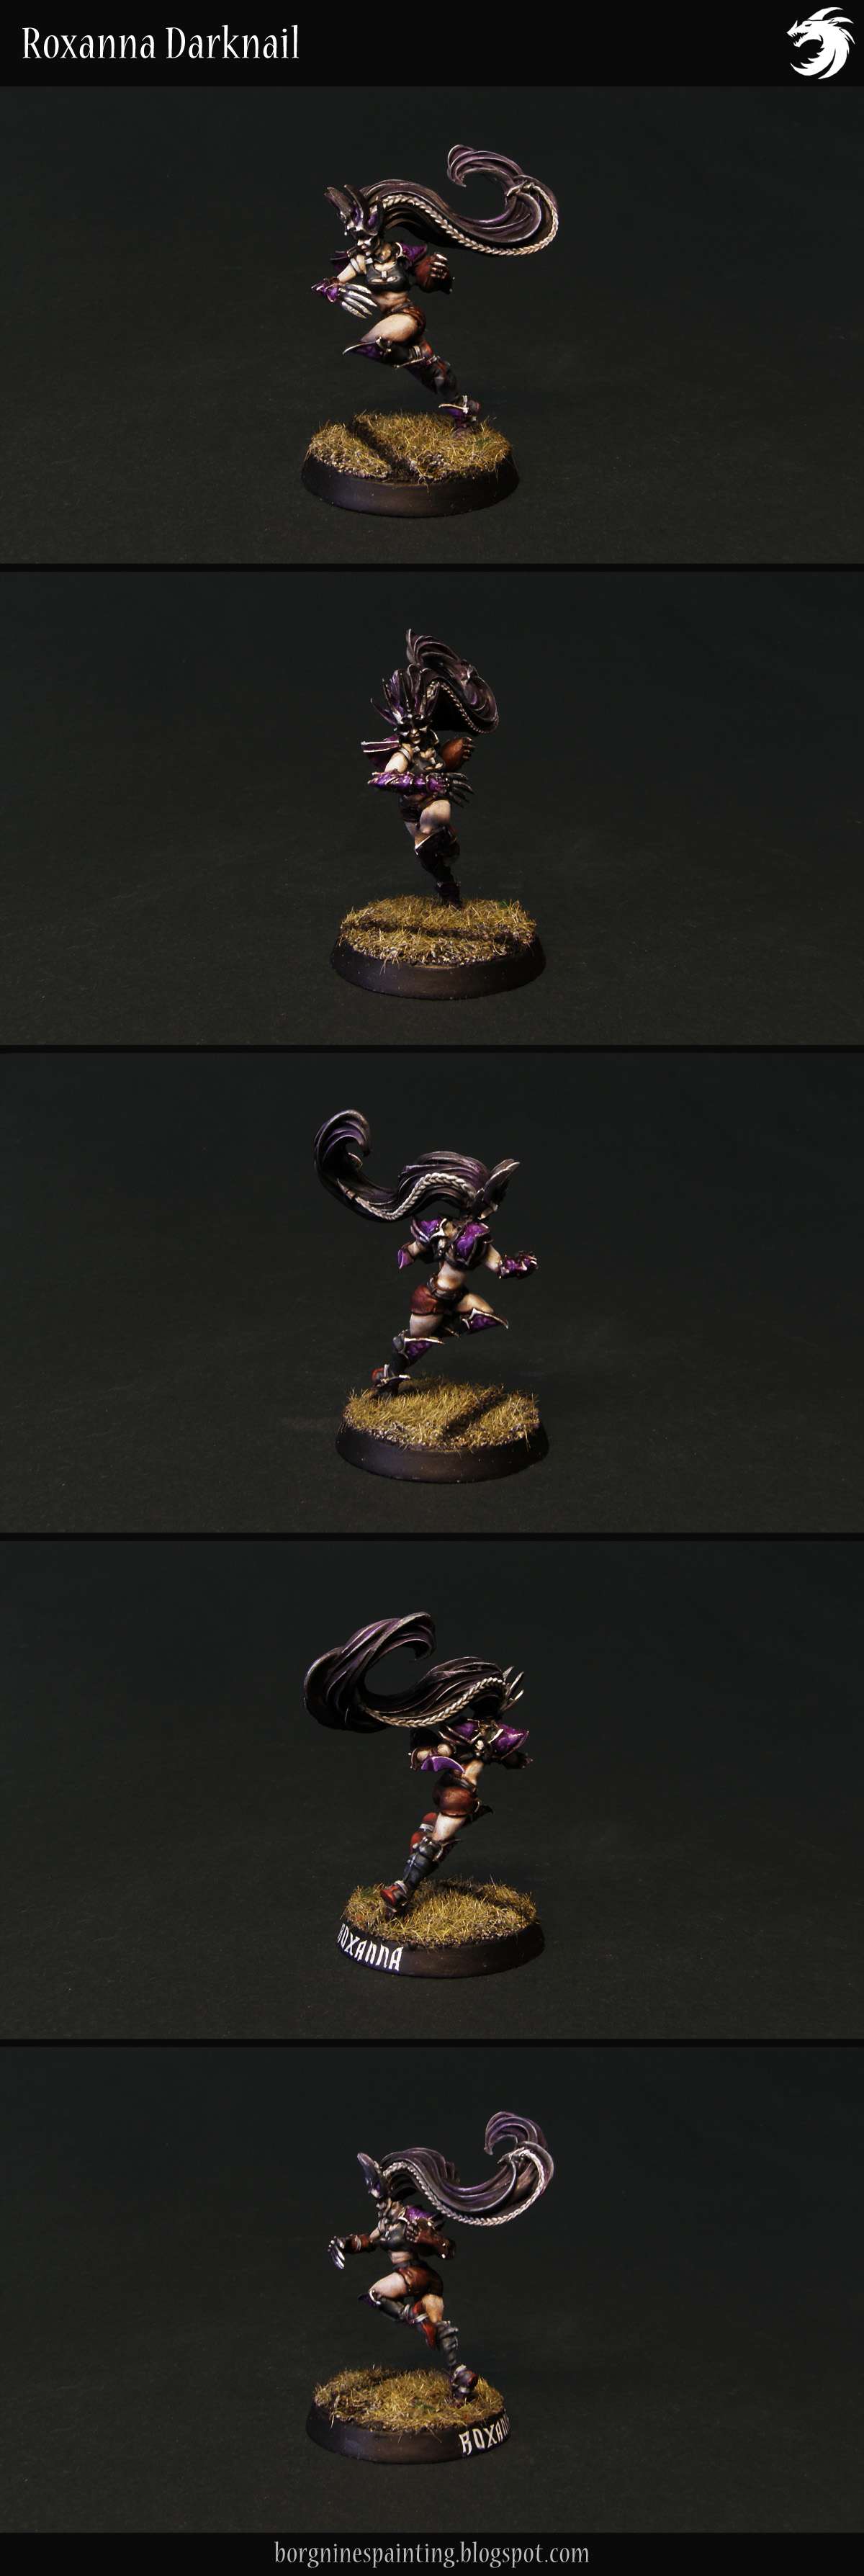
First one is Roxanna Darknail, an official and completely non-converted miniature from Forge World. She was a tough one - the most important part of her are her hair, the thing I often most struggle with. I tried to make them special with the white braids and some purple highlights, but I will leave it to you to decide if it worked well enough. Besides that, painting her was similar to the other Witch Elves.

Roxanna Darknail - painted miniature from Forge World, a Dark Elf Star Player for Blood Bowl, painted in a purple color scheme and visible from several angles.

And the second one, a 'star player' built by me, created to commemorate a particularly unlucky Dark Elf lineman that my wife had in her BB video game campaign. I kitbashed him out of various bits, greenstuff and other random objects that were laying around my workshop - you can see the WIP version HERE. Painting him was nice enough, but the most interesting part was easily the cast on his leg - I painted various signatures there, from his team-mates to famous Blood Bowl personas from the game lore.

I even came up with some stats for him:

Star Player 'Torles the Unlucky'
MV:6 ST:2 AG:3 AV:9
Skills: Loner, Stand Firm, Sprint, Tackle, Juggernaut, Horns (Wheelchair Momentum)
Cost: 120 000
Usable by Dark Elf and Elven Union teams.

Painted, kitbashed and homebrewed Blood Bowl Star Player for the Dark Elves team, an unlucky, injured player sitting on an elaborate battle-wheelchair