-->

Sunday, July 29, 2018

Zombie Legion - Torn parts

Part of the Zombie Legion.

This batch was brought together rather accidentally, it was only after building the whole horde when I noticed that they kinda fit a common theme. The first one was the ogre, I had a lot of ogre bits laying around after assembling my Crypt Horrors and I wanted to use them somehow. With a head and two hands it was relatively easy to sculpt just the torso with some guts spilling out. The spine was taken from a skeletal horse model, you can see the unpainted conversion HERE.

The parts of a giant was my attempt at using all the extra parts from the Giant box. There are so many additional body parts there, it would be a waste to not use them somehow. It was just a matter of sculpting some additional flesh to show that the part in question was indeed torn or cut off. Even though there are giant hands in the kit, the hand crawling here comes from the Beastmen Ghorgon kit - I bought the spare bits from someone on ebay mostly just to get that limb and make it crawl together with my zombies. Its position was perfect for my needs, I just needed to sculpt the torn stump and insert a toothpick and a bone from the Crypt Horrors kit there. You can find the unpainted versions of the head and the hand in the WIP post HERE.


It’s no difference for a necromancer whether the raises whole bodies or only parts of them - even a single hand can crawl if it’s instilled with dark magic - it just isn’t worth it most of the times. Unless one finds a giant or an ogre - that’s something else. Of course it would be ideal to raise such behemoths whole, but Constantin doesn’t complain when he happens upon just some torn pieces. A crawling giant’s hand can still crush a grown man and an ogre ripped in two will still messily devour anything unlucky to be caught by it.

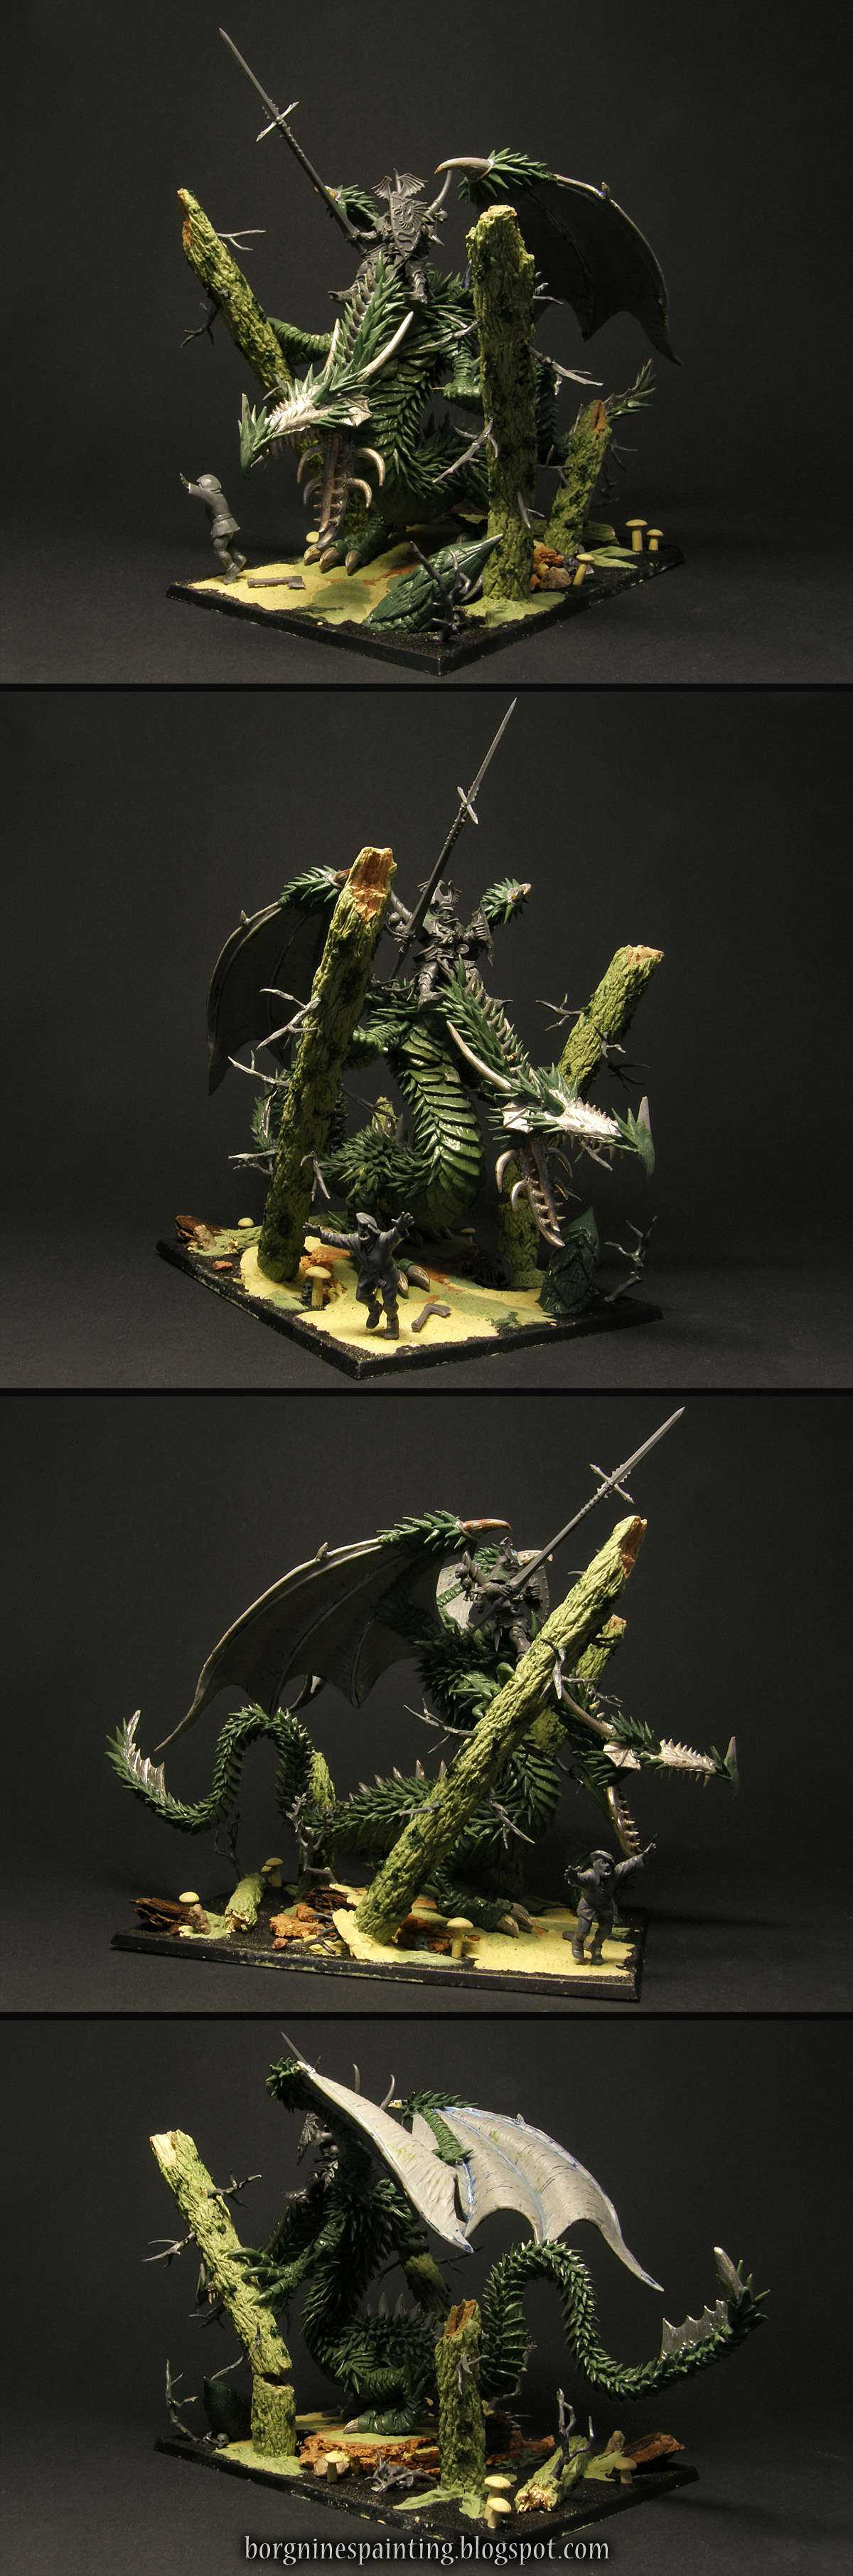
Several rectangular bases of fillers and miniatures for a Zombie Unit of tabletop miniatures. There is an undead giant head, foot and a Ghorgon hand and an ogre torn in half, with intestines trailing behind him. All miniatures are shown from several angles.

Sunday, July 22, 2018

Zombie Legion - Command Groups

Part of the Zombie Legion

More zombies while I am meticulously painting all the individual scales on the dragon...

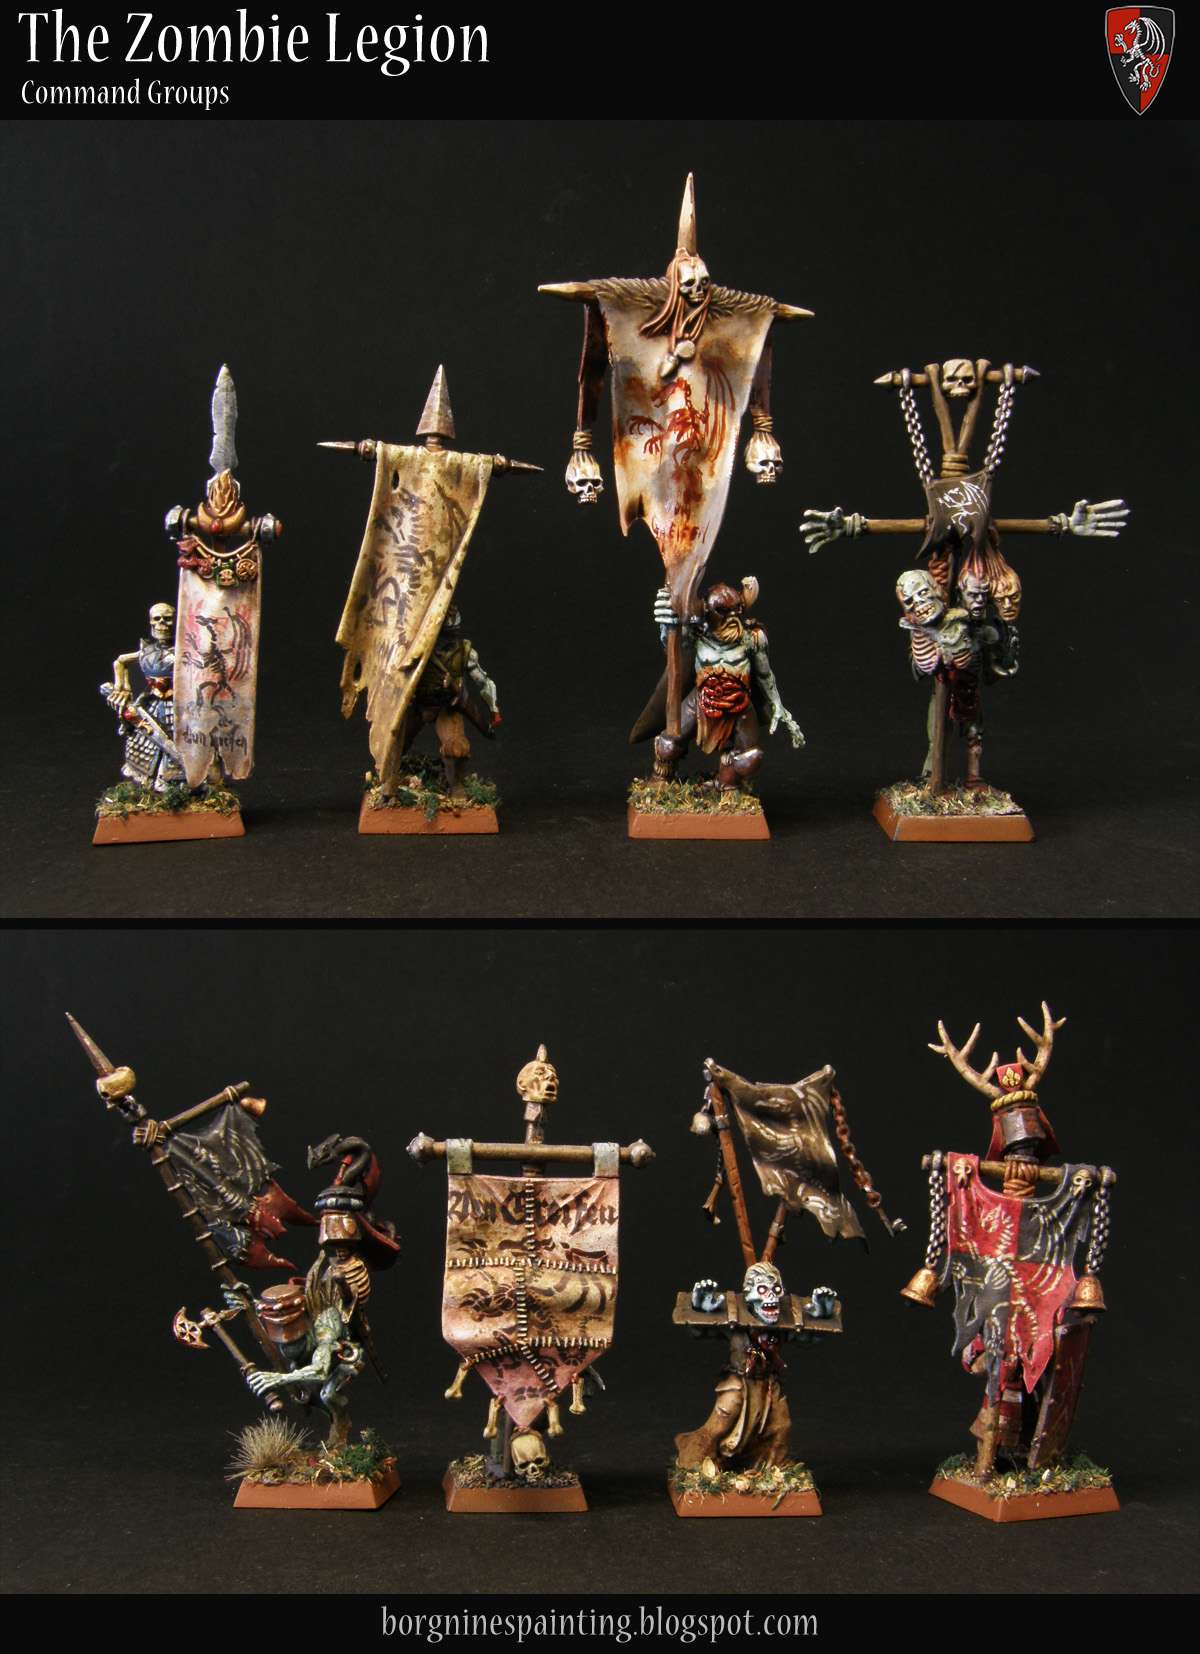
Now, these were fun! Ever since the very beginning I have been trying to assign one command group to every zombie unit. Champion included, even if zombies cannot have champions in 8th edition WFB. Not only those groups made them look more organized, which I like, but they were also very good from the hobby standpoint - lots of converting, freehands, creating more interesting dudes than just your usual wound markers.


Constantin likes his horde somehow organized, at least slightly resembling real military units. He achieves this by giving each section a command group, with his family banner, a musician and a single zombie dressed like an officer. Surprisingly, this somehow improves their performance on the battlefield. It is unknown, if it’s because of the residual memories in each walking corpse are making them fight better under one command, or because it makes vampires and necromancers easier to focus their magic better when they can recognize each unit on the battlefield. No matter what it is, Constantin keeps the command groups gladly, replacing them after each battle as soon as possible.

First, the champions and the musicians. For this purpose, a champion was basically any zombie that is sticking its weapon into the air - and I actually ended with more of them than 8, so I had to choose some favorites. Musicians were also fun to build - I have so many leftover instruments laying around, I could do twice the amount needed - and every one was a cool modeling opportunity. Like that half of a zombie sitting on a carriage - I was really running out of legs so I got creative with some balsawood.

Tabletop miniature zombies for my horde unit - 8 champions and then 8 musicians, almost all of them kitbashed, converted and painted to be different and unique. They are all standing on square bases.

And the standard bearers - with their height, I couldn't fit them on one picture with the rest. As with the musicians, I could use a lot of my spare banners thanks to them - and they were also a freehand opportunity too! I tried painting my usual von Greifen coat of arms in many different colors and styles. It would be good to mention here that the ghoul with a bretonnian helmet, holding an axe, that's something I copied from one creative take on the Flesh-Eater Courts, done by the user Dez in the Dark Age of Sigmar thread on TGA community HERE.

Tabletop miniature zombies for my horde unit - 8 standard bearers, almost all of them kitbashed, converted and painted to be different and unique. They are all standing on square bases.

Sunday, July 15, 2018

Varsavian Hermits - WIP

While I have been working on the dragon, I managed to fit a small WIP project to have something new to show this week.

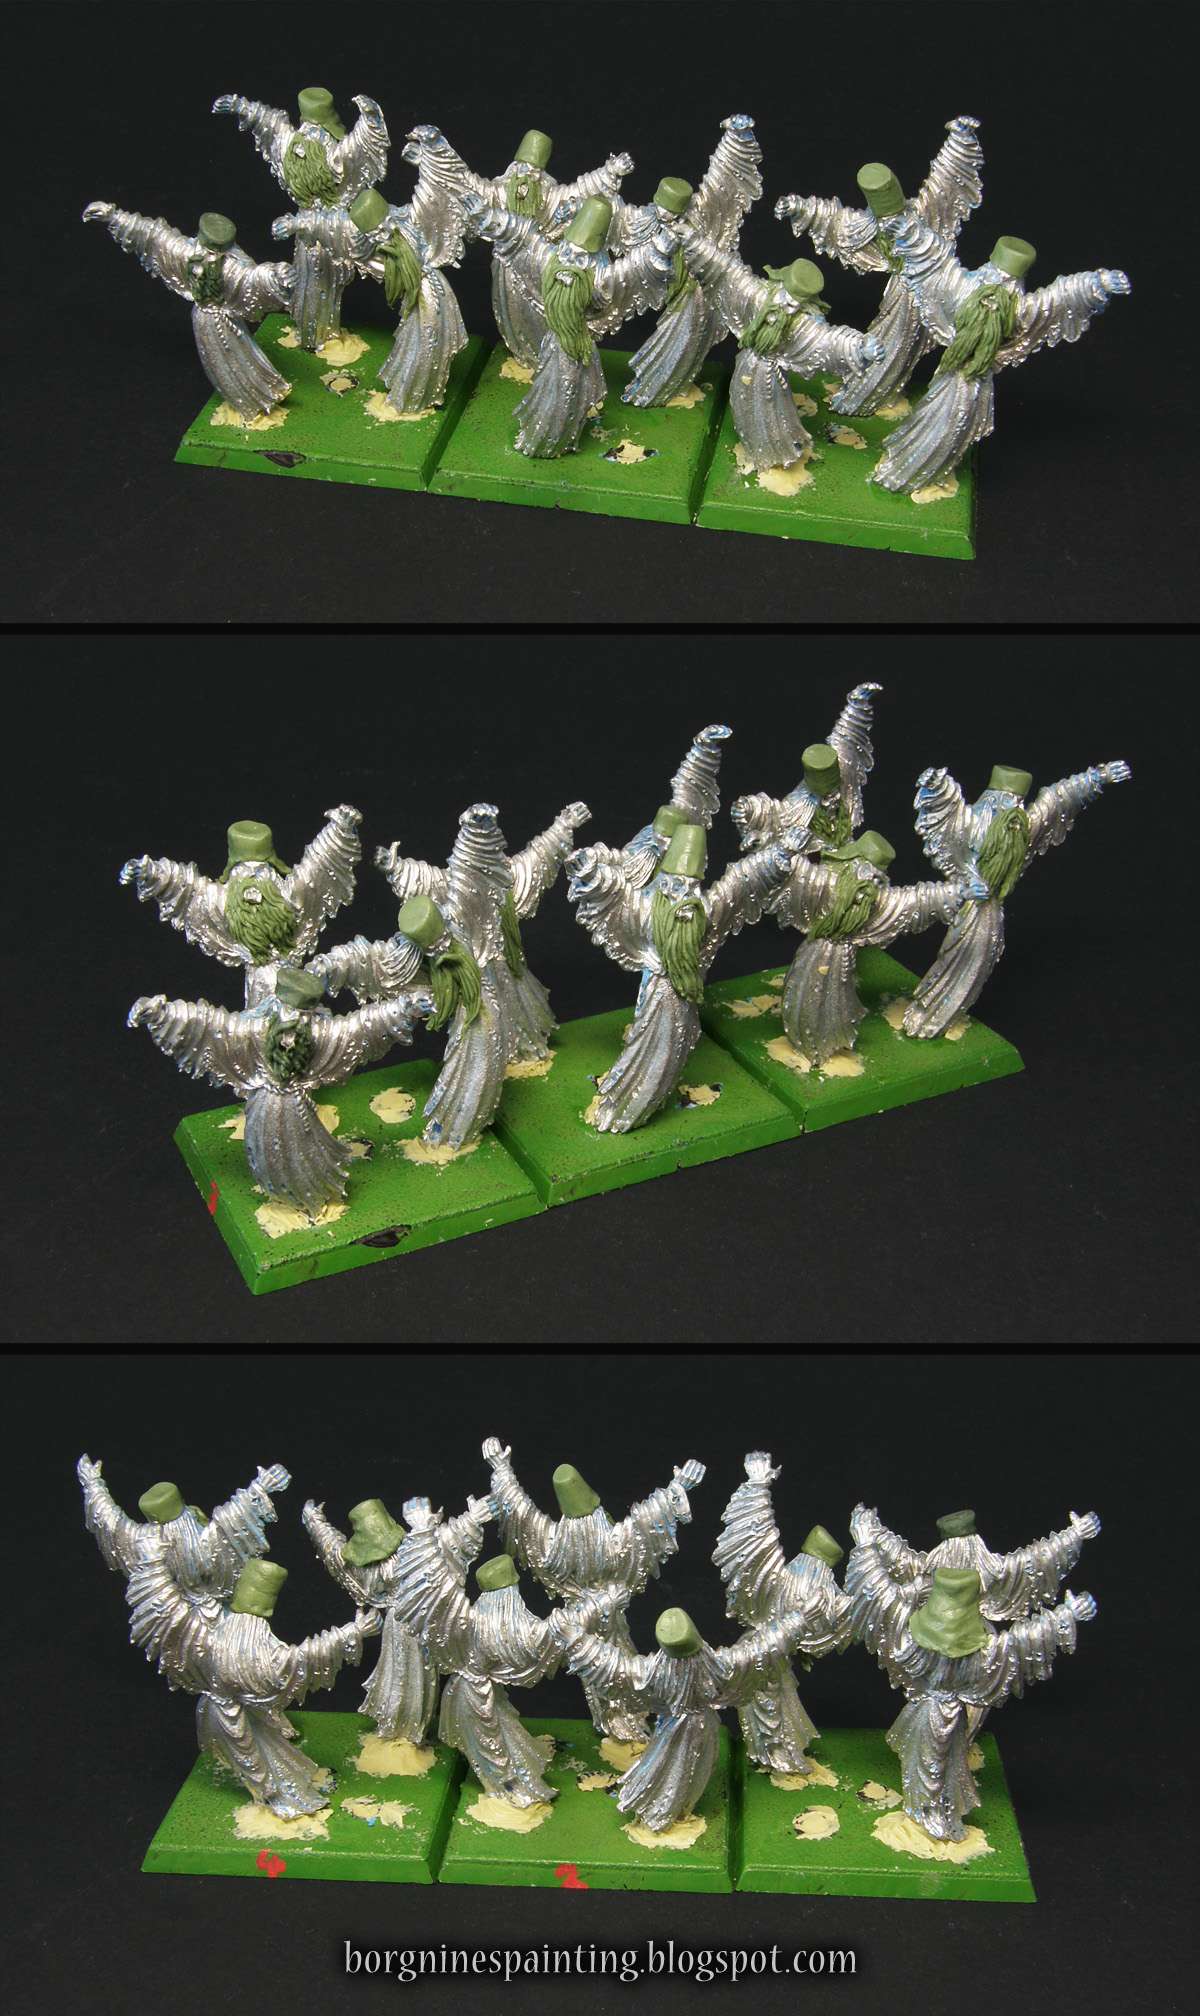
For a long, long time I really disliked those old bedsheet spirit hosts of old. That's why I used LOTR minis for my own ghosts. But about a month ago, when I was looking through eBay I noticed three bases of them being sold cheaply and I realized that I actually like those goofy bastards and I totally want some.

Seeing as they are dressed in robes, have bald heads and use ropes as belts, I wanted to have them as some kind of monks - and mix them that way into my story. But their remaining hair is long, so that theme wasn't perfect. So next, I thought of the Russian ascetic hermits of old - I would only need to sculpt some beards and hats. The picture that inspired me is below the photos. This idea was also great to add some differentiation too - for all their oldschool charm, those ghosts come in only three variants and are rigid enough to make them unposeable. Besides that, this also instantly gave them some Slavic feel and made them fit better into my army and story.

EDIT: Painted ones can be seen HERE.

Three groups of Spirit Host miniatures for Warhammer, on square bases, visible from several angles. Original metal models have greenstuffed hats and beards to make them resemble russian hermits of old. They are usable in WFB or AoS.

And here you can see the painting that inspired me the most on how to make them - "Hermit fathers and the immaculate women" by Mikhail Nestrov, 1932.

Beforementioned painting, showing three hermits on the right, looking at the women on the left. Hermits have long hair and beards, wearing black, long robes and hats - which was an inspiration for the Spirit Host conversion above.

Sunday, July 8, 2018

Zombie Legion - Elves

Part of the Zombie Legion.

The Dragon is taking a lot of time to paint, so I'll be showing some zombies in the meantime. This time, some elves.

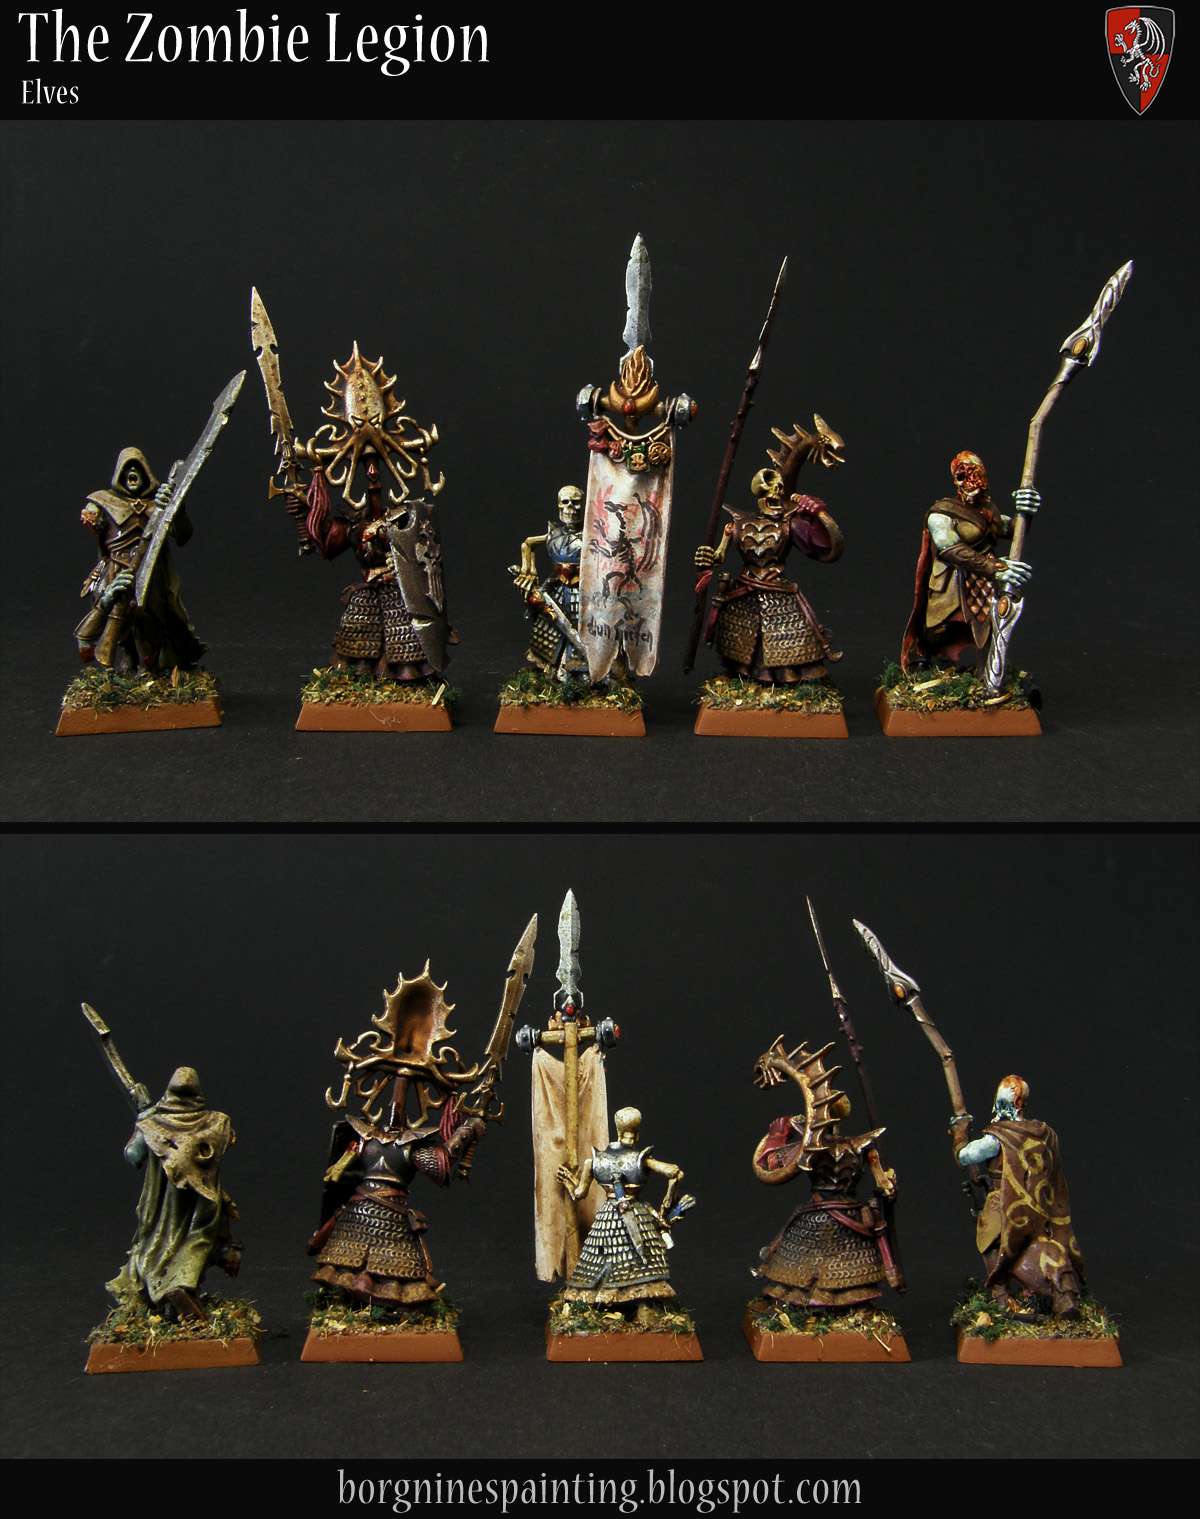
I had some elf miniatures laying around, but I was never really fond of using them as zombies. They are all very clean, many of them with cloaks, robes - and the minis themselves, with their elves proportions, don't look very good if mixed with parts from the zombie kit. All of that makes it quite difficult to turn them into undead. Despite all that I added a small amount of them to the legion - even if it's only to have representatives of every race in the horde. Still, I think they turned out pretty ok - I especially like 'Lokhir Fellheart lite', the one with a standard crammed into his torso - and the wood elf with a bloody face. The High Elf one is from the old Cursed Company set, no converting needed - you can see other miniatures from that set in my collection, you can find them HERE.


Elves don't show up in Varsavia very often but Constantin can still boast about having few members of the elder race in his rotten legion. Some of those were parts of the Druichii slave raids, some were scouts operating in the Old World and some even fell from the sky after one of their aerial battles. Unfortunately, after being raised they don't retain their legendary skill or agility, so those zombies are just weak and frail versions of the human ones - with them it's probably more about collector's value than anything else.

Tabletop miniature zombies for my horde unit - 5 elves, two Wood Elves, Asrai, two Dark Elves, Druchii and one High Elf, Asur, from the Cursed Company - who is also the standard bearer. Besides him, they are all converted to look dead and mangled. They are shown from the front and the back - and they are all standing on square bases.

And the second picture, an undead dark elf mistress whipping her zombie sub. The idea came to me when I was looking for usable bits in my Dark Elf Dragon box. There are two body options there, a male lord and a female sorceress. I wanted to place either one of them on a log and look silly, but I didn't know which one should I take - the sorceress won in the end because giving her a whip was an excuse to add someone being whipped in front of her, cheaply taking even more area using only 1 model more. That and the lord could be used for some vampire conversion later on, maybe. I added some trees to the bases, sculpted half a head for her, a new back for him, painted them - and a small BDSM action in the middle of the rotting horde was done. You can see the unpainted version HERE.

Tabletop miniature zombies for my horde unit - a unit filler. One base is taken by a headless Dark Elf zombie sorceress sitting on a log, readying a whip to scourge a human zombie running on the second base. This little double diorama is set in a forest, with trees and foliage.

Sunday, July 1, 2018

Blood Bowl Team - The Carcassonne Cavaliers

My second Blood Bowl team. The first one, Orcs, can be found HERE. I converted the standard human team to represent Bretonnia rather than Empire. It started with giving them extravagant helmets taken from Knightly Orders, but then I noticed that I don't have enough of them - so I made them Bretonnians instead. That makes them more varied, gives Bretonnia some representation in Blood Bowl (at least until the official team is released... as if!) and makes use of some of the helmets I had laying around my bits box. One change I made since the WIP post was to sculpt little shields on their chests. I wanted some clear, visible space to paint their coat of arms, but all the existing ones weren't good for that - so I made them myself. This strengthens their Bretonnia-ness even more! I also had to freehand all the markings on them, with texts on the bases too, because the font provided by GW didn't fit those knights at all.

At first, I wanted to paint them blue+yellow and call them Aquilean Aces - but that not only involved using yellow, making this project more difficult than it should be, it also narrowed down the colors I could use to those two. Because of that, I changed the color scheme to a red+blue background with yellow markings - not only it gave me more options when painting their armor, it also references the most common Bretonnian color scheme, which makes them even more recognizable.

All in all, painting some Bretonnians, all (mostly) clean and shiny was an interesting exercise, but I think I need to paint something darker now! That and finally play some Blood Bowl!


The Carcassonne Cavaliers are your typical Bretonnian knights-only team - proud, chivalrous and completely full of themselves. All the players were - as all self-respecting noblemen - trained from childhood to compete - and they are really good at it. They would probably win the championship already if only their concept of nobility and superiority weren’t hammered so hard into their heads. Every single one of those knights considers himself the star player, regardless of skill - and they notoriously underestimate their opponents, believing them to be beneath them. They also have big problems assisting their teammates - older veterans don’t want to pass to knights who aren’t their seniors - and the younger ones are impetuous and hungry for glory, always wanting to score the touchdown by themselves. Besides that, they are a pretty solid team!

First, the whole team:

Tabletop miniature Blood Bowl players - a converted Human Team, with their heads replaced with Bretonnian helmets. They have red/blue color scheme with yellow markings - and here they are presented together as a 12-man-strong group.

And the individual Cavaliers:

Tabletop miniature Blood Bowl players - a converted Human Team, with their heads replaced with Bretonnian helmets. They have red/blue color scheme with yellow markings - here they are shown seperately, Blitzers, Throwers, Catchers and Linemen.

Sunday, June 24, 2018

Coniferous Tree Trunk Tutorial

Title card with the tutorial name and several stages of the tree-making tutorial - from a twig, through unpainted sculpts to finished effect.
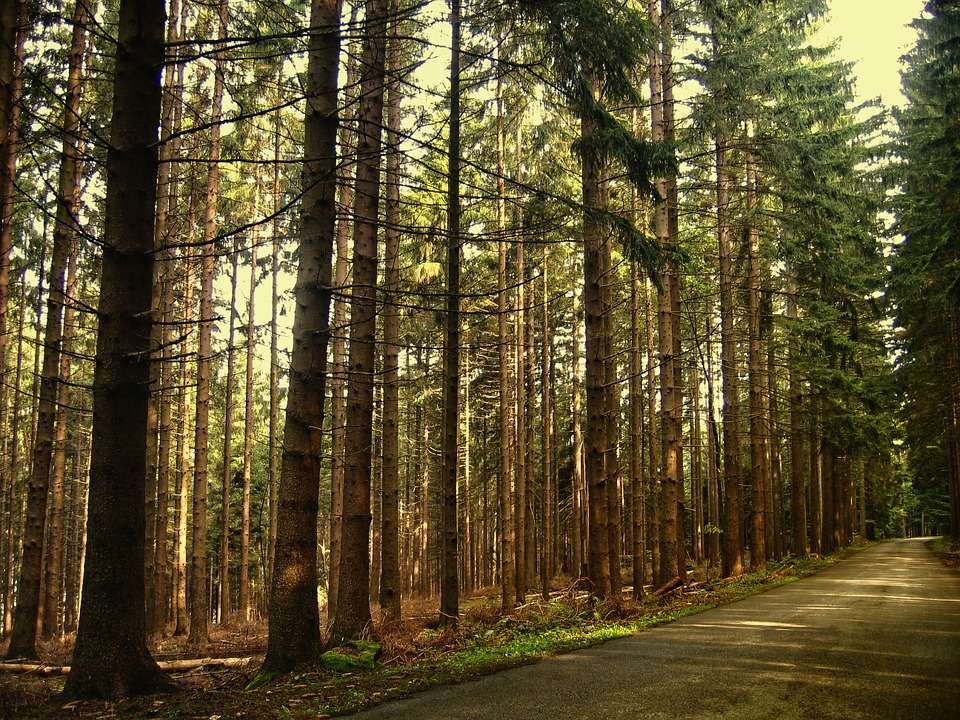
At some point, I decided that I want my undead army to be forest themed. And to be more precise - a coniferous forest themed, to resemble 'bór' forests that can be found, for example, in Poland. Below you can see a photo that shows the look I was going for (picture from pixabay). Mine is only a little more grim.

Photo showing a road going through a coniferous forest - showing the general feel that the trees are supposed o to convey.

I started with the appropriate basing flock, but when I was doing Nagash and his giant base, that wasn't enough. So I decided to sculpt my own trees, looking at photos and trying to make something that would resemble the real ones close enough. I started with few short ones, but later, when doing the Zombie Legion the trees got higher, thicker and branched too. I made so many of them that once I decided to actually make some photos and make a tutorial out of it. Maybe someone will make an use of it.

NOTE: My trees do not have any needles or bushy branches, those are always very high up the tree - mine are all conveniently broken at a certain height to avoid that. Thanks to that, I can make them as high as I want and they look certainly good enough for me. It's much easier too!

What's needed, including all the optional parts:

For the sculpting:
  • a straight stick
  • Greenstuff
  • Milliput
  • a sculpting tool / a knife
  • some cork pieces
  • thin twigs or leftover sprues
  • round clay shaper / rubber brush
  • Liquid Greenstuff
  • sand
  • some kind of varnish

For the painting:
  • Steel Legion Drab
  • Athonian Camoshade
  • Nuln Oil
  • Agrax Earthshade
  • Ushabti Bone
  • light turquoise paint, like for example: Templeguard Blue mixed with white
  • Coelia Greenshade

I start with a mostly straight stick glued to a base or something else you can hold. Pinning it wouldn't hurt too, I had some of those trees break off when I was sculpting the bark.

Photo showing a wooden stick taken from the backyard, cleaned of bark and glued vertically to a square, plastic base.

Then I prepare the mix for the bark. I use Milliput mixed with Greenstuff in a ratio of about 3:1. I find this mix really good for this purpose - not too rubbery, not too crumbly - and not too expensive too! Guessing the right amount of it to cover the whole tree can be tricky, so I try to flatten the mix and compare it with the stick.

The stick is laying on the table, with a flattened rectangle of greenstuff-milliput mix laying next to it as a comparison.

Then I cover the stick and try to spread the mix around to make it relatively even all around. The thicker this layer is, the more definition you can sculpt on the tree.

The stick is standing vertically and the greenstuff-milliput mix is wrapped around it.

Now it's time to use sculpt some vertical ridges on the bark. I use a sculpting tool you can see below, the producer called it 'a scythe'. A knife can be used too, I use this tool to give those ridges a bit of width. That makes them easier to work with in the later stages.

Closeup on the sculpting tool - looking like an inverted, tiny scythe.

Below you can see the ridges. They should be kept pretty random all around the bark.

The greenstuff-milliput mix around the stick has now numerous vertical indentations all around its surface.

And now it's time for the bark texture. For that, I am using various pieces torn off a cork mat:

Photo showing numerous torn pieces of flat cork to illustrate what's needed in the next step.

I wet the pieces with some water to prevent it from sticking too much and I press them against the bark, trying to line one of the cork edges with the existing ridges.

Closeup on the cork inserted, by the edge, into the milliput-greenstuff mix.

This gives it a random, bark-like rough texture. I try to turn the cork piece or switch them often to keep the pattern from repeating too much.

Closeup on the milliput-greenstuff mix with the irregular texture left by the cork.

Here you can see the bark texture mostly sculpted:

The milliput-greenstuff around the stick has now the texture all around, while retaining some of the deep crevices left by the sculpting tool.

And a closeup:

Closeup on the current state of the sculpting.

Now it's time to deepen and emphasize the ridges, to simulate many pieces of broken bark sticking to the wood of the tree. Earlier stage, even if performed very carefully, tends to cover up some of the earlier ridges so it's good to bring them back. Not to mention separating them a bit. For this, I have been using either a scalpel or the 'scythe' tool pictured earlier.

The 'bark' is once again shown close up, with red pattern imposed over the photos, showing the places where the crevices should be pronounced - with the effect after shown below.

I try to sculpt elongated cigar shapes interlocking with themselves. On the left is the idealized version, the principle that should lead the sculpting process - and on the right how it should mostly look in the end. This time it's important to distinguish many separate parts of this cracked bark, in opposition to the continuous, vertical surfaces seen before texturing.

A diagram showing the sculpting principle. On the left - a geometric, regular pattern, like scales - and on the right - an irregular, more organic pattern that resembles the other one.

If you want to use real twigs to act as branches, this is the time to add them - while the sculpting mix is still soft. I put a small drop of superglue on the end of such a twig and stick it into the bark, trying to get them at different heights all around the tree, pointing slightly downwards.

The sculpted tree with bark now has several, unpainted, much smaller twigs stuck inside it - some of them thicker, some thinner and branching.

If real wooden twigs are used, I suggest coating them in some superglue or a greenstuff + glossy varnish mix. This makes them a tiny bit more durable. Still, even with that, I had numerous of such twigs break off...

The same situation as on the picture above, only that the new twigs are green - covered with the described mixture for protection.

And because wooden twigs break off easily, I tried to do some of them out of plastic. The easiest way would be to take branches that come in a Dryad box, for example. Those didn't fit my needs, though - I wanted long main branches with smaller pieces sticking out of it - that's why I made some of my own!

I start with a slightly curved piece of leftover sprue. I found ones that are 2-3 cm (or about 1 inch) long tend to work the best. Still, longer ones can be shortened easily and are easier to carve, so it's always better to cut them longer.

Photo showing a cut segment of a gray plastic sprue, slightly curving.

Using a scalpel or another sharp knife, I begin to shave the sprue away, switching from side to side and thinning them down, tapering to a point at the end.

The sprue from previous photo is shown shaved from one side, with the tool used - a scalpel, seen on the right.

Instead of sticking them into the bark while it's still soft, for these branches I drilled holes in the tree after the mix has already cured and glued them inside with some superglue. Any gaps that remained were covered up with greenstuff. Like earlier, they should be set at different heights all around the tree.

Closeup on the piece of sprue shaved and sculpted into a fine point, stuck in the milliput-greenstuff mixture, creating a new, plastic 'twig'.

And now it's time to go fractal and add little branches around the big branches in the same way that the big ones go around the whole tree. For those, I actually used the branches that are found in a Dryad box - but instead of using them whole, I cut off the thinnest and tiniest ones and gathered a pile of them:

Photo showing a collection of loose twigs and branches taken from the Sylvaneth Dryad box.

I glued those little twigs around the big branches using plastic cement glue. For each one I put a drop on the big branch and a drop on the small one - and glued them together only after about a minute later. That gives the glue some time to work with the plastic, melts it a little and makes the new connection much stronger and smoother - and there's no worrying about the loss of detail here.

The 'sprue' branches are now seen mounted on the 'tree', with many additional plastic twigs from the Dryad set glued around them, creating a branching effect.

If you want - that's optional - this is a good time to add some roots going around the tree. For ones that look like here below, I made some rolls out of the same Milliput / Greenstuff mix that the bark is made of and stuck them on the ground. After that, I smoothened out how are they connected with the ground and sculpted them a bit with a round, pointy clay shaper/rubber brush.


And another optional part - moss on the trees. I make it by mixing sand with gloss varnish and liquid greenstuff. It would be easier to just add some flock after everything's done, but I couldn't find one in the right color, so I made my own.

As for the ratio of this mixture, I suggest adding 1:1 sand and greenstuff and keep adding varnish until the mix achieves the right consistency. It cannot be watery, but it cannot be dry too - it needs to be wet enough to stick to the tree and thick enough to retain some shape. Not enough varnish and it will fall off - too wet and it won't be even noticeable after drying. Thankfully it's easy to adjust.

I put it in random spots and amounts all over the tree.


Now it's time for the painting! It's not short, I'm not a very optimized person when it comes to painting - but it's all straightforward.

After the usual priming (I primed them white here, but any grey, black, brown or green should work too) the basecoat is done by applying two thin coats of Steel Legion Drab.


Now coat all the bark with Athonian Camoshade.


When this is completely dry, apply a drybrush of Ushabti Bone all over the tree, watching out not to break any branches.


And now, another throughout coat of wash, this time Nuln Oil.


When that's dry - once again, an Ushabti Bone drybrush.


And a coat of Athonian Camoshade again.


A subtle, refining touch - few careful, thin spots of Agrax Earthshade applied randomly all over the bark. It's probably not even visible on the photos, but it livens up the tree a bit and makes it more natural.


If you went for the 'sand moss' earlier, this is the time to paint it. I didn't use flock to make it because I wanted to make it look like I remember it from polish forests - where it looked like THIS, with a light grey / turquoise(ish) color (and it's technically a lichen, not moss). I start doing it by mixing a very light turquoise paint out of white, green and blue, to achieve the paint you can see below. I tried to find a ready, potted equivalent, but I couldn't... I think the closest one I could come up with was mixing Temple Guard Blue with white paint. If someone knows a paint that looks like this, tell me about it, please.


I forgot to take photos of the whole process, so I will just describe it here, it's simple.

Using the paint shown above, I paint all the spots of moss/lichen - they should be easily found, they stand out on that bark, especially after all those drybrushes and washes. When that's done, I coat them with Coelia Greenshade. It's a pretty thick wash, so later, when it's dried, I use the same light turquoise paint to add some highlights on the moss/lichen patches.

And that's it! The tree is ready and it should look similar to the one you can see below (painting-wise of course, the height of the tree may differ of course!):


I hope somebody will find at least parts of this tutorial useful. I will probably do another one about sculpting and painting Slavic wooden idols you can see on my bases often.

Sunday, June 17, 2018

Vaclav the Red, the Dragonrider - Finished Base

EDIT: The finished model can be seen HERE.

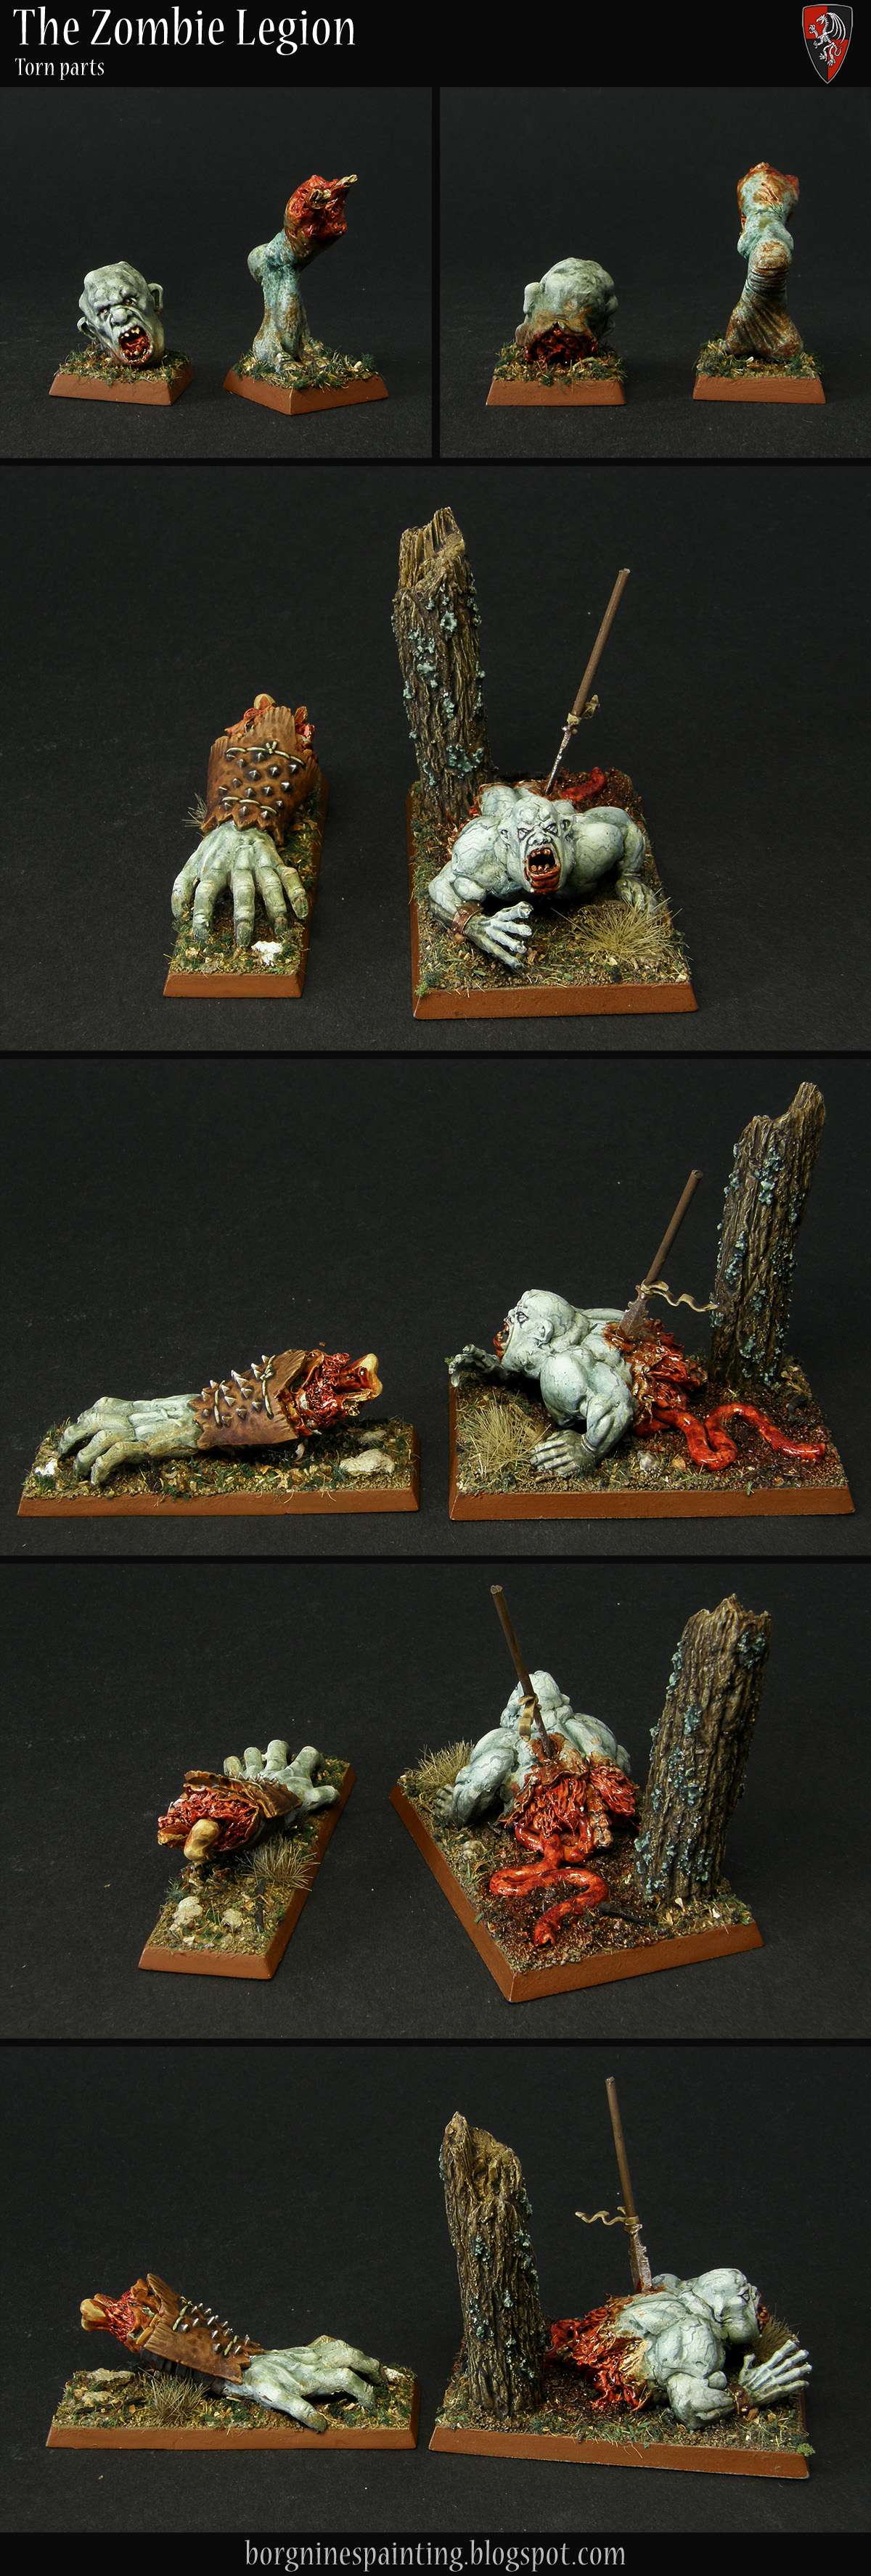
This is the project (whole WIP can be found HERE) that I shelved in September 2017 when I decided to focus on the Zombie Legion. When that massive project was finally done I could go back and actually make a proper base for this dragon. The problem was, the most important parts of it were two trees that the beast was supposed to be felling down - and I was completely sick of making those for the legion. So, the project waited more and more.

Only about a week and a half ago I moved my ass and actually sculpted the bark for those two trees and set them in the right place - one being broken and another being uprooted. When that was done, the rest of the work went really smoothly. I was supposed to paint my Blood Bowl Bretonnians first, but it was difficult to resist messing with the base. I just kept adding more and more stuff, changing, reposing things, checking the composition, etc. I wanted to create an impression of the dragon emerging from the forest and into the fray.

I did quite a lot of those trees for all the zombie fillers, but this was the first time when I added plastic branches to them. Real thin twigs I used for this purpose earlier are REALLY breakable - and for this project, I wanted to avoid it. They took much more time, but they should endure more too - I hope they'll look okay when painted. I will describe how I did those branches in an upcoming tutorial describing the process of making those trees.

Here you can see the base without the dragon on it.


And here it is with the dragon and Vaclav on it, everything ready to be primed and painted. I would like to say that this was my most elaborate basing project, but the one I made on Nagash was still way more complicated and took MUCH more time...


And now only the painting remains! Only if it was that easy... Currently, I am struggling with choosing the right color scheme. I know that he should keep my usual red-black-white scheme, with the red one being the most prominent. Below you can see some of my rough sketches. From those I am mostly torn between 2 and 5. 2 is a classic look, like a DnD dragon and looks the most natural, but 5 looks more sinister, more vampiric, so to say - and I still need to think what do I like more. Fiery belly on 4 is also an interesting idea, but adding fire to this busy composition would be disrupting in my opinion - not to mention that it suggests, that those belly plates are thin and/or open somehow.

Any ideas or opinions?